NJFTG March Newsletter Vol. I No. iv
The Catskill Dry Flies of Scott Fisher
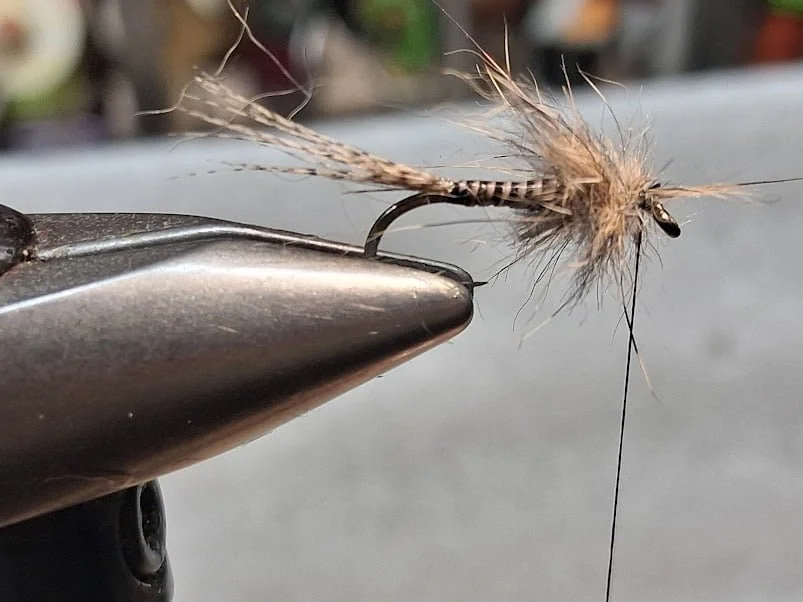
Quill Gordon by Scott Fisher
The Quill Gordon is a foundational American dry fly created by Theodore Gordon in the late 1800s to match the Epeorus Pleuralis mayfly hatches in the Catskill region.
As a pioneer of American dry fly fishing, Gordon developed the fly with stiff blue dun hackle and a stripped peacock quill body for superior buoyancy and imitation in fast-moving water.
Hook: #12 Daiichi 1180 or Dette D180
Thread: 12/0 Tan
Tail: Medium dun spade hackle barbs
Body: Stripped peacock quill
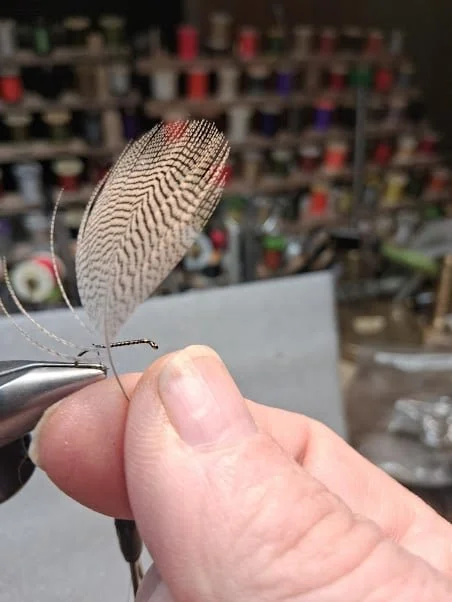
Wing: Wood duck
Hackle: Medium dun
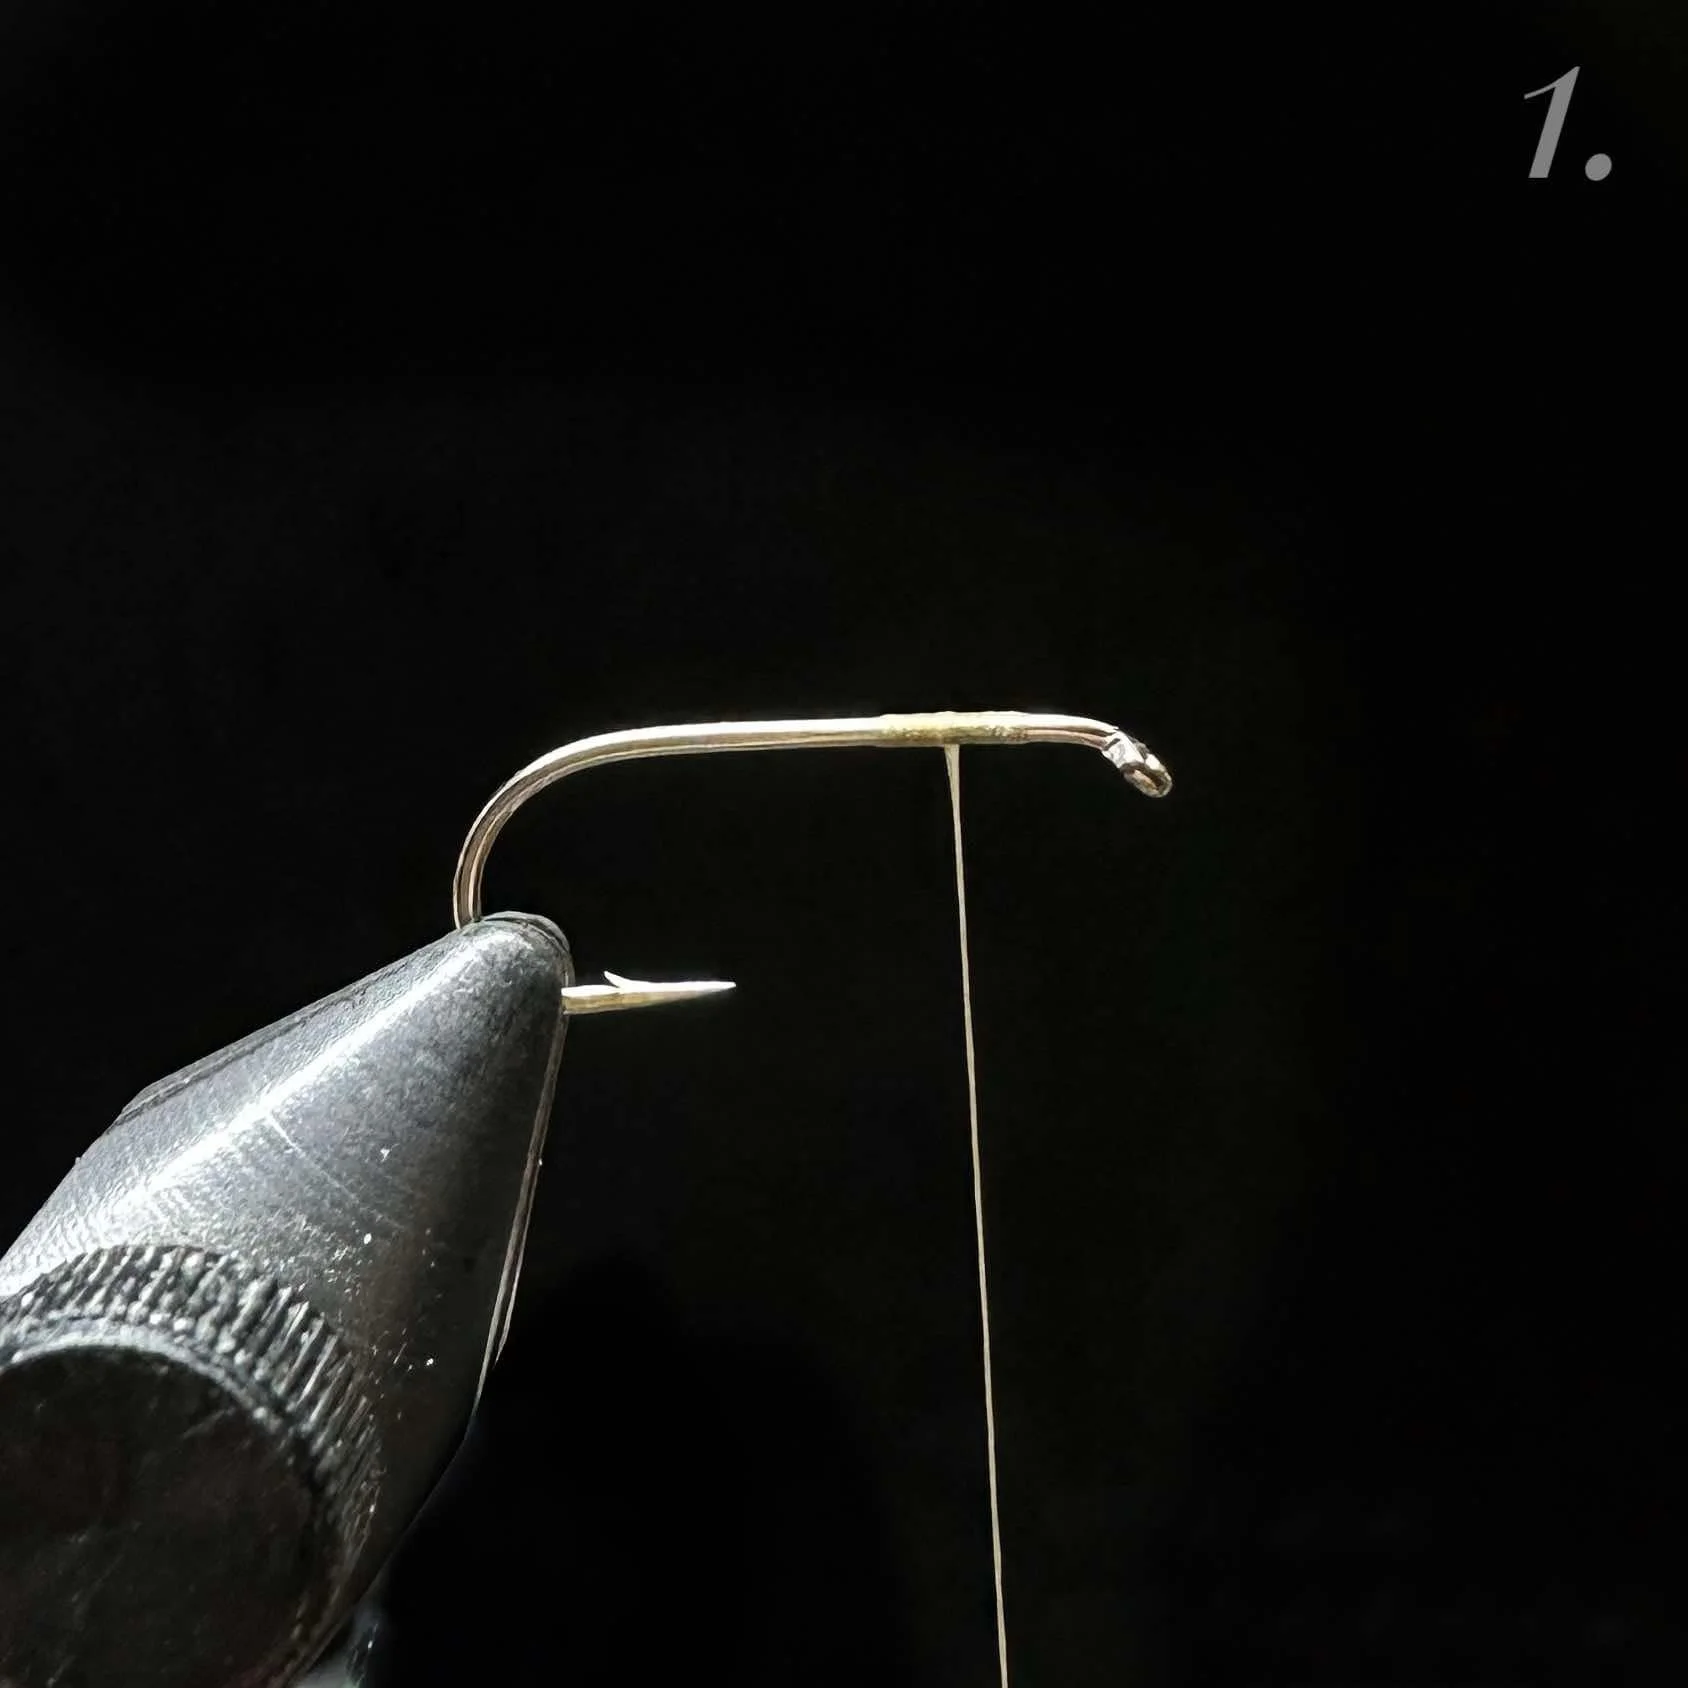
-1. Start your flattened thread onto the hook one hook eye length behind the hook eye, creating a smooth thread bed. End your thread with one additional hook eye length behind where your thread began. You should have the traditional Catskill bare shank, and your thread should be in place for where your wood duck wings will be installed.
2. Remove center of wood duck feather approximately half way down, creating two separate sides.
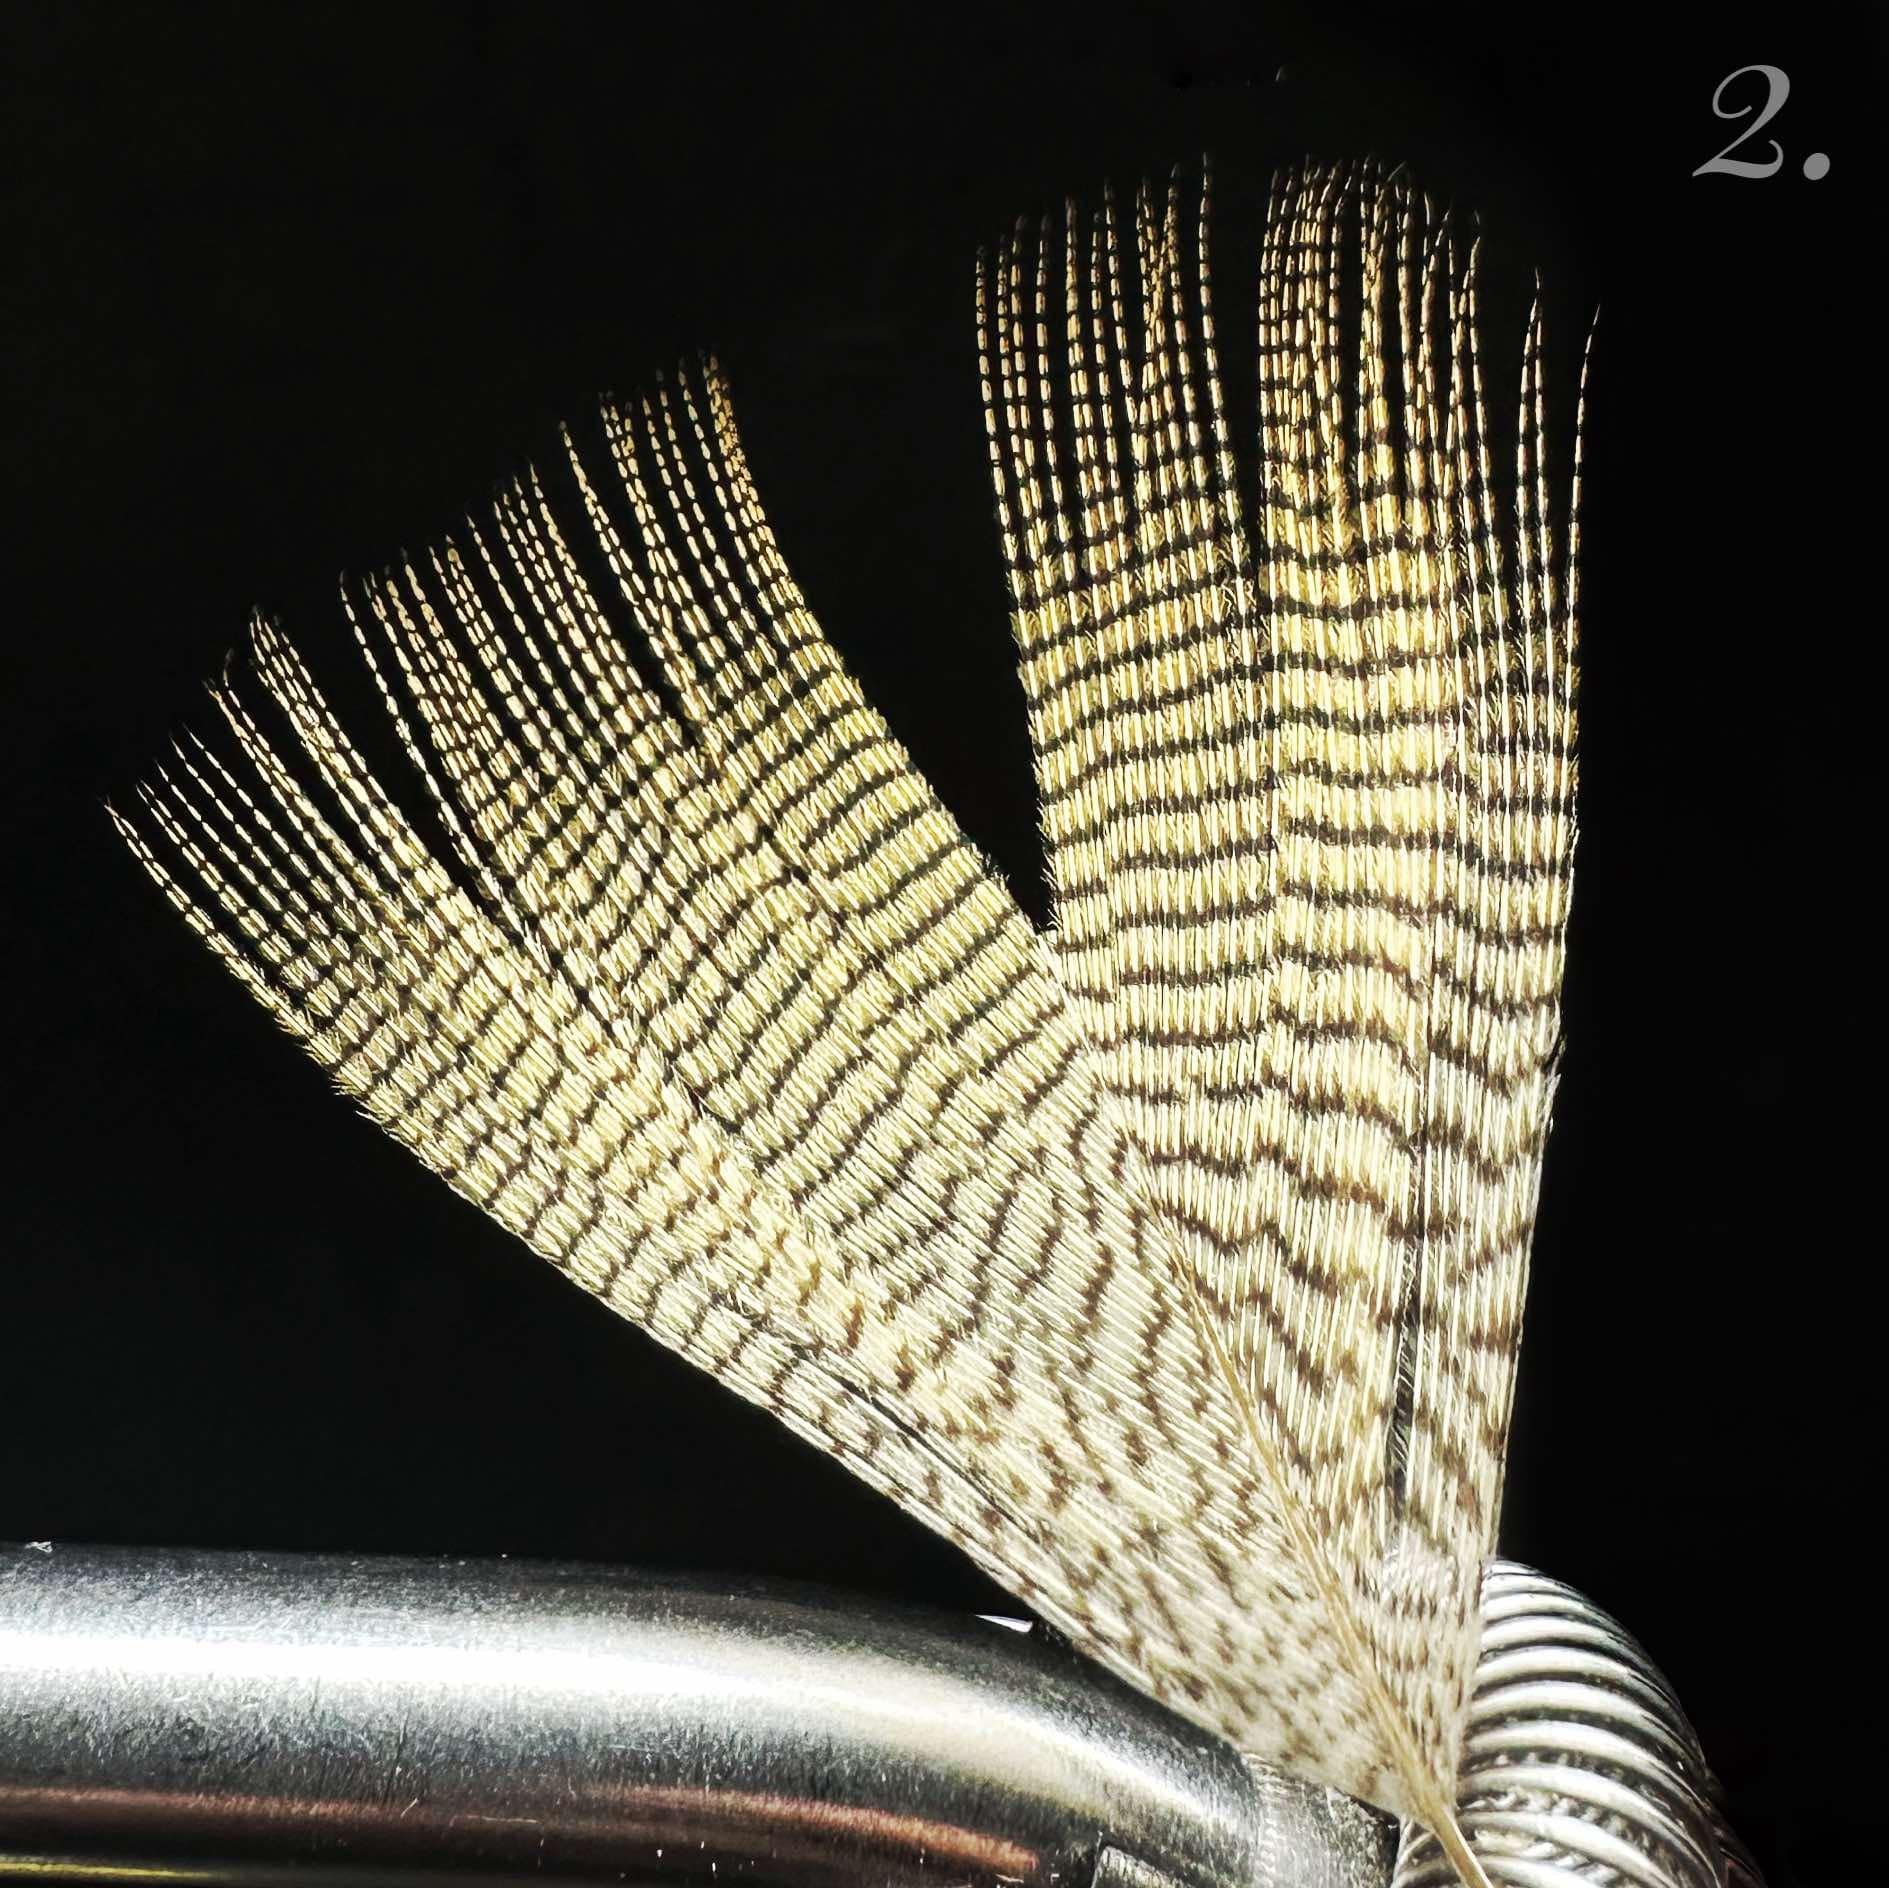
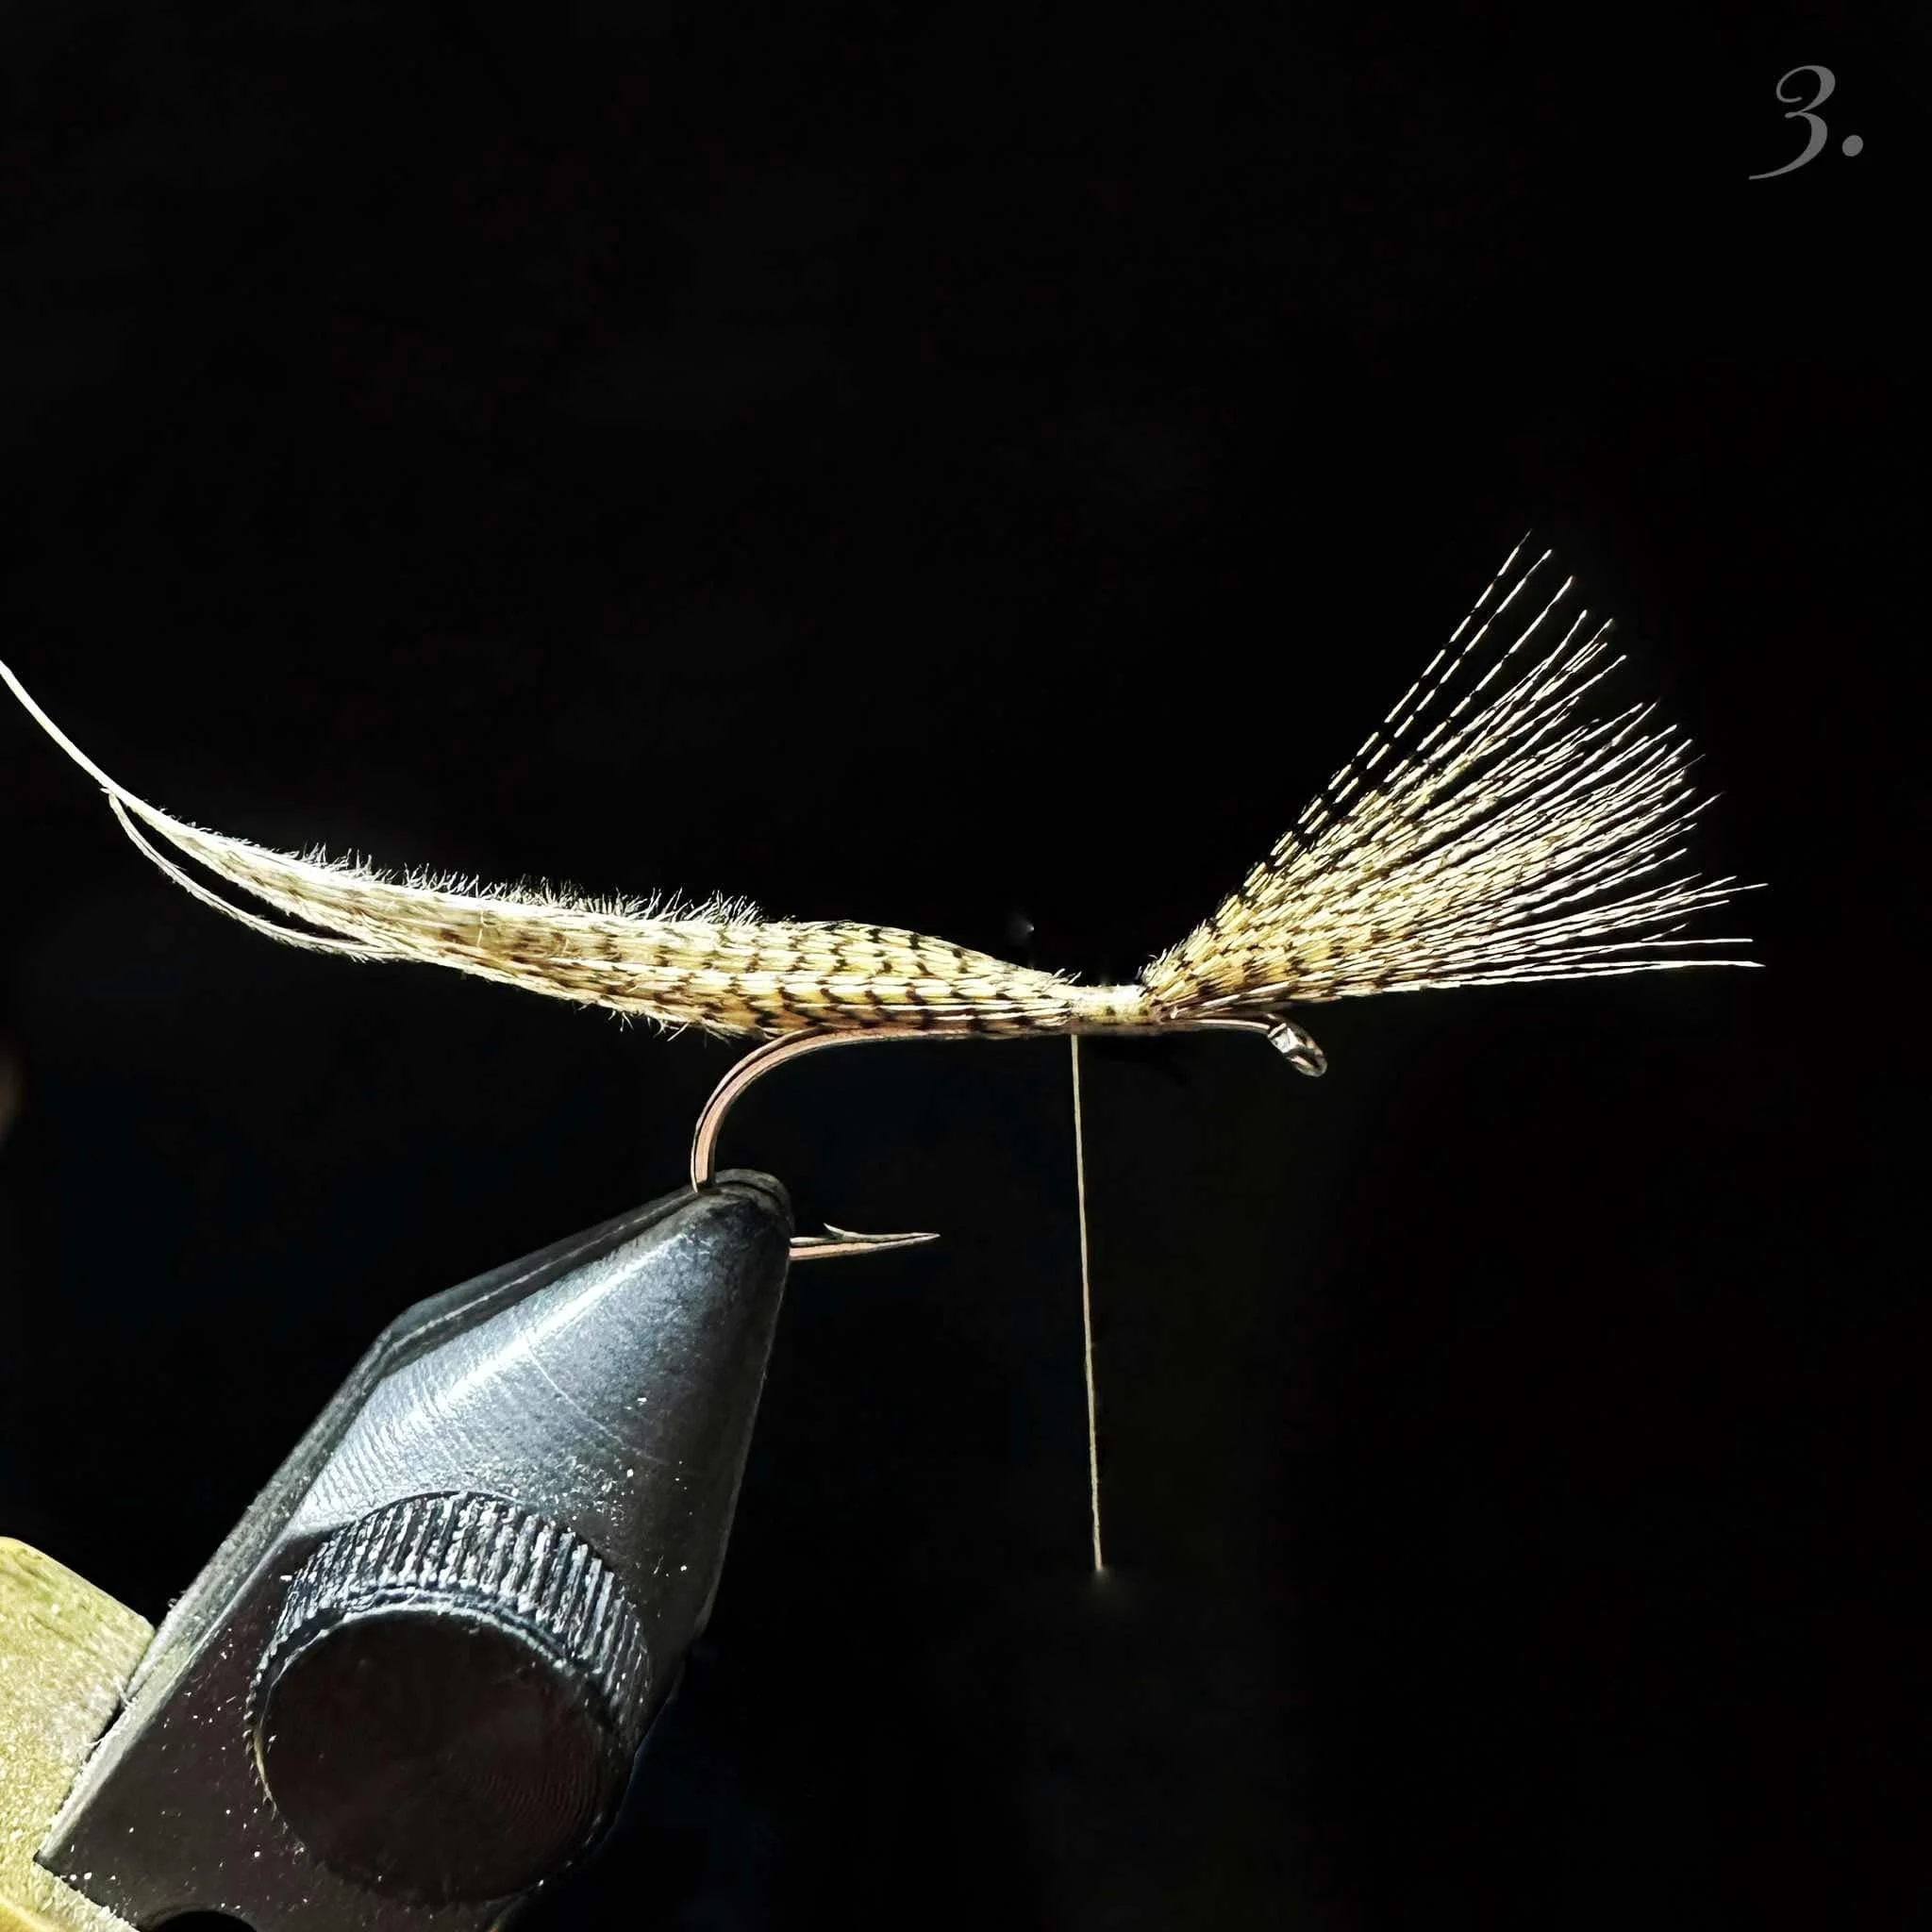
3. Select a wood duck feather that, when drawn together, the tips align with each other for best results. (Substitute Mallard flank or teal if wood duck is not available.) Remove soft fibers from the bottom of the feather. Cut the rachis out approximately halfway down from the top and remove the wood duck fibers, creating a V-shape with two clearly defined sides of fibers. Using your right hand, draw the fibers together in a bundle with tips facing the hook eye. Measure the wood duck to be a full hook length minus the eye. Bring that measurement forward and take two pinch wraps over the bundle, mounting the wood duck fibers onto the shank. Check to ensure you have them secured where your thread originally was resting, and if satisfied, proceed by taking 6-8 more flattened thread wraps down the shank to lock in your material.
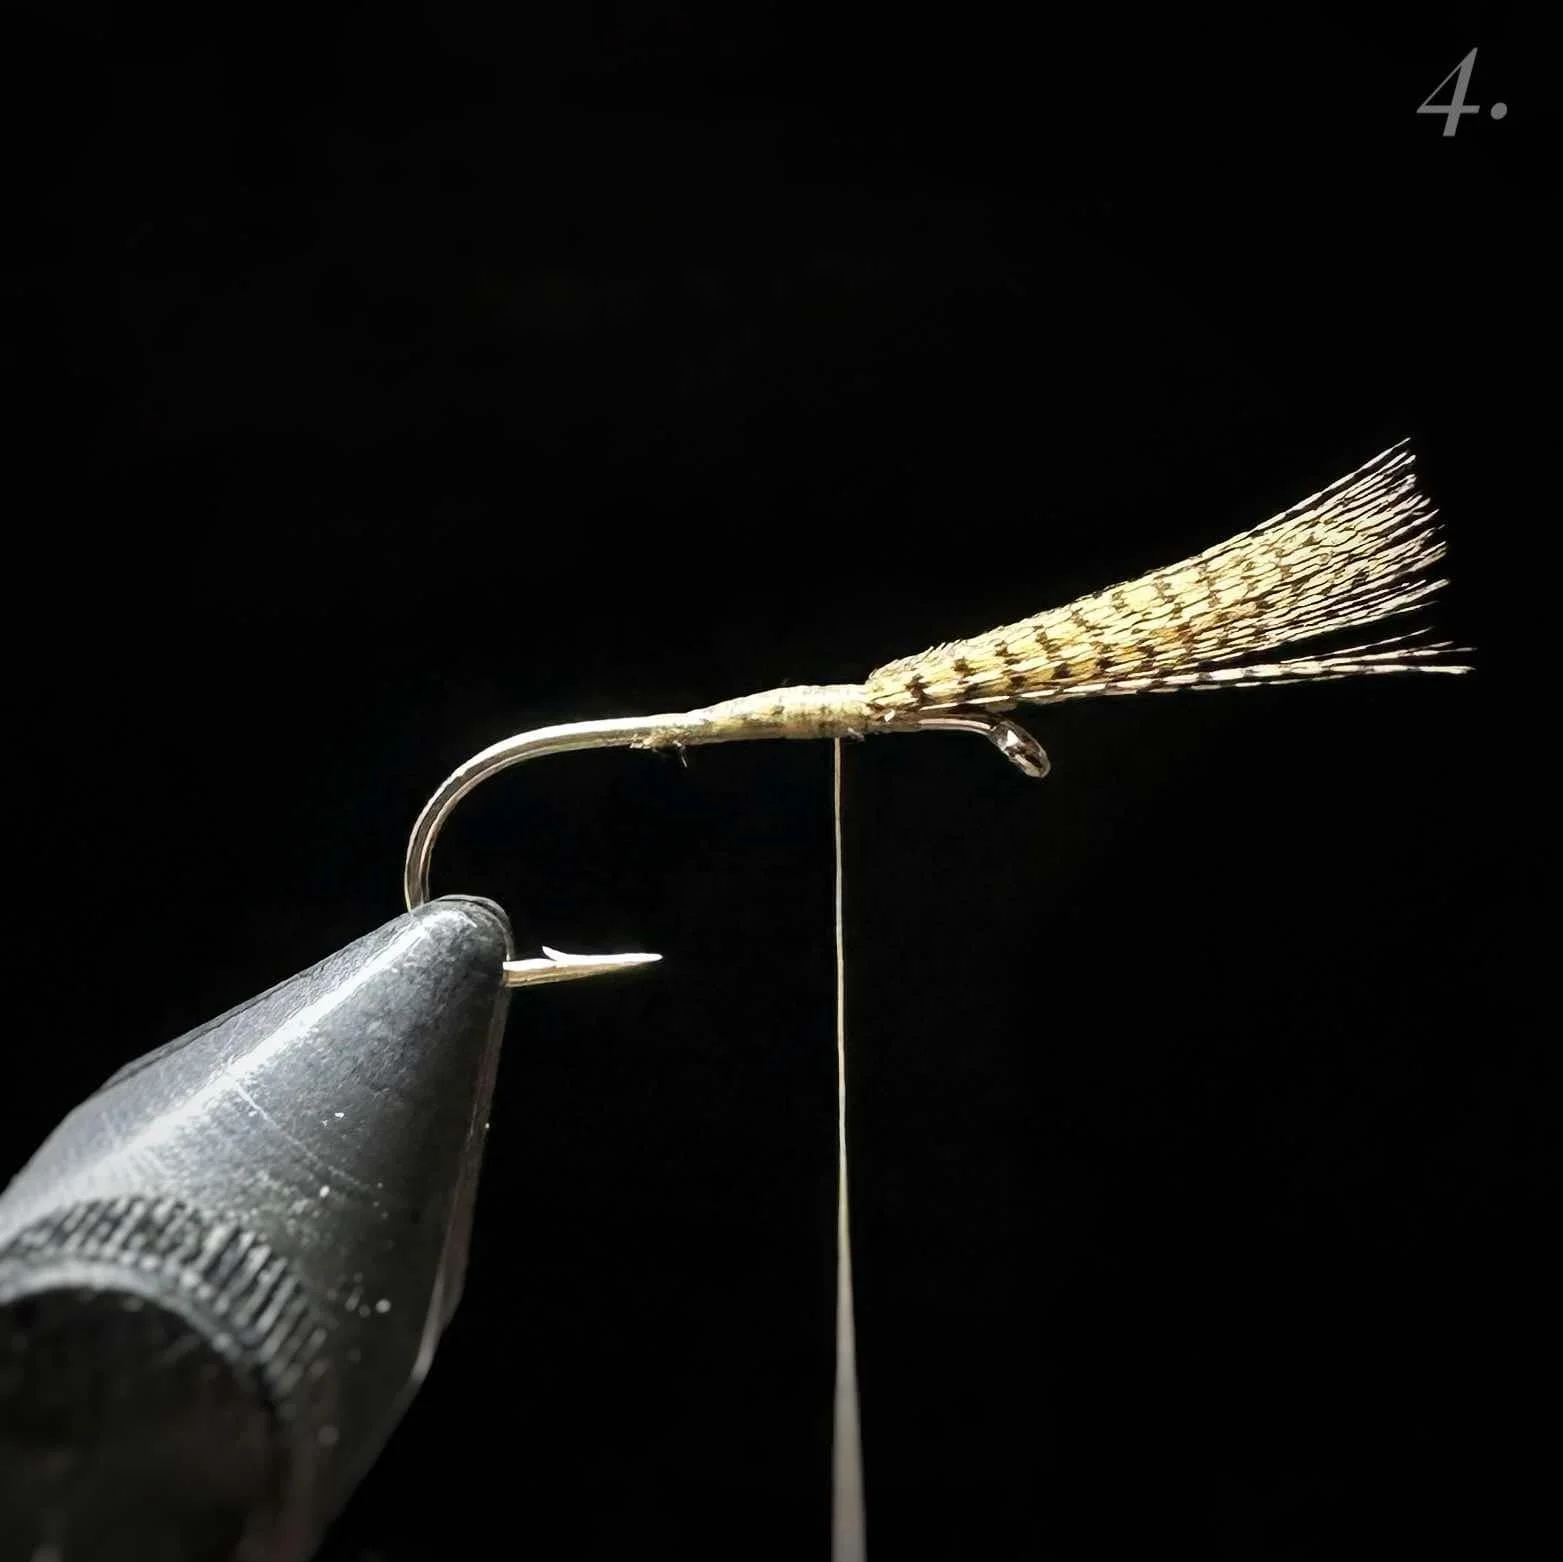
4. Clip excess wood duck at a 45° angle to the shank, creating a smooth taper of thread leading down the shank. End with your flattened thread behind the bundle of fibers.
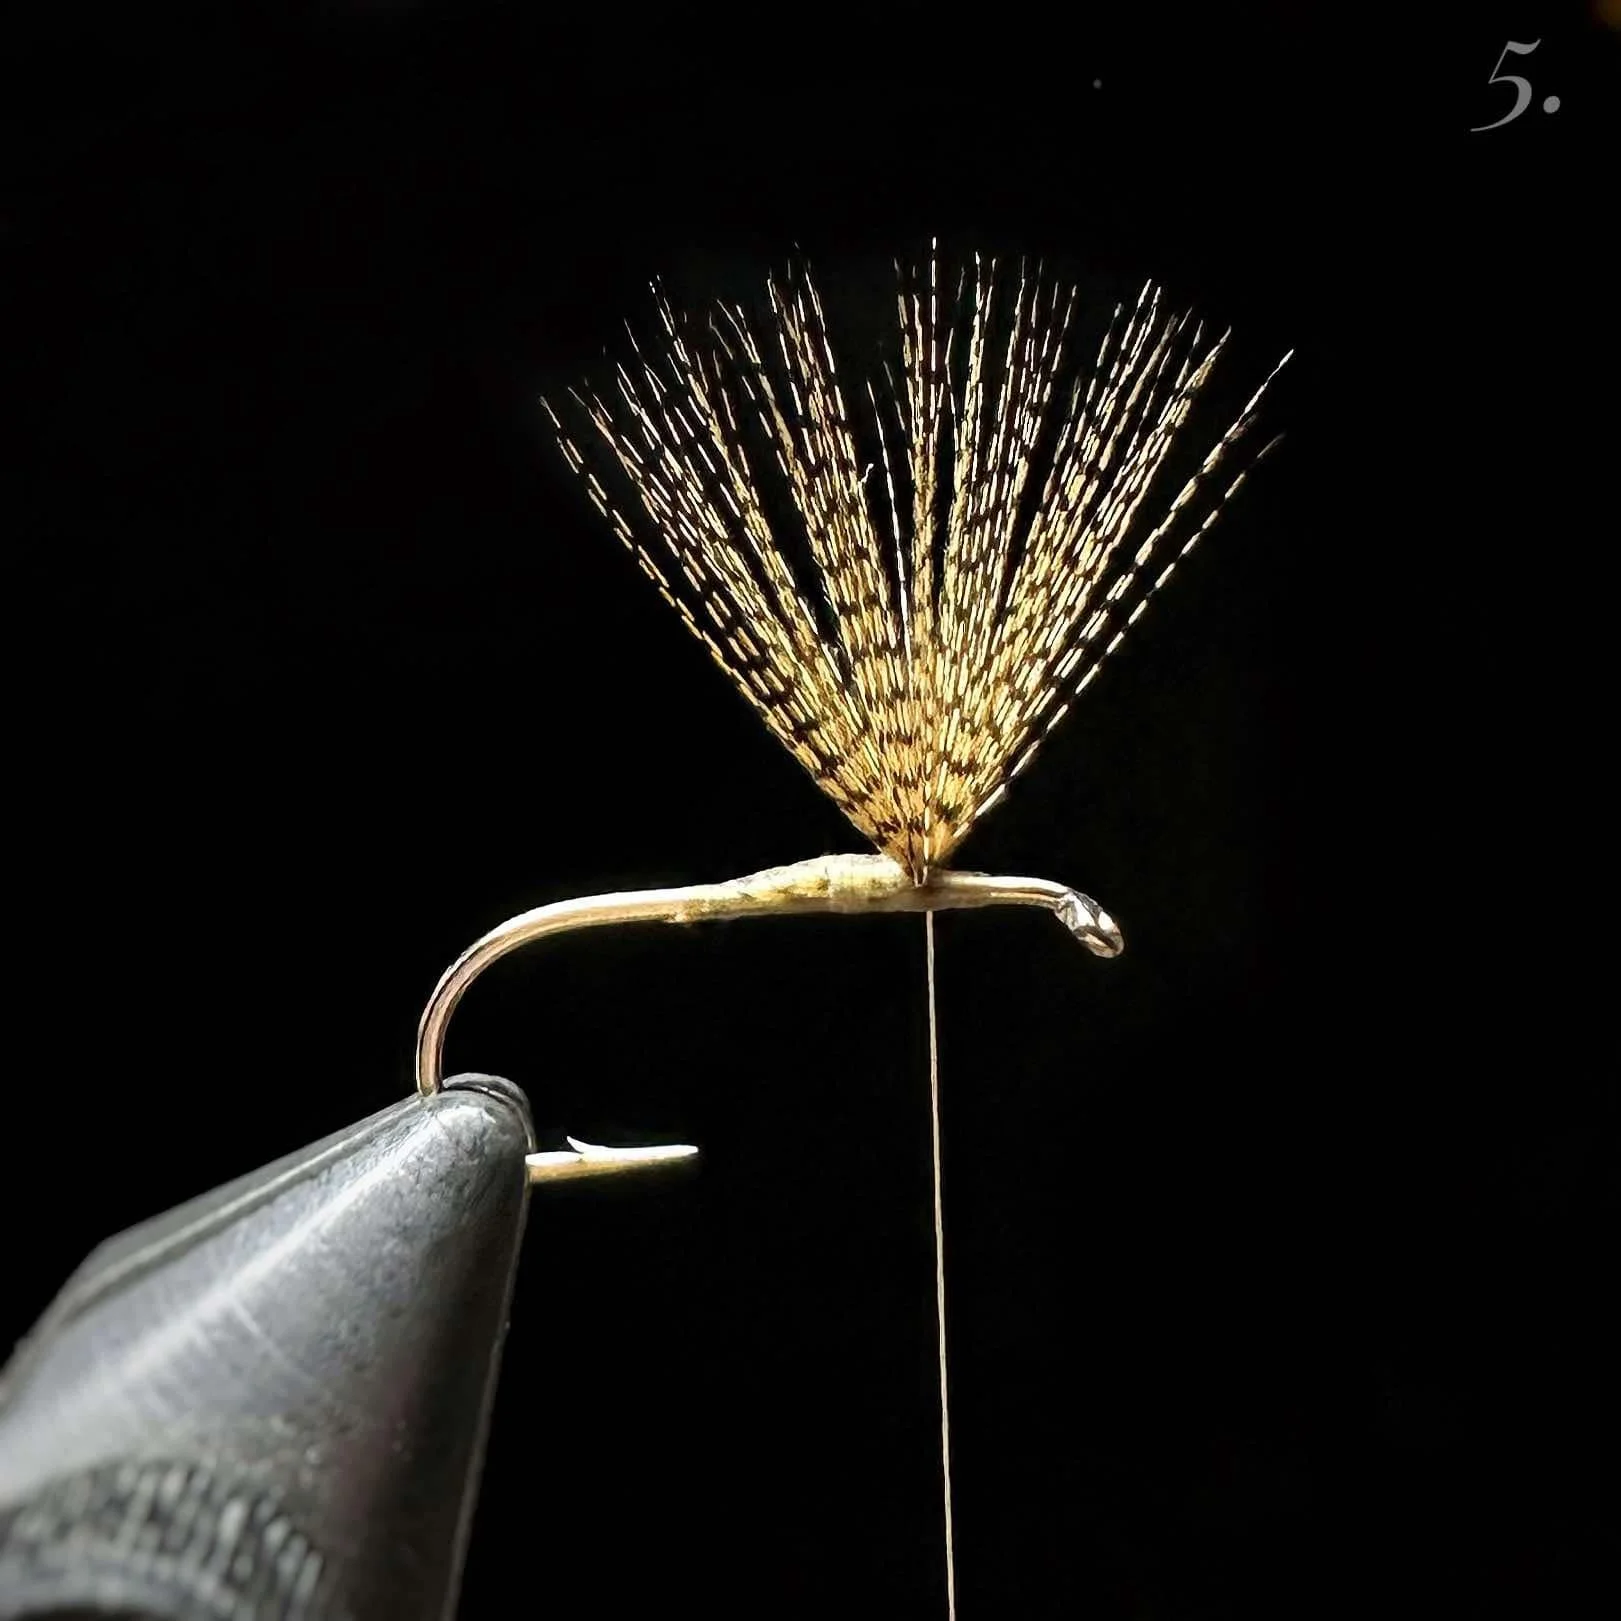
5. Grab the bundle of wood duck fibers with your left hand and lift them vertical. Proceed to move your thread in front of the bundle and create a thread dam by taking wraps very close to the underside of the fibers, walk the thread forward and then come back in once more with a few more wraps under the fibers, propping up the bundle to almost vertical. Feel free to pull the fibers back and continue to coax them into an almost vertical position.
TROUBLESHOOTING The underside of the shank should still be smooth with no lumps or bumps where the thread dam was created. If there is, redo and make sure your thread was completely flat during the thread dam process, and possibly take fewer wraps. This is critical for your hackle wraps to wrap around the shank smoothly, as it will react to everything underneath it.
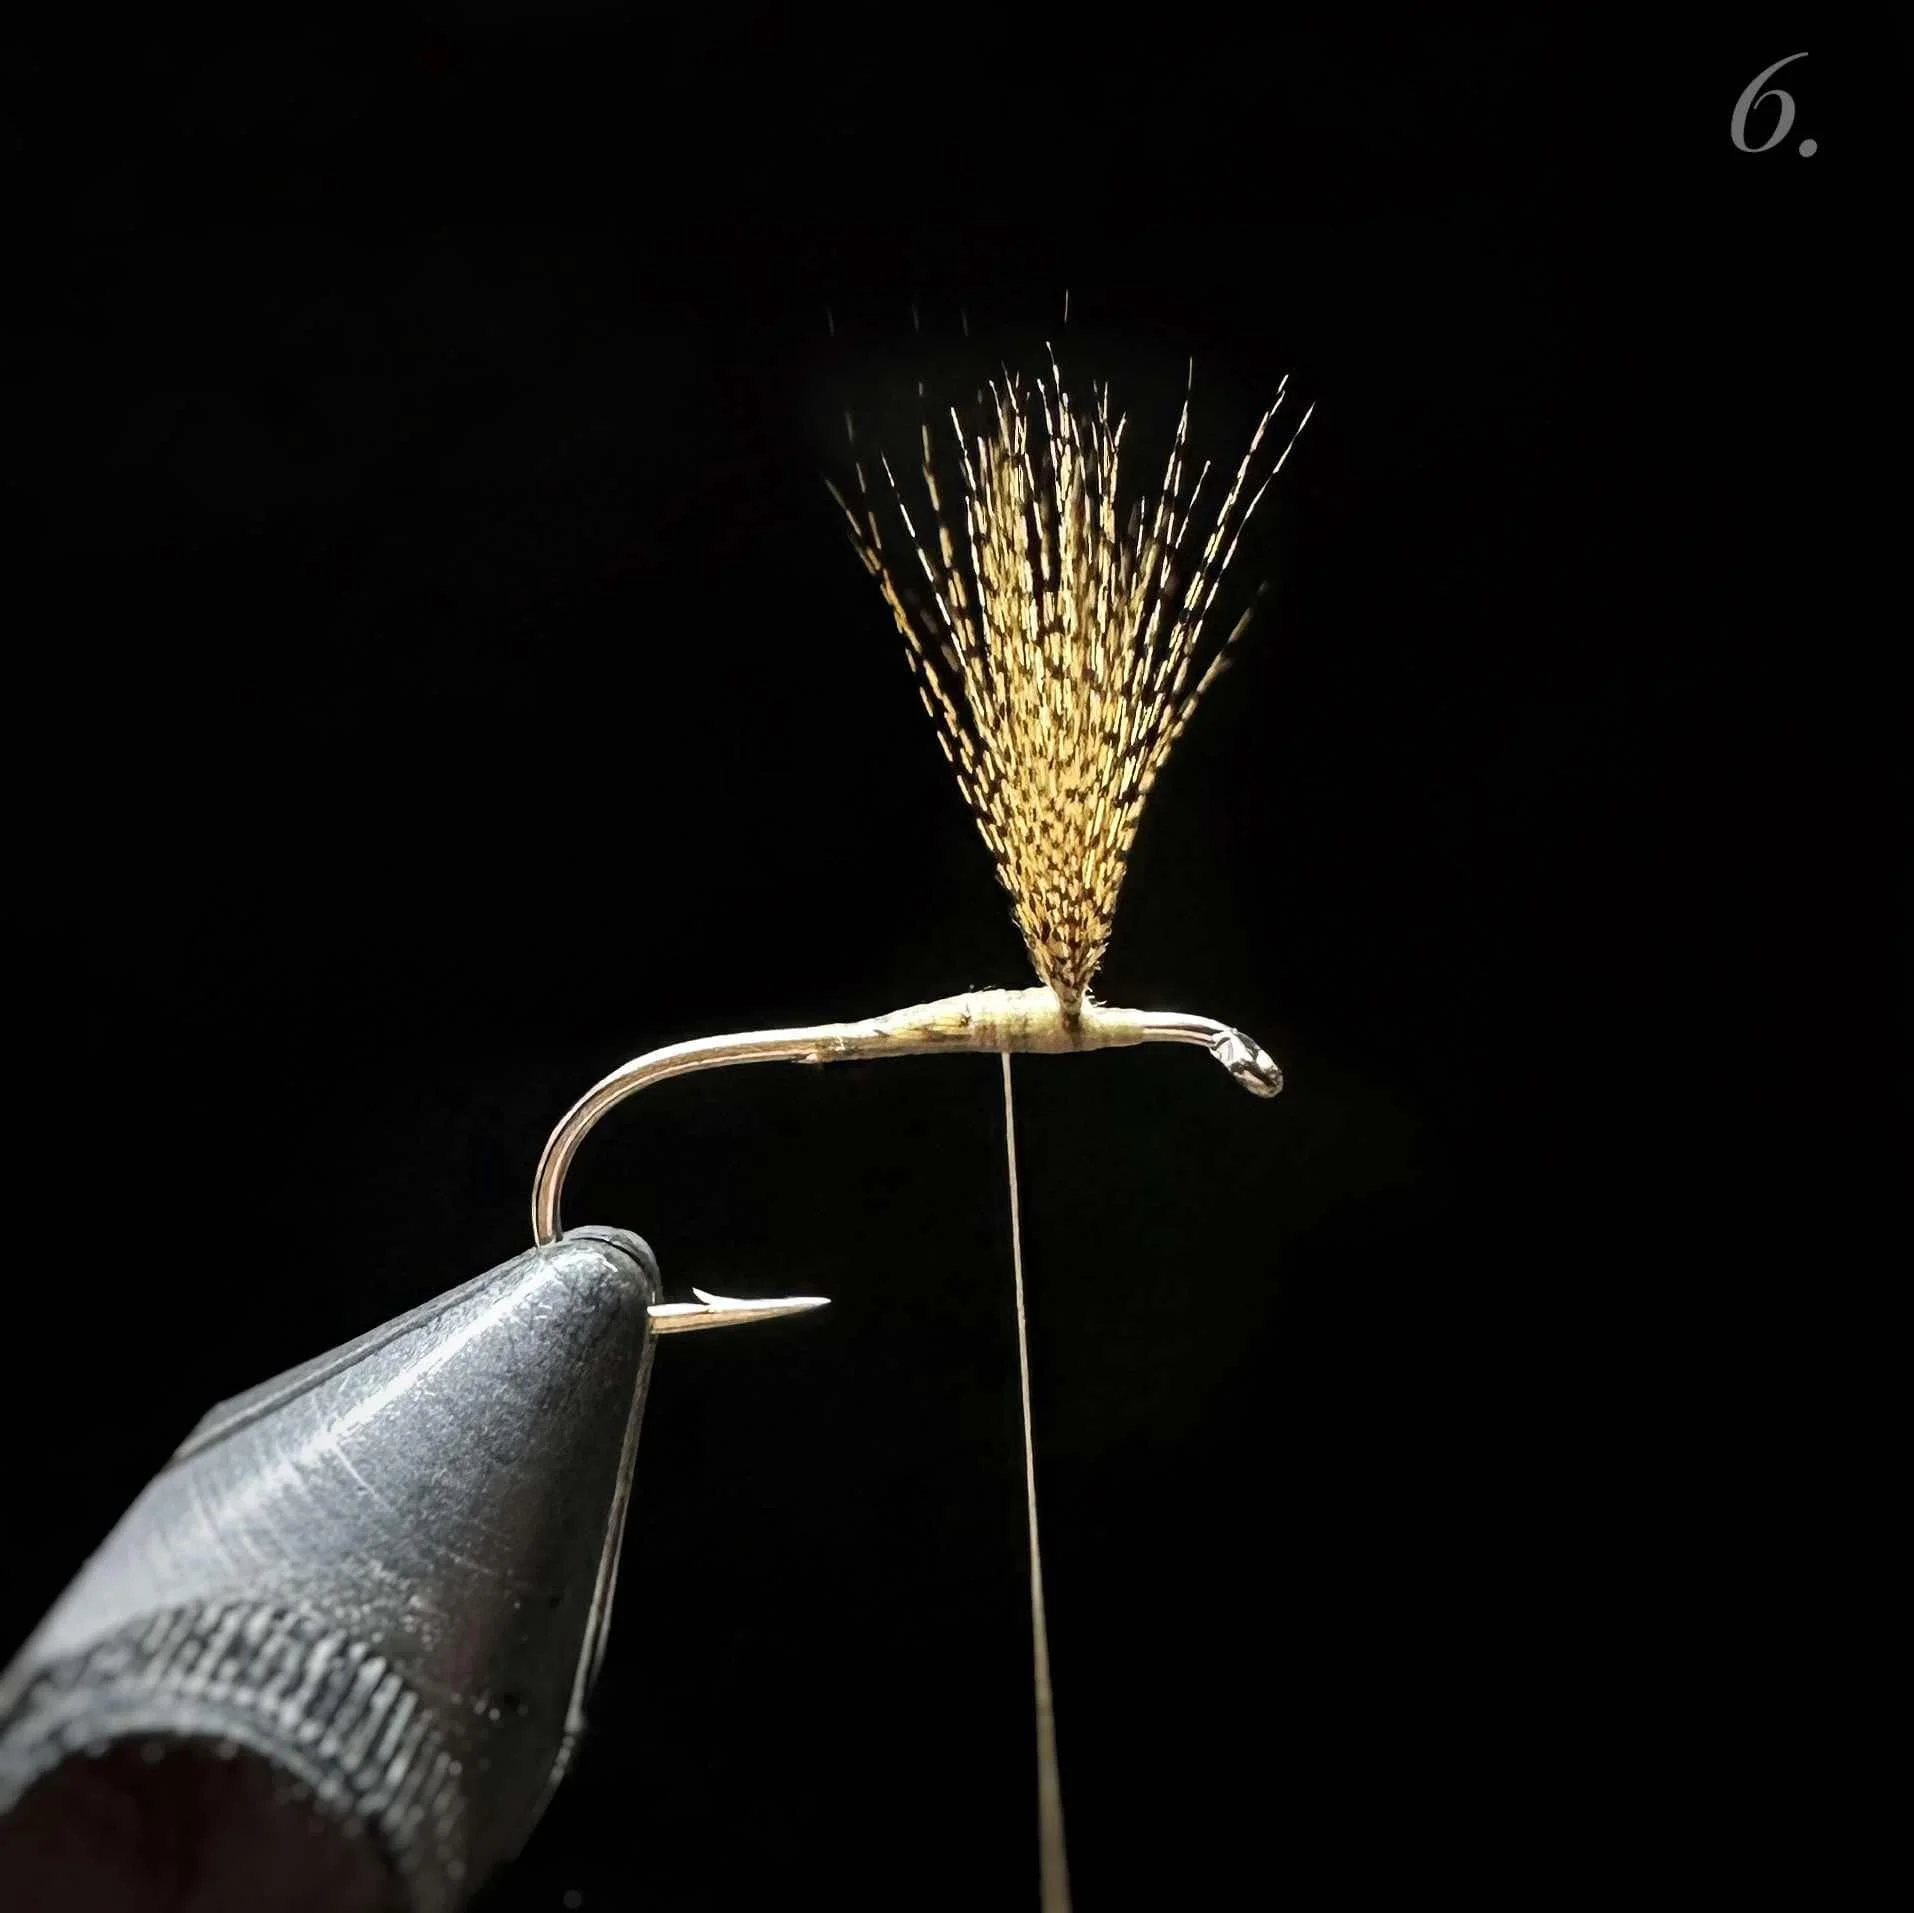
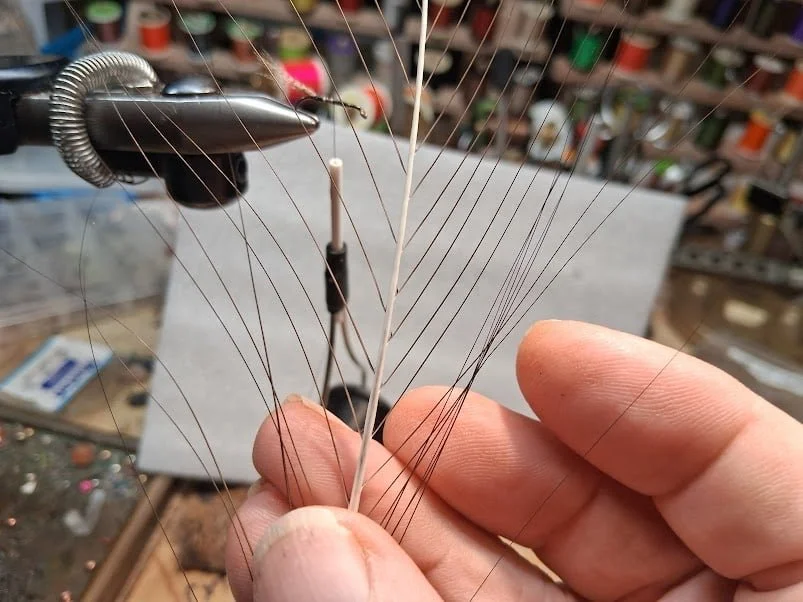
6. Fan the fibers out and start to find the divide between the fibers to create your near-side and far-side wings. If done well, the fibers should almost tell you where they want to go. Ensure you have equal amounts of fiber on both sides. With flattened thread, take two sets of figure eight wraps between your two sides of fibers, further dividing them into two distinct wings.
Optional: To further your wings into two defined shapes, take two soft wraps encircling the base of the far-side wing, a wrap around the shank behind the wings to save your work, and finally, another two soft wraps around the base of the nearside wing. End with your thread behind the wings. Use your thumbnail and fingers to prop your wings up vertically or adjust the angle of the wings to your liking.
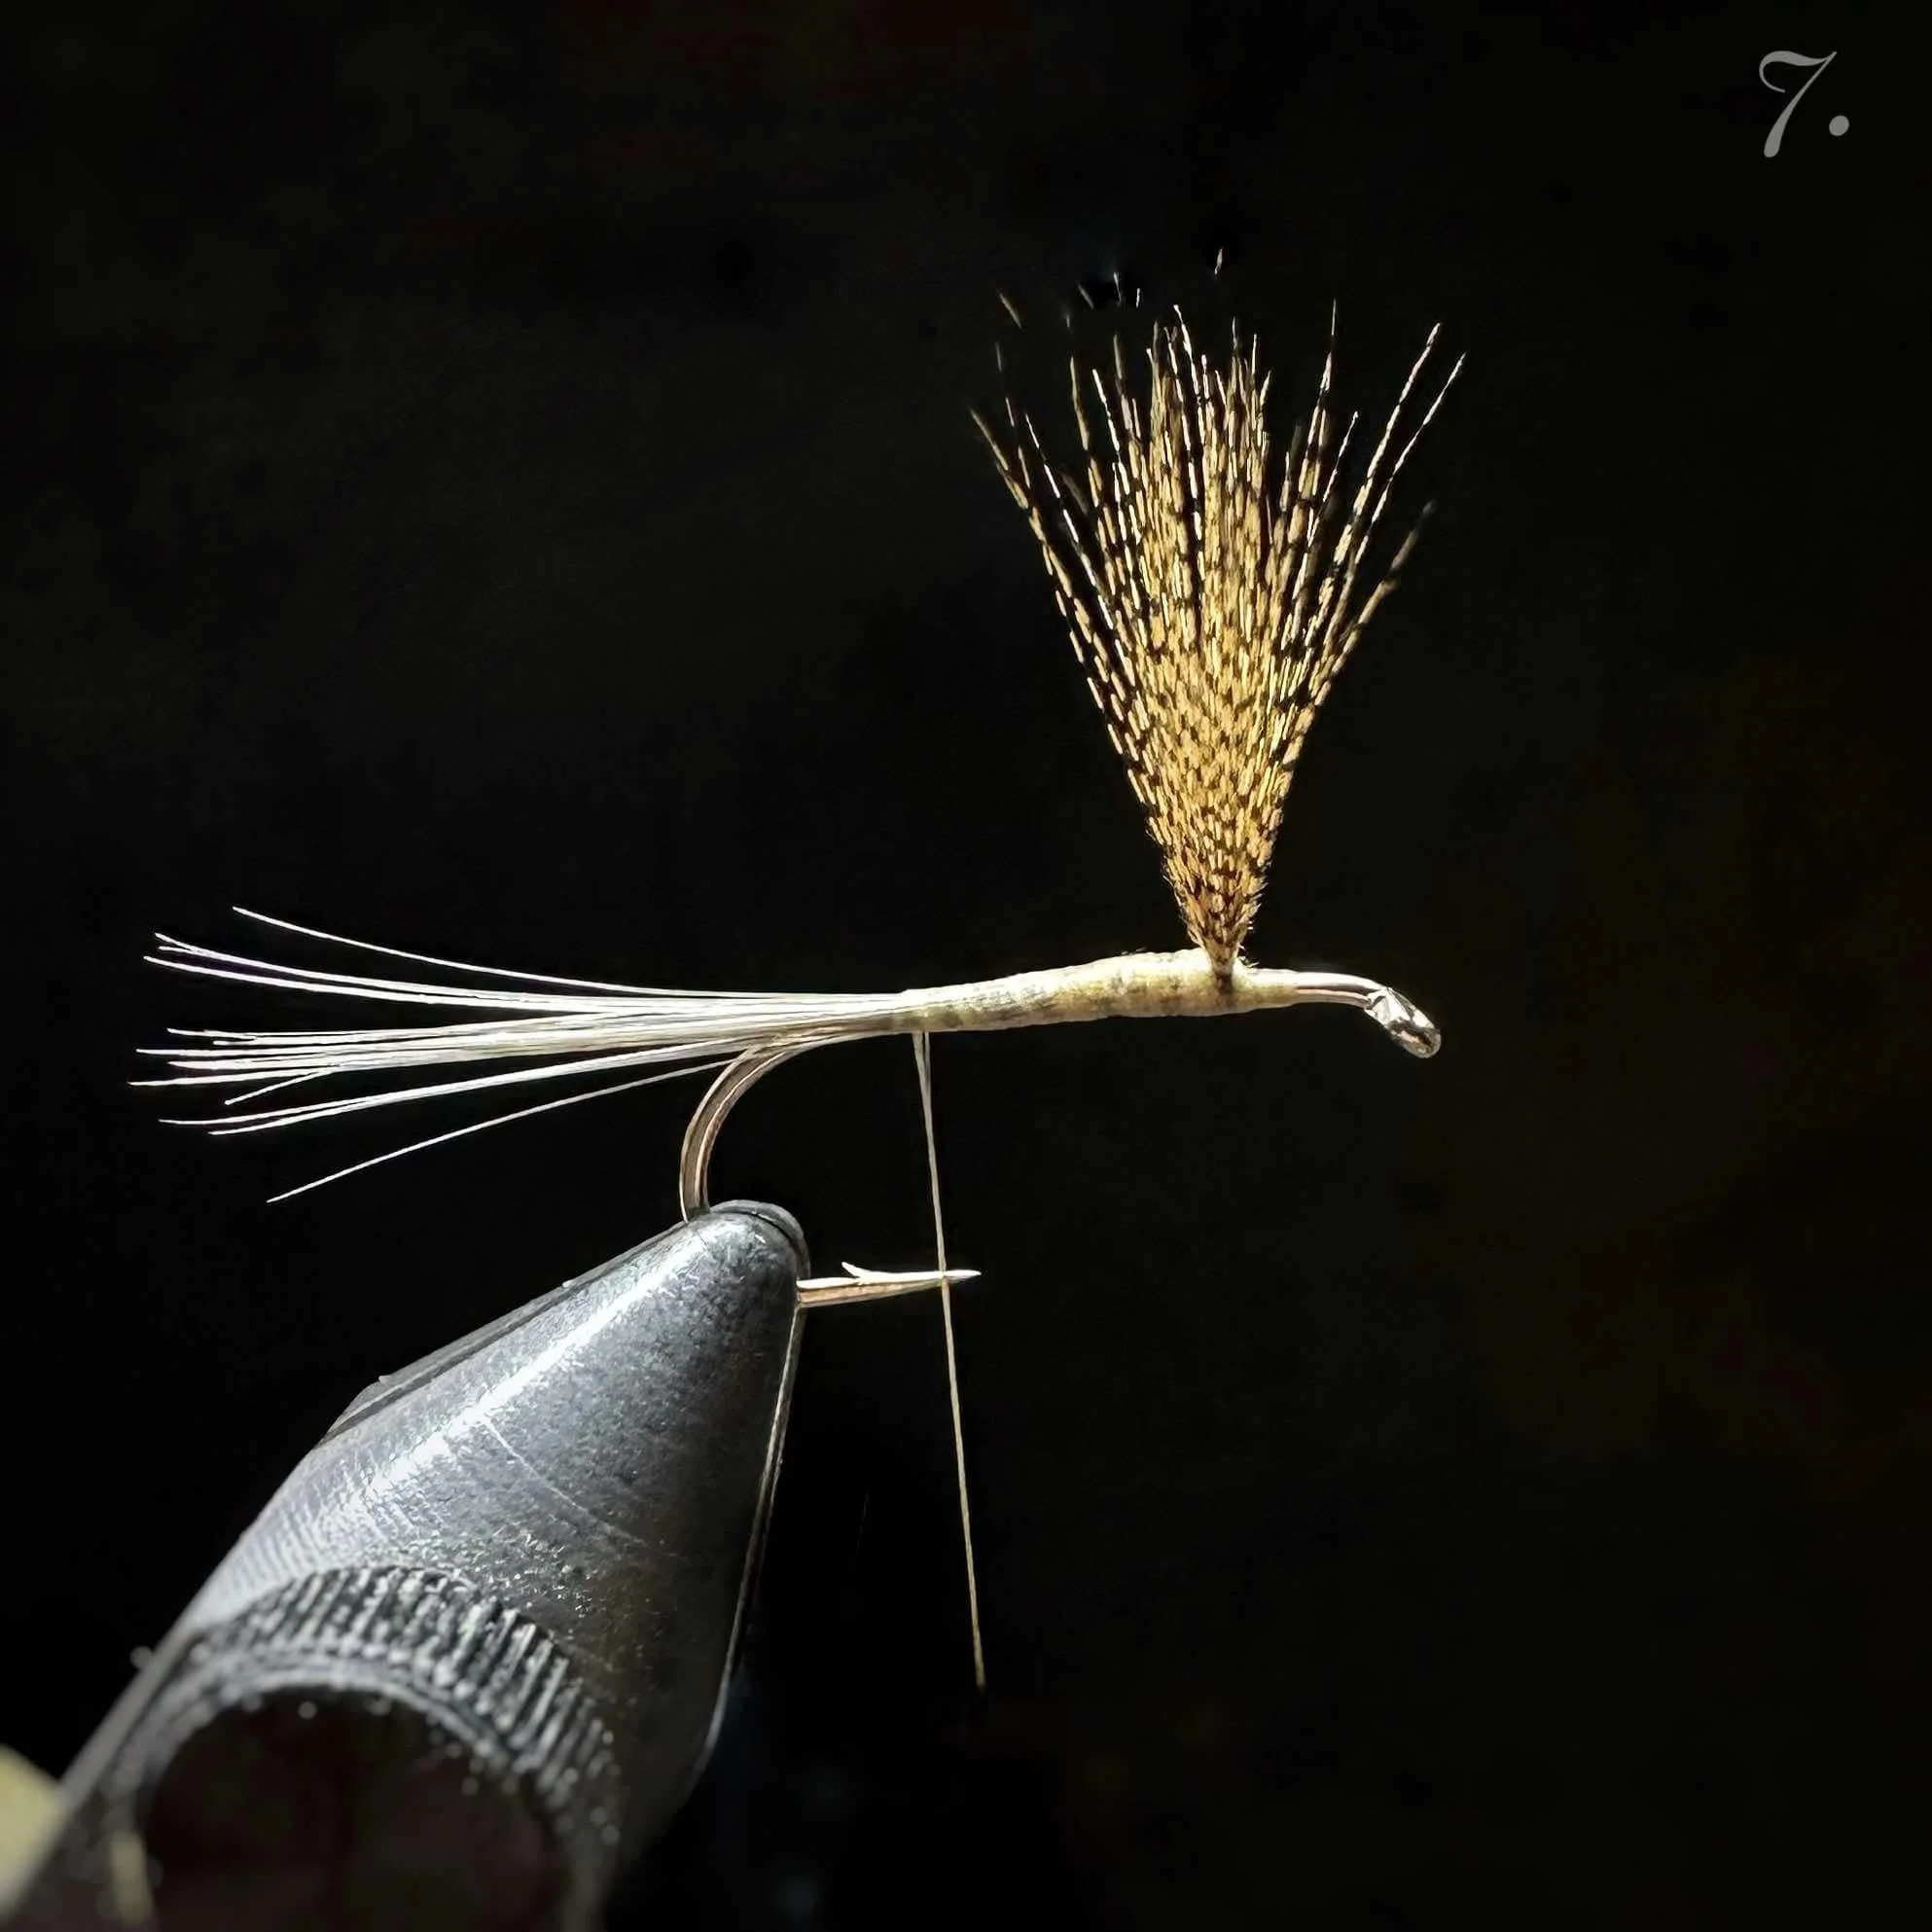
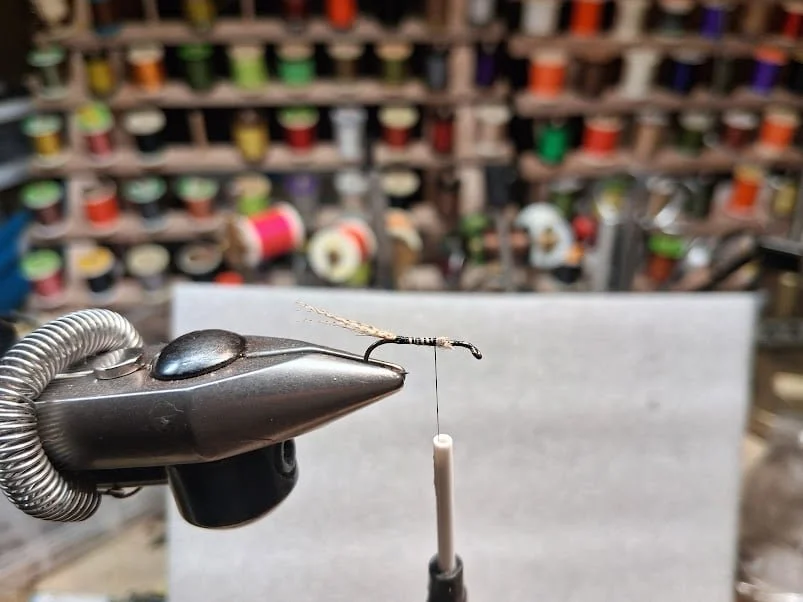
7. With flattened thread, take touching wraps down the hook shank and stop right before the hook bend. Take 8-10 fibers of your tailing material, making sure the tips are aligned and measure a full hook length minus the eye, just as you did the wings. Take two soft wraps to get your tailing fibers mounted onto the shank. If satisfied, lock in your tail with thread wraps moving up the shank.
Cut excess material at the taper you created earlier, making a smooth carrot shaped thread body, and end with your thread back down at the base of the tail.
*TIP: If your tail is slanting downward at this point then you went too far into the hook bend. Undo, and back off a wrap or two and try again. Your tail should extend horizontal to the shank.
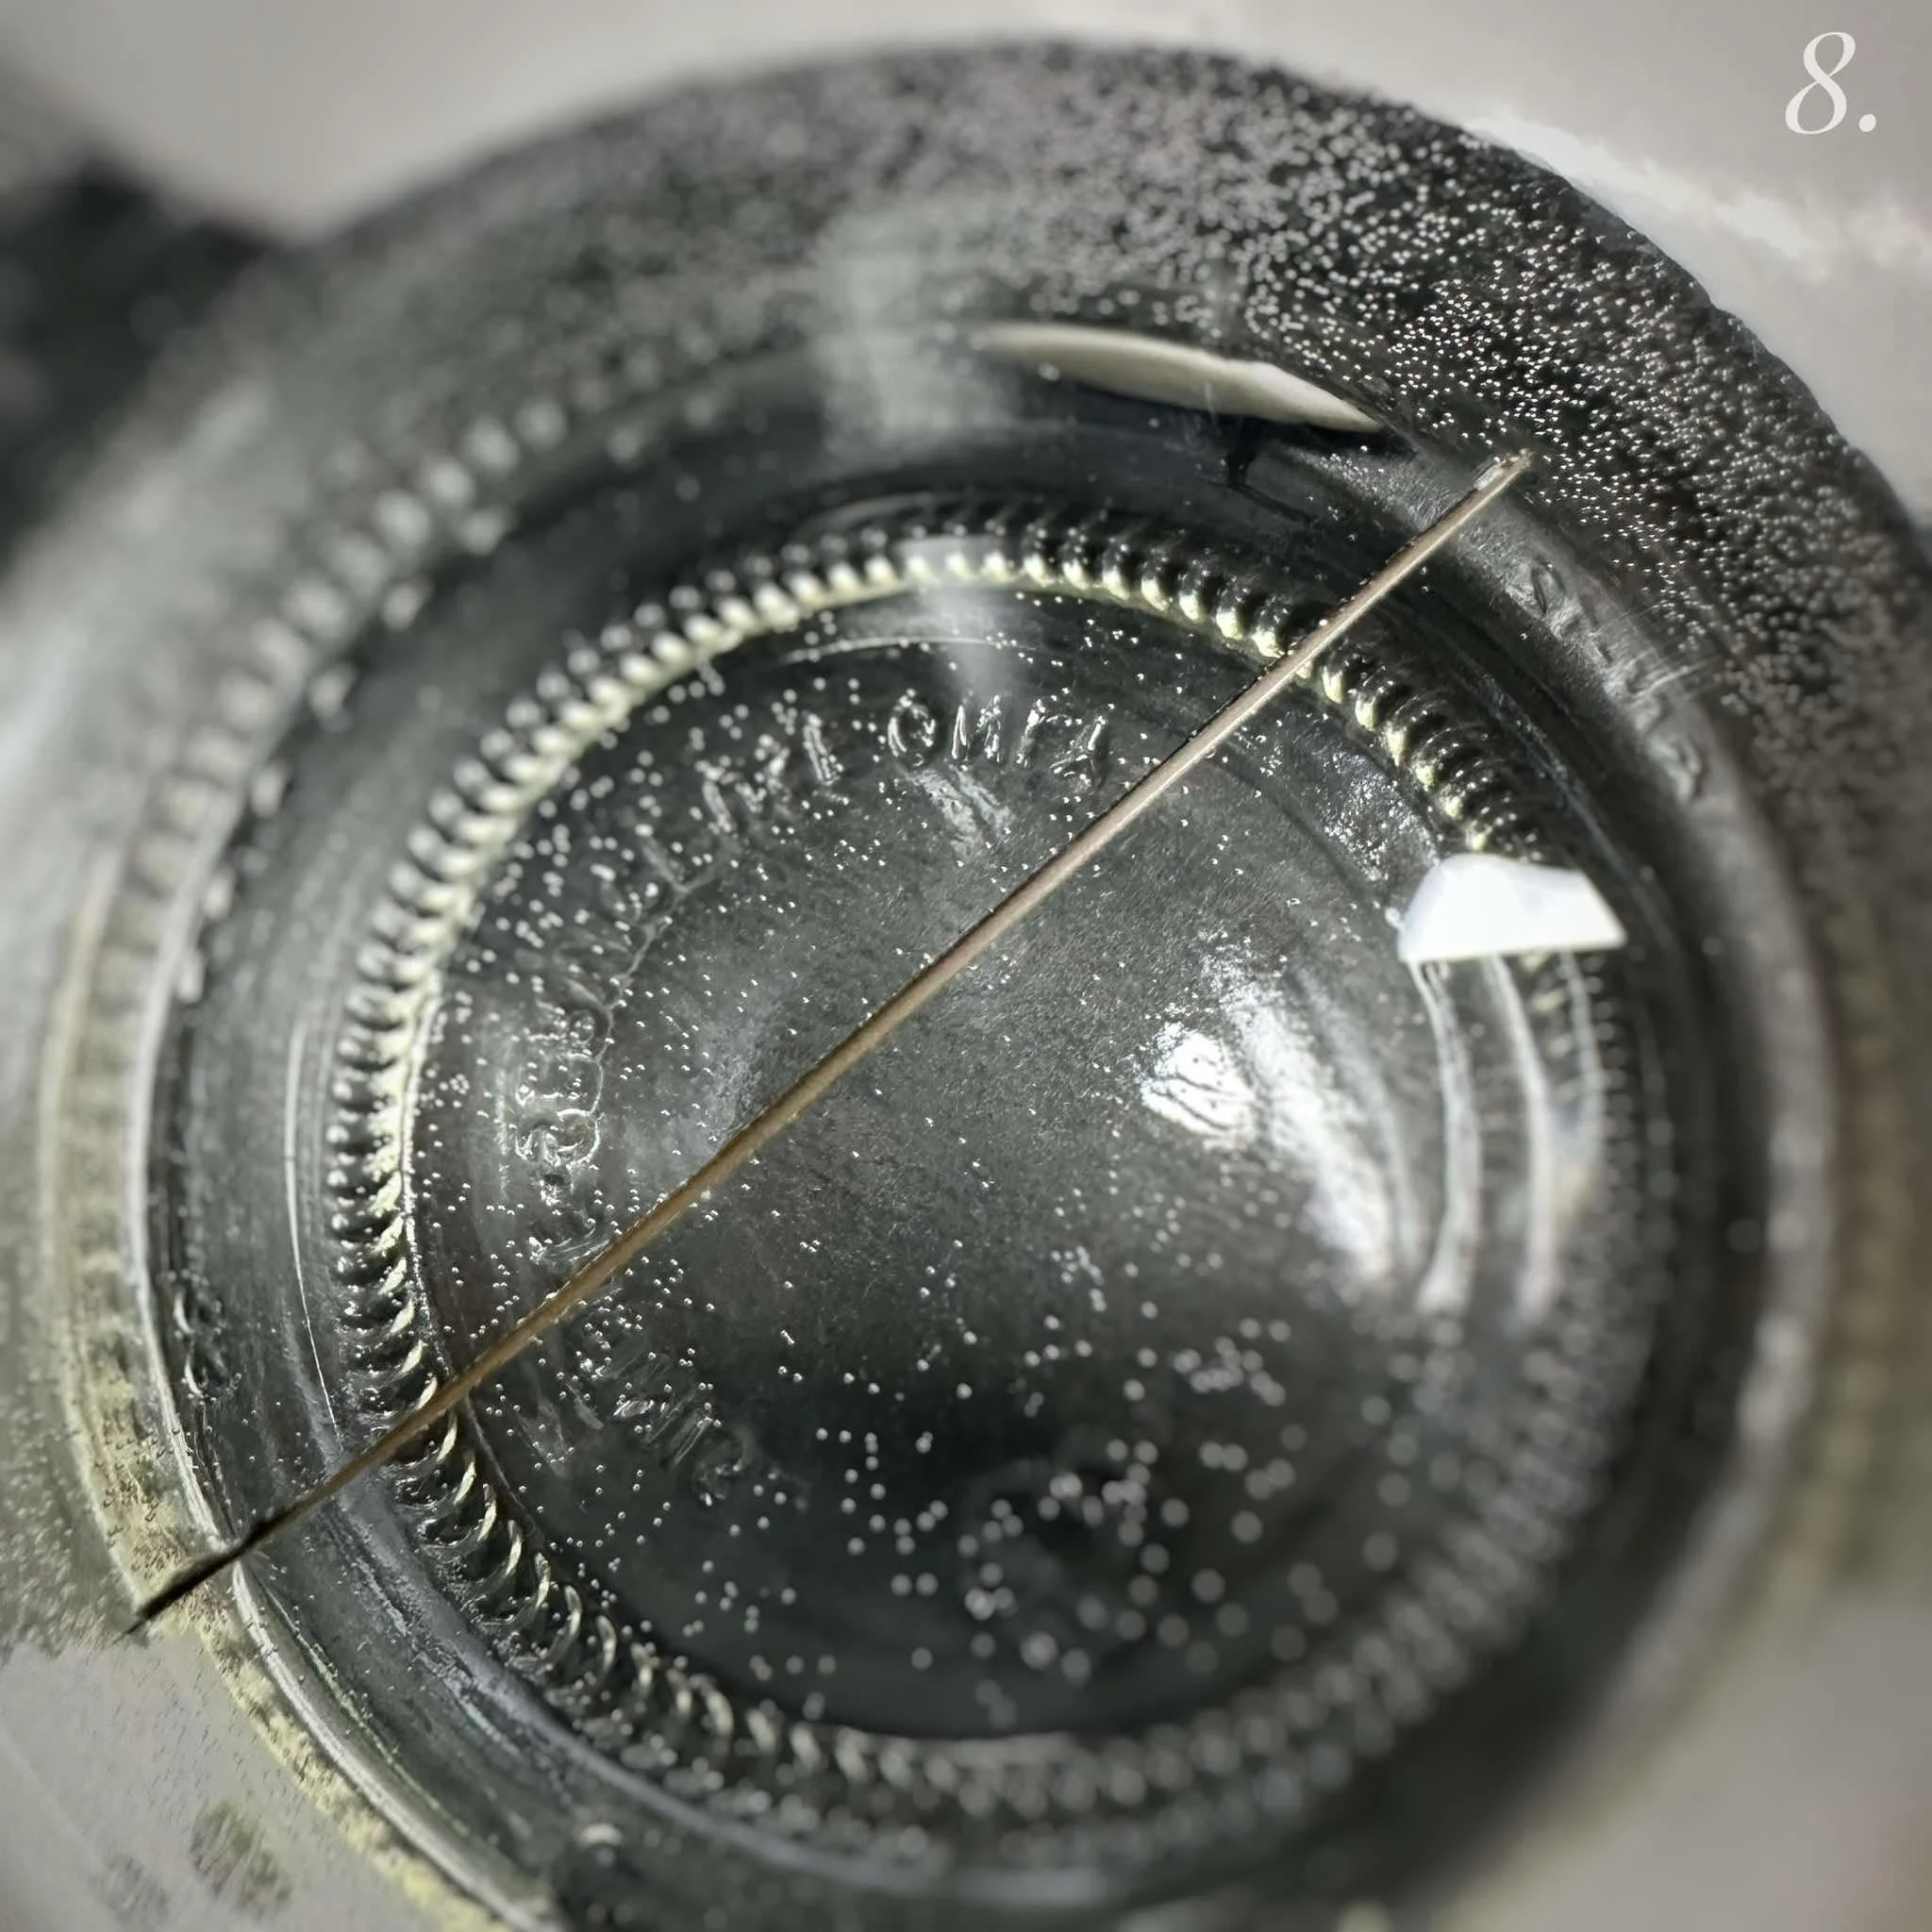
8. Strip a peacock herl from the center of a peacock eye. This is where you will find the ideal herl, where there is a clear light and dark banding when the flue is removed. Remove the herl with a pink eraser by gently pinning one end down on a table with your finger, and then running the eraser carefully along it and away from you, stripping the flue from the herl. Flip it, and repeat until it is free of fibers. Soak your quill in warm/hot water for 5 minutes to soften the quill. If this is not done you will risk cracking/damaging the quill during the wrapping process.
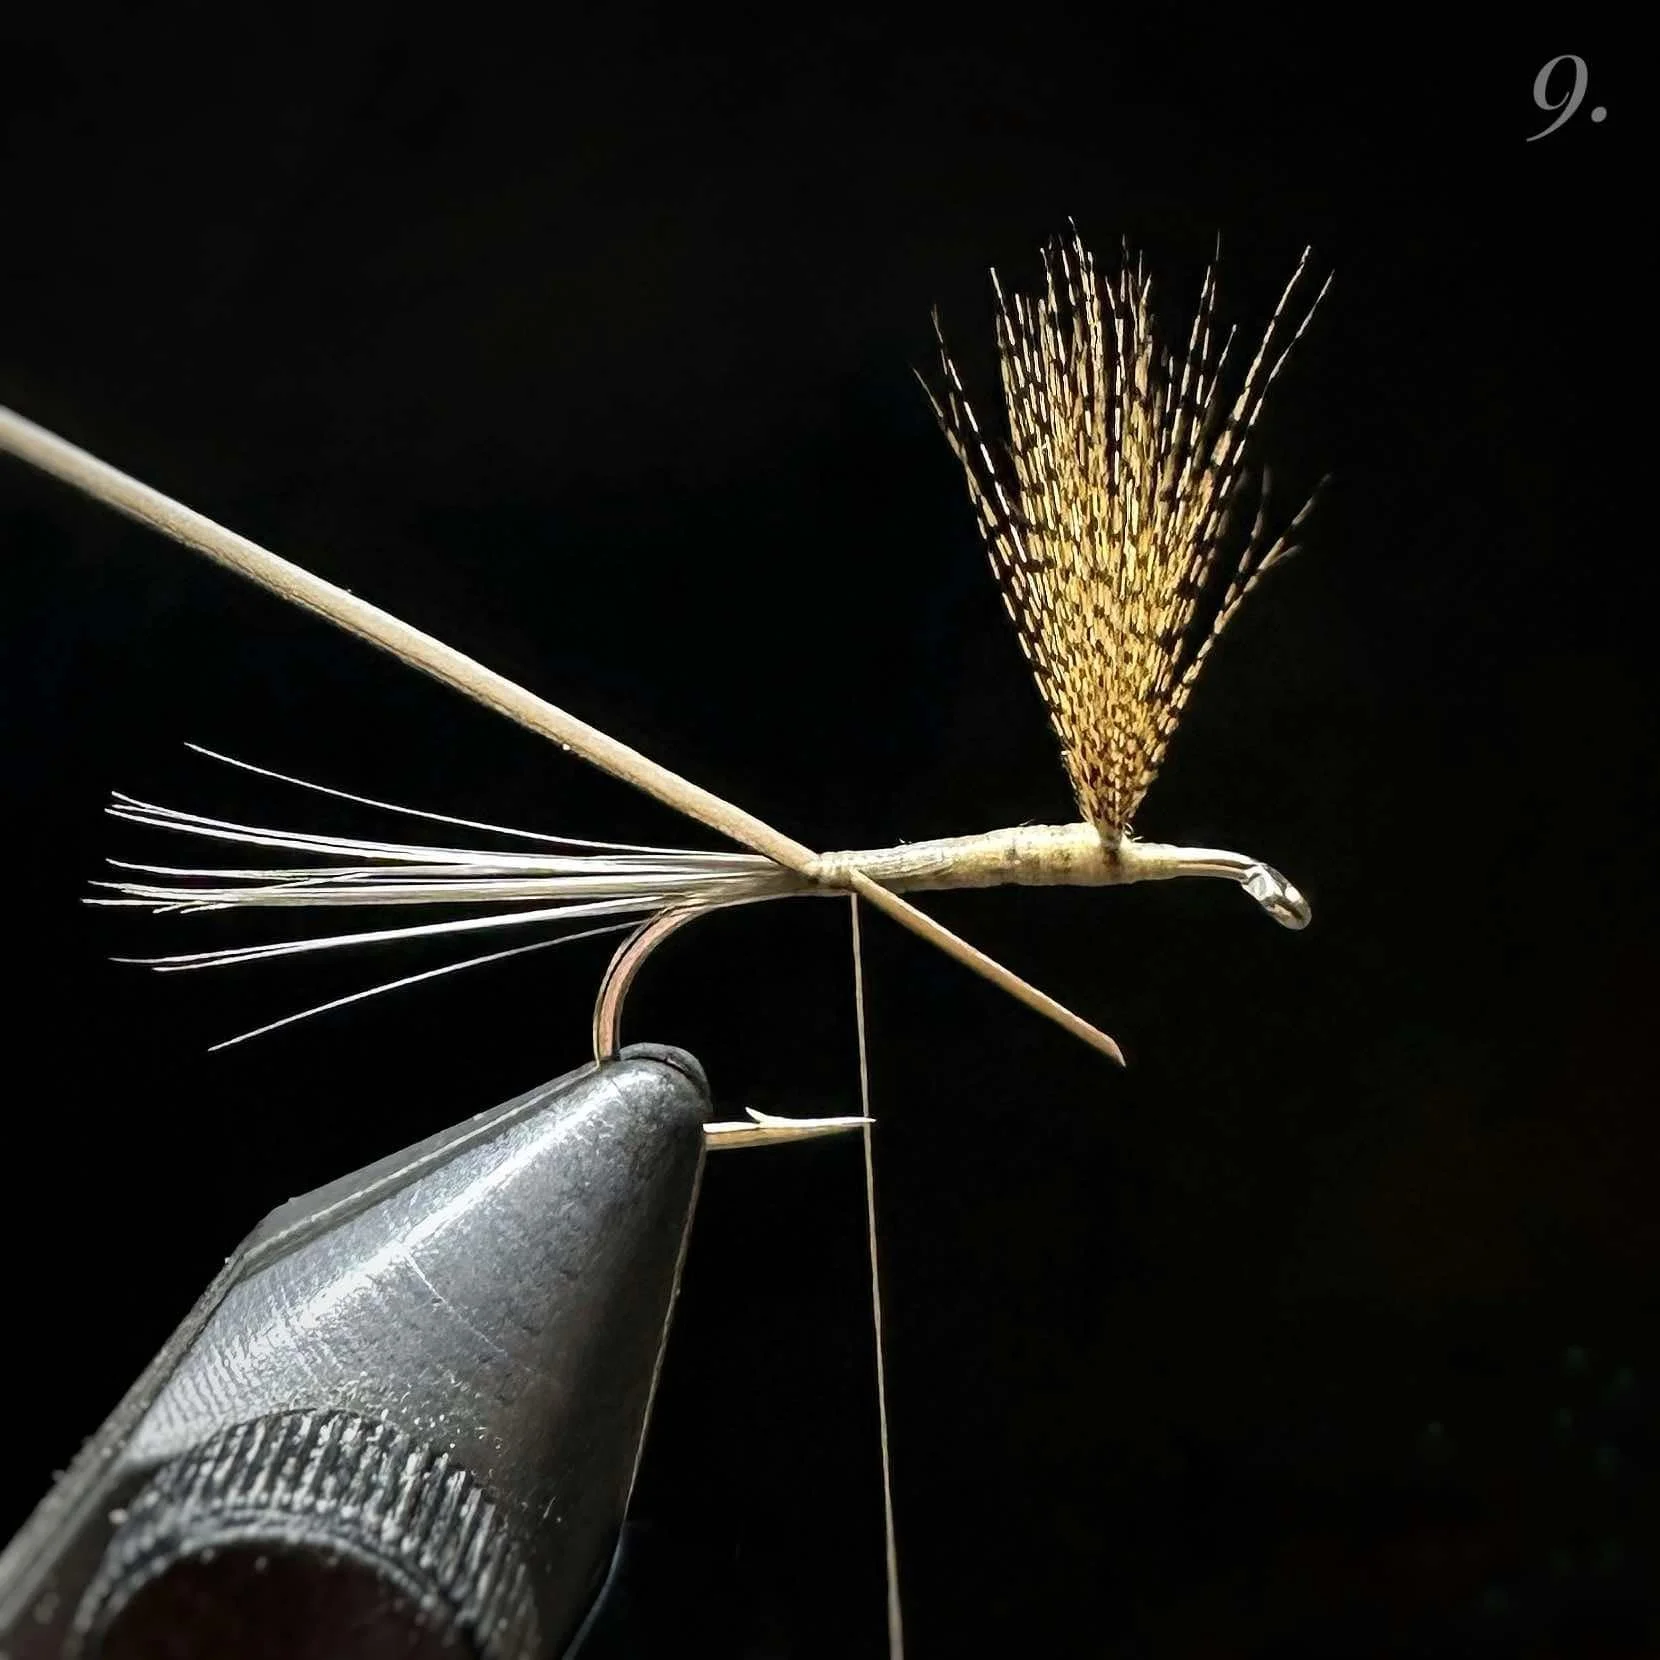
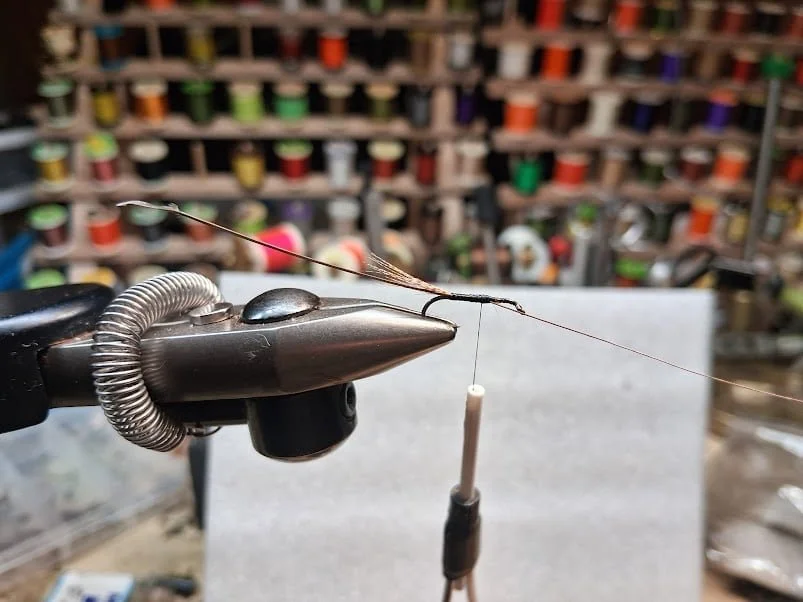
9. Install your quill at a 45° angle to the shank with the dark banding facing the rear of the fly.
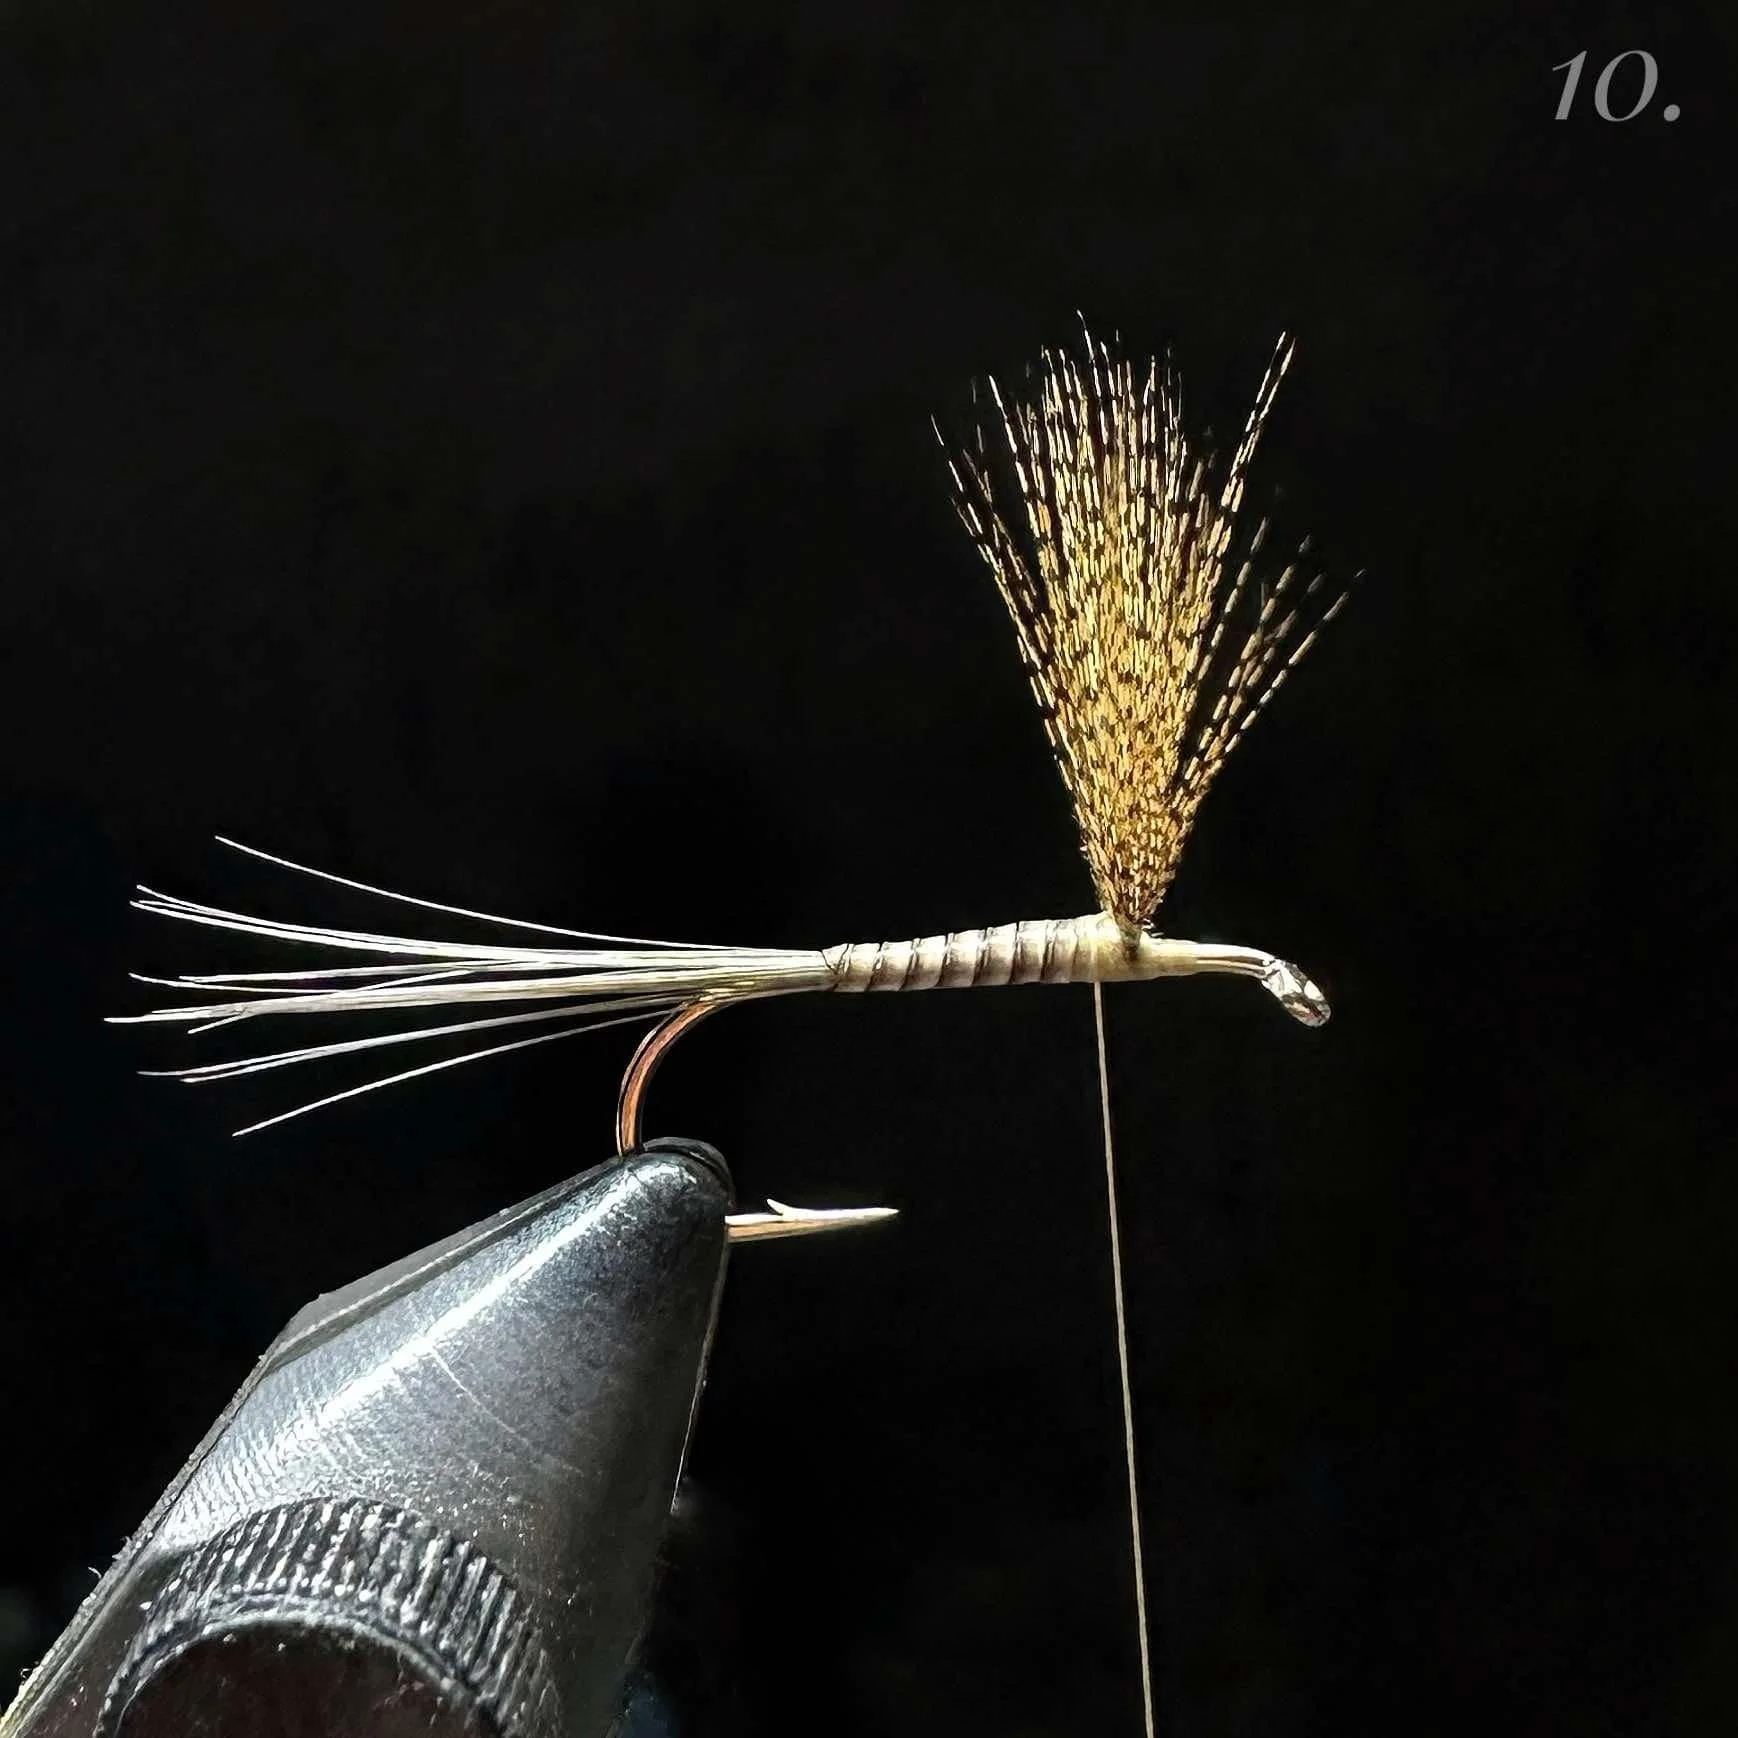
10. Use your hackle pliers and gently start wrapping your quill ensuring you are making touching wraps that SLIGHTLY overlap the last, giving your quill plenty of space to show the light band as well as the thinner dark band to create a natural looking quill body segmentation.
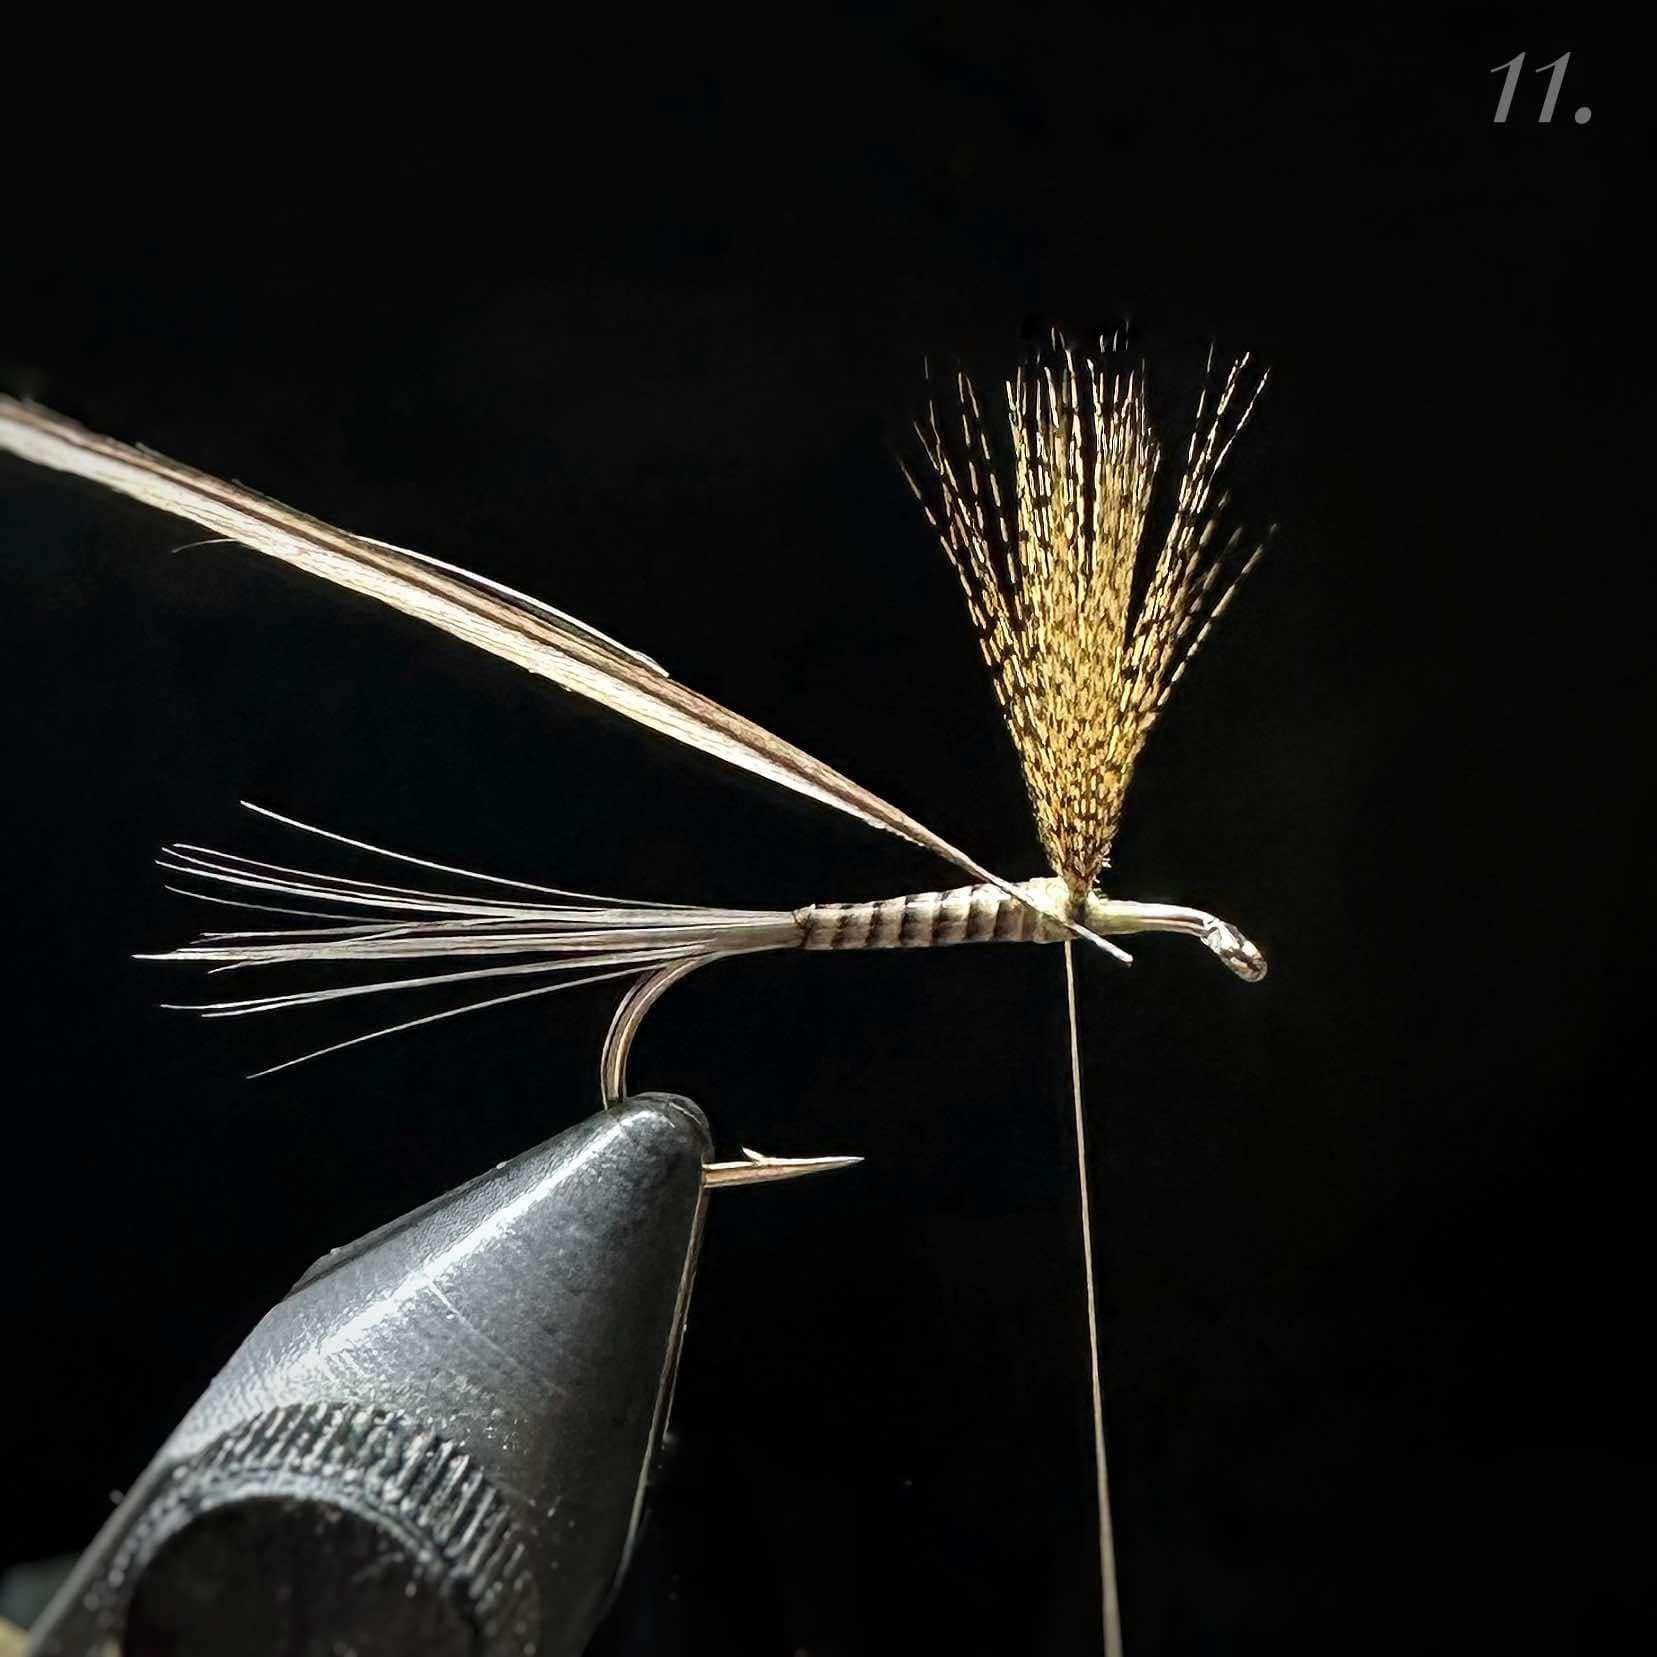
11. Select a rooster hackle feather from either a cape or saddle and measure on your hackle gauge so the tips match exactly a size 14. As the Daiichi hook is the closest to the original hook shape and length these patterns were built upon, the hackle measurement is true to size. Cut the rachis at the “sweet spot” where the webbing disappears and uniform barb length is seen.
Then strip a quarter inch of barbs off both sides to expose bare stem. Strip approximately 6 additional fibers on the right side of your feather (if the face of the feather is facing you.)
Install the rachis at a 45° angle on the near side of the shank, where your dubbing body ended. Keep thread flat, and take touching wraps forward securing your hackle, passing behind and in front of your wings and ending where your thread originally started. DO NOT move past this point, as to preserve the bare shank of the hook.
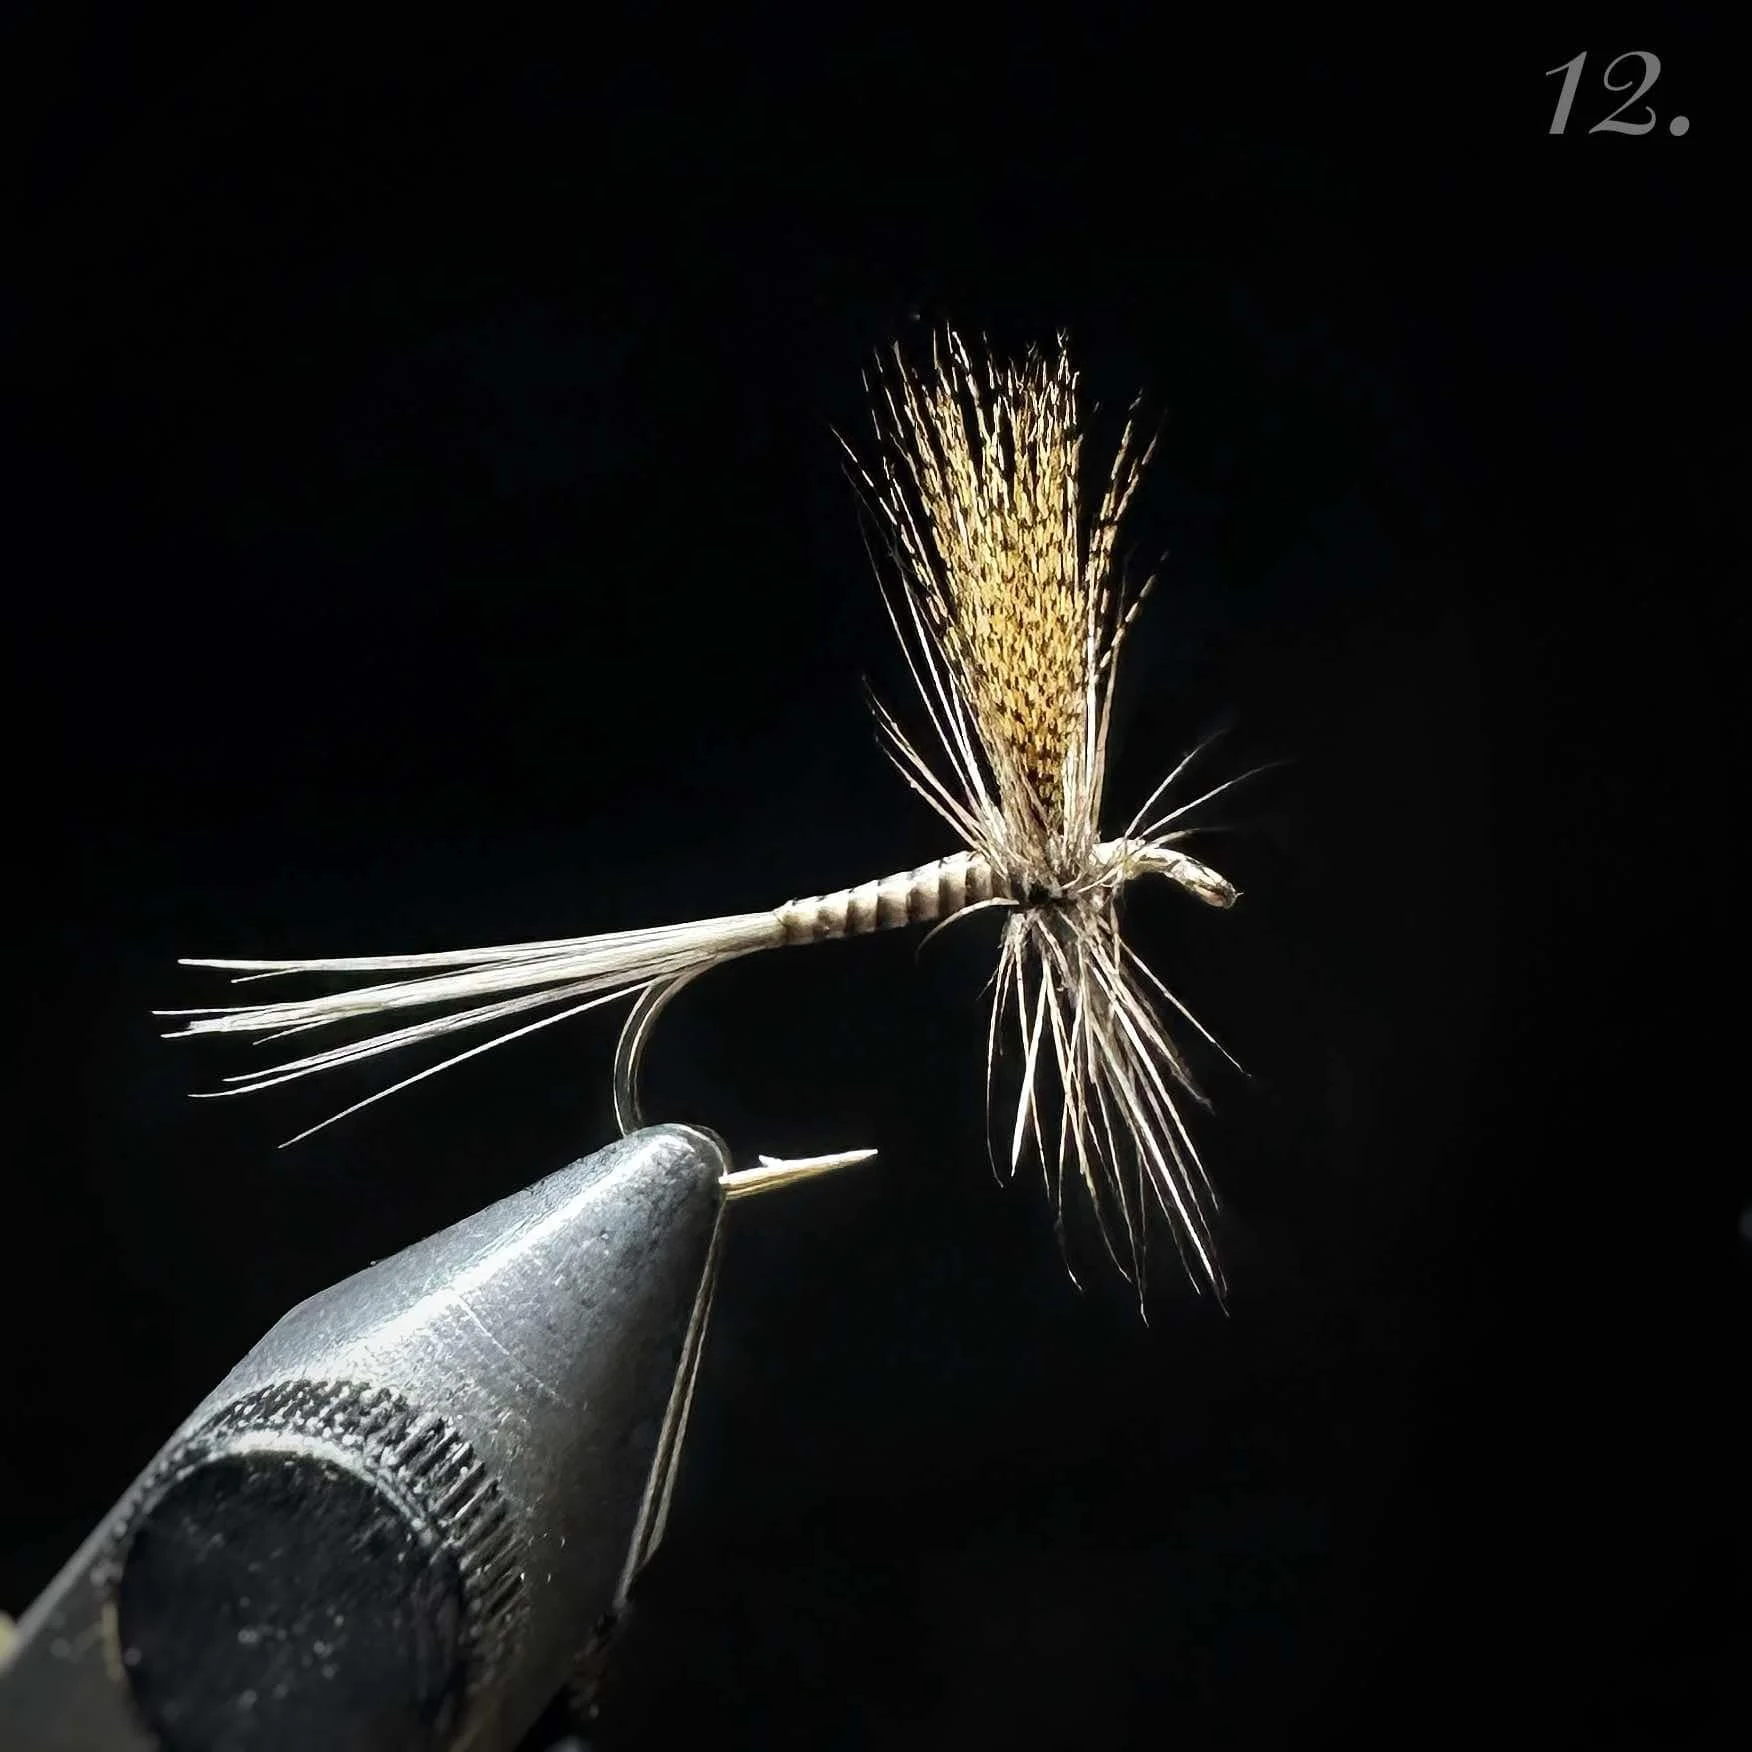
12. Coax the hackle feather by lightly bending it forward until the feather almost stands vertical on its own. Take your first wrap of hackle over the shank, followed by one more. At this point the barbs should be wrapping vertical and neatly. If this does not show, and you see the barbs tilting back, reverse the wraps are do it again until they splay neatly. This is another critical step to ensure a neat, uniform hackle collar, as the first two wraps will tell you how future wraps will lay down.
Like a domino effect, if the first two wraps don’t look good, they will continue to get worse. If satisfied, proceed by taking close wraps, making sure not to trap barbs from the previous wraps. General rule of thumb is 3 behind the wing, and 2-3 in front. Though this does vary depending on your hackles barb density, so use best judgement.
Secure your hackle stem no further than where the thread base stops. Take securing wraps slightly back toward the hackle, as taking them forward will possibly jeopardize losing your bare shank space. Finish with 3 half hitches and secure with either traditional head cement or Solarez Bone Dry.
I caution against using a whip finisher because it risks the possibility of ruining your last hackle wraps, and not getting a clean finish to the head of the fly.
Happy fishing!
Editor’s Note: The beauty and allure of dry flies entrances me. How dries look and work to catch trout is a big reason many of us love this sport. Devoted father and husband, Master Tyer and Guide - general guru and inspiration, Scott is quick with laugh and fun to fish with. Scott Fisher’s Catskill Dry Flies are well known and it is an honor to present his Quill Gordon as April’s FotM.
The Versatility of Bryan Farmer
NJFTG March Newsletter Vol. I No. iii
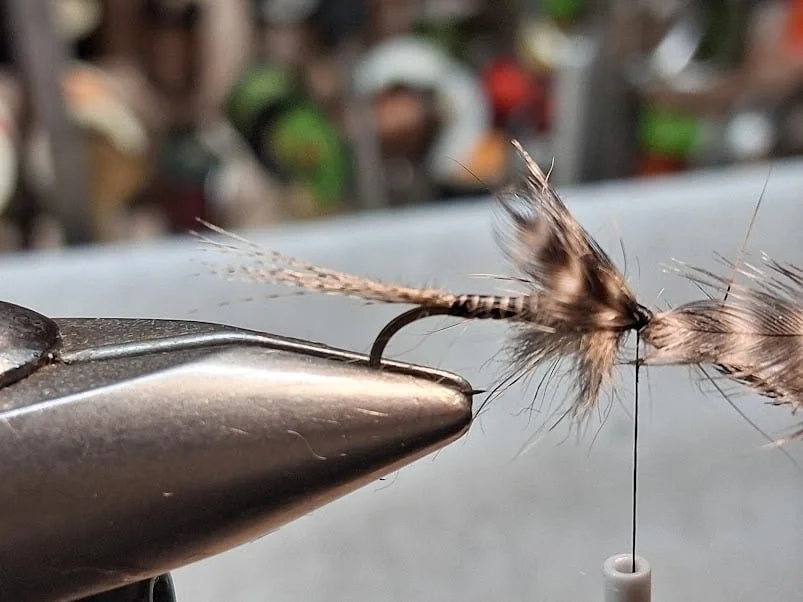
At our last guild meeting, Bryan explained this pattern as "a little black stonefly," that also works as a Quill Gordon. I was intrigued. Bryan readily agreed to share the pattern and pictures. The combination of stonefly and early mayfly make this March’s fly of the month.
Bryan is generous with his stuff: materials, ideas, and flies themselves.
If you're interested and will listen, he is willing to share.
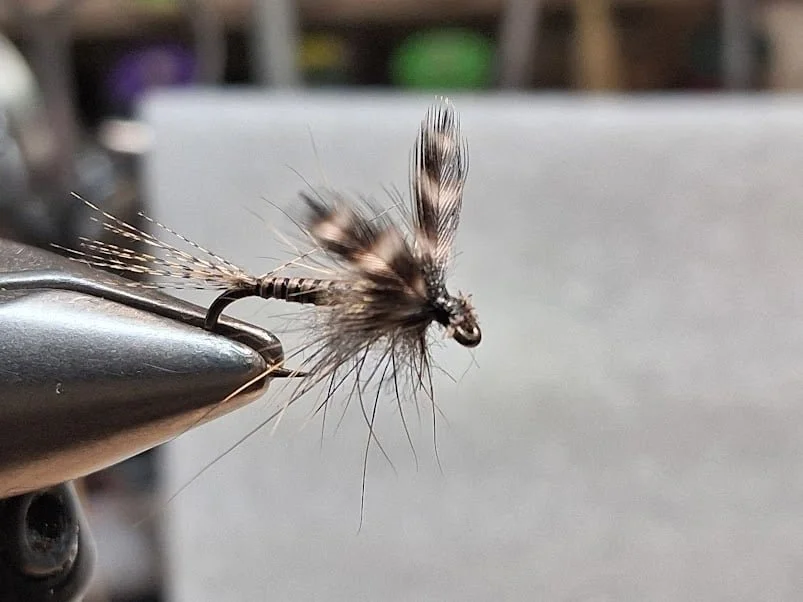
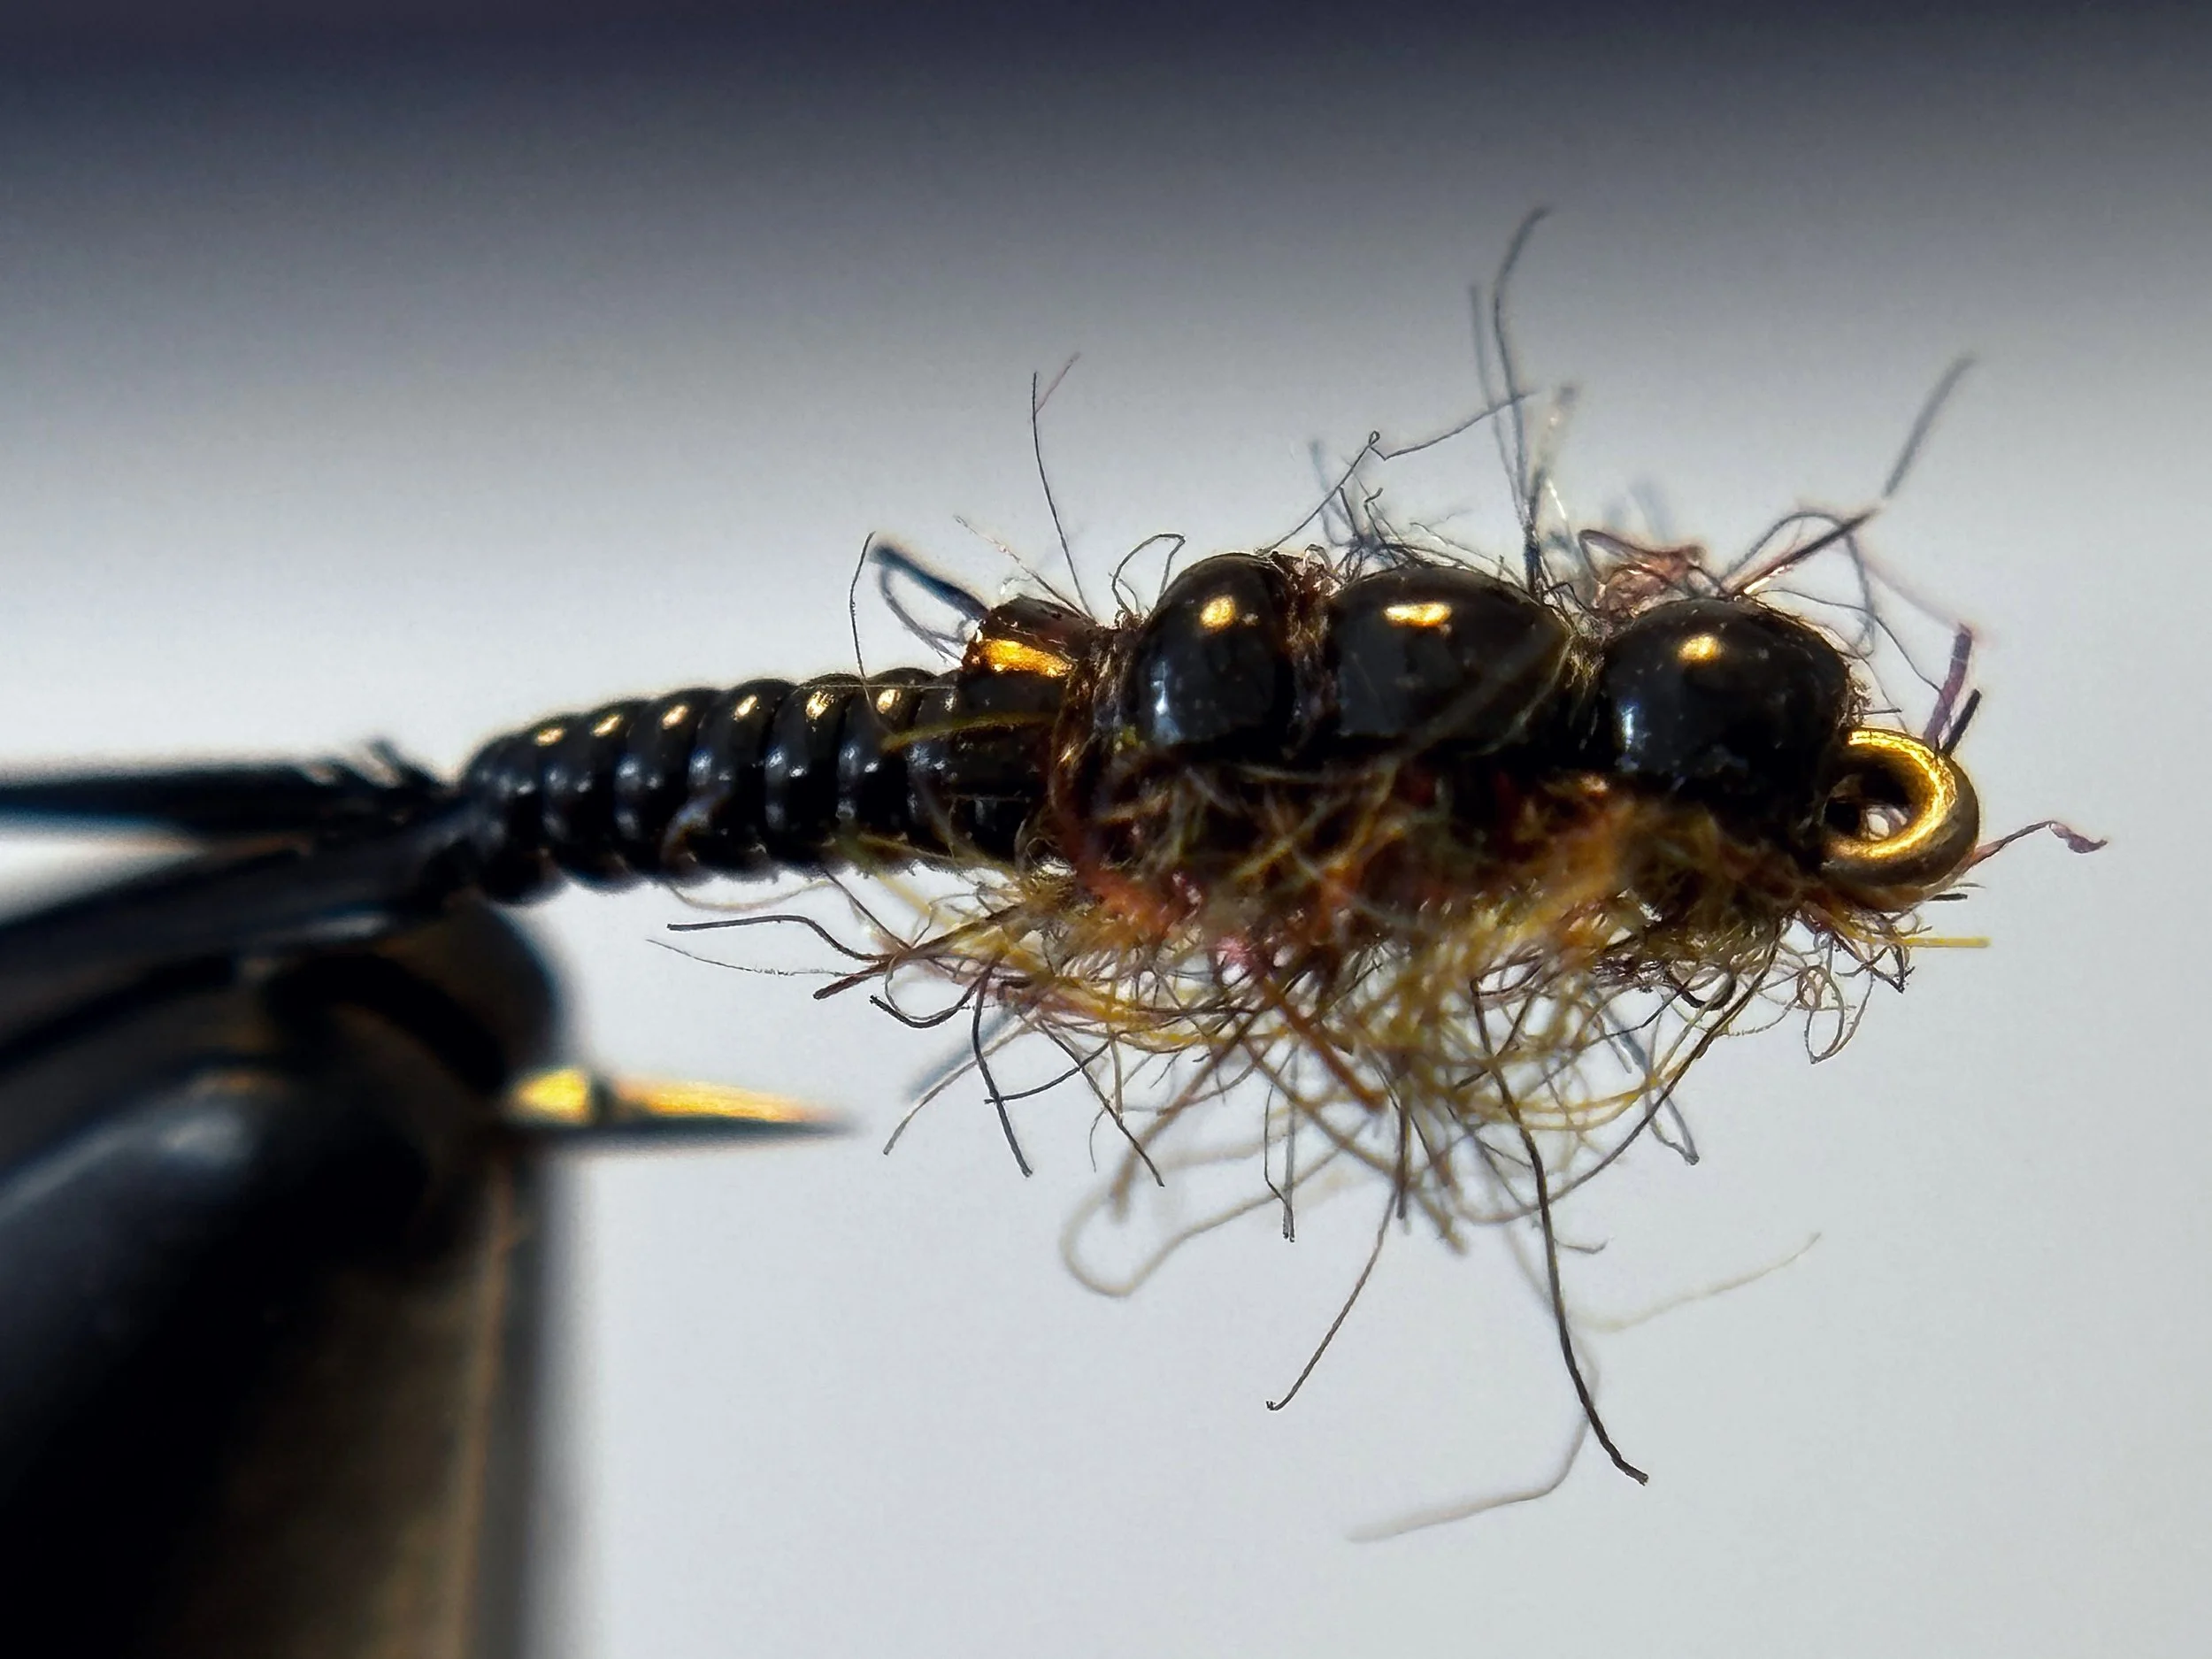
It looks like a stonefly or a Quill Gordon and Bryan calls it the Grizzly nymph. Versatile
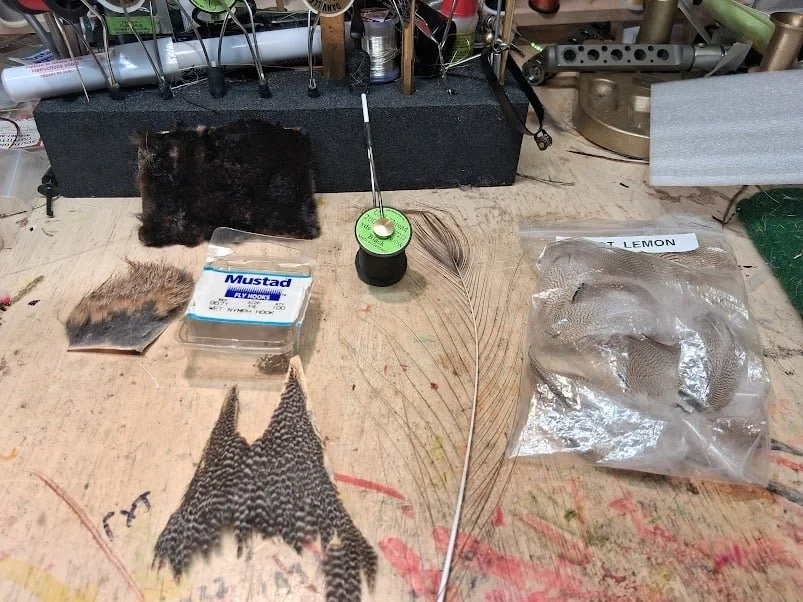
Thread: Uni black 70D
Hook: #14 nymph
Tail: Wood Duck
Wings: Grizzly Hen or Rooster
Body: stripped peacock herl
Thorax: any "spiky" dubbing, spun and combed out
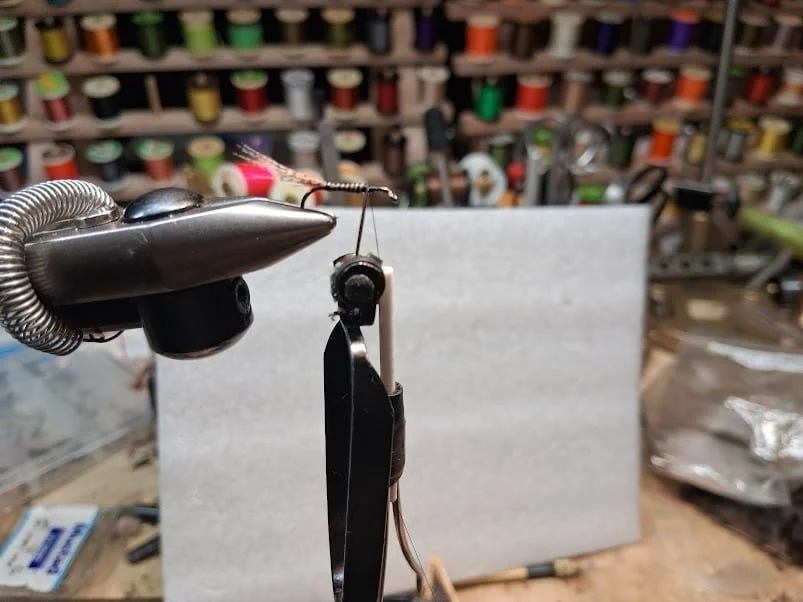
Start your thread on the hook and a Wood Duck tail.
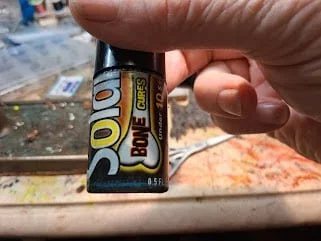
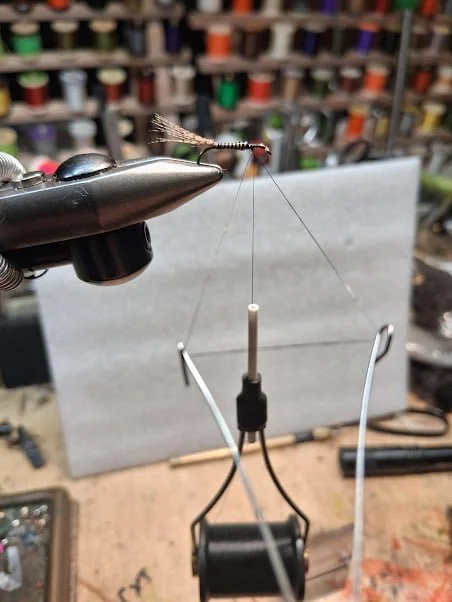
Next, a stripped peacock herl makes the abdomen; use Bone Dry UV cure before adding the thorax.
Spun deer hair and dubbing - or any spiky, leggy dubbing - makes the thorax.
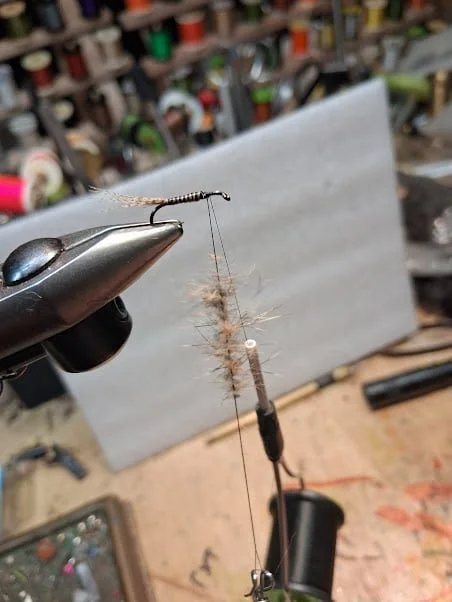
Finally, two grizzly hackle tips make the wing.

Bryan Farmer is one of the most creative and innovative tyers I know. He also catches a lot fish. He studies the bugs to create patterns fish can't resist and is infamous for using unique materials and creating the tools he needs to get the flies the way he wants them. For me, his process can be overwhelming; I never thought I'd need a power drill as part of the fly dressing process, but the results speak for themselves.
NJFTG February Newsletter Vol. I No. ii
Editor's Note: Working in any shop, the clerk has no idea who is in front of them. Working in a fly shop, you don't know who doesn't know a nymph from their elbow and who is a pro. Jeff D. is so humble and unassuming, it took me way too long to find out just how awesome his flies are. It is easy to learn how great Jeff is. I asked him to share his recipe for his Early Black Stonefly and he went further and wrote the whole newsletter for February. This is an awesome fly and just in time. We have to thaw out eventually and these flies will be ready to make their move. Thank you, Jeff! Visit his site and salivate. Jeff's flies are closer to art:
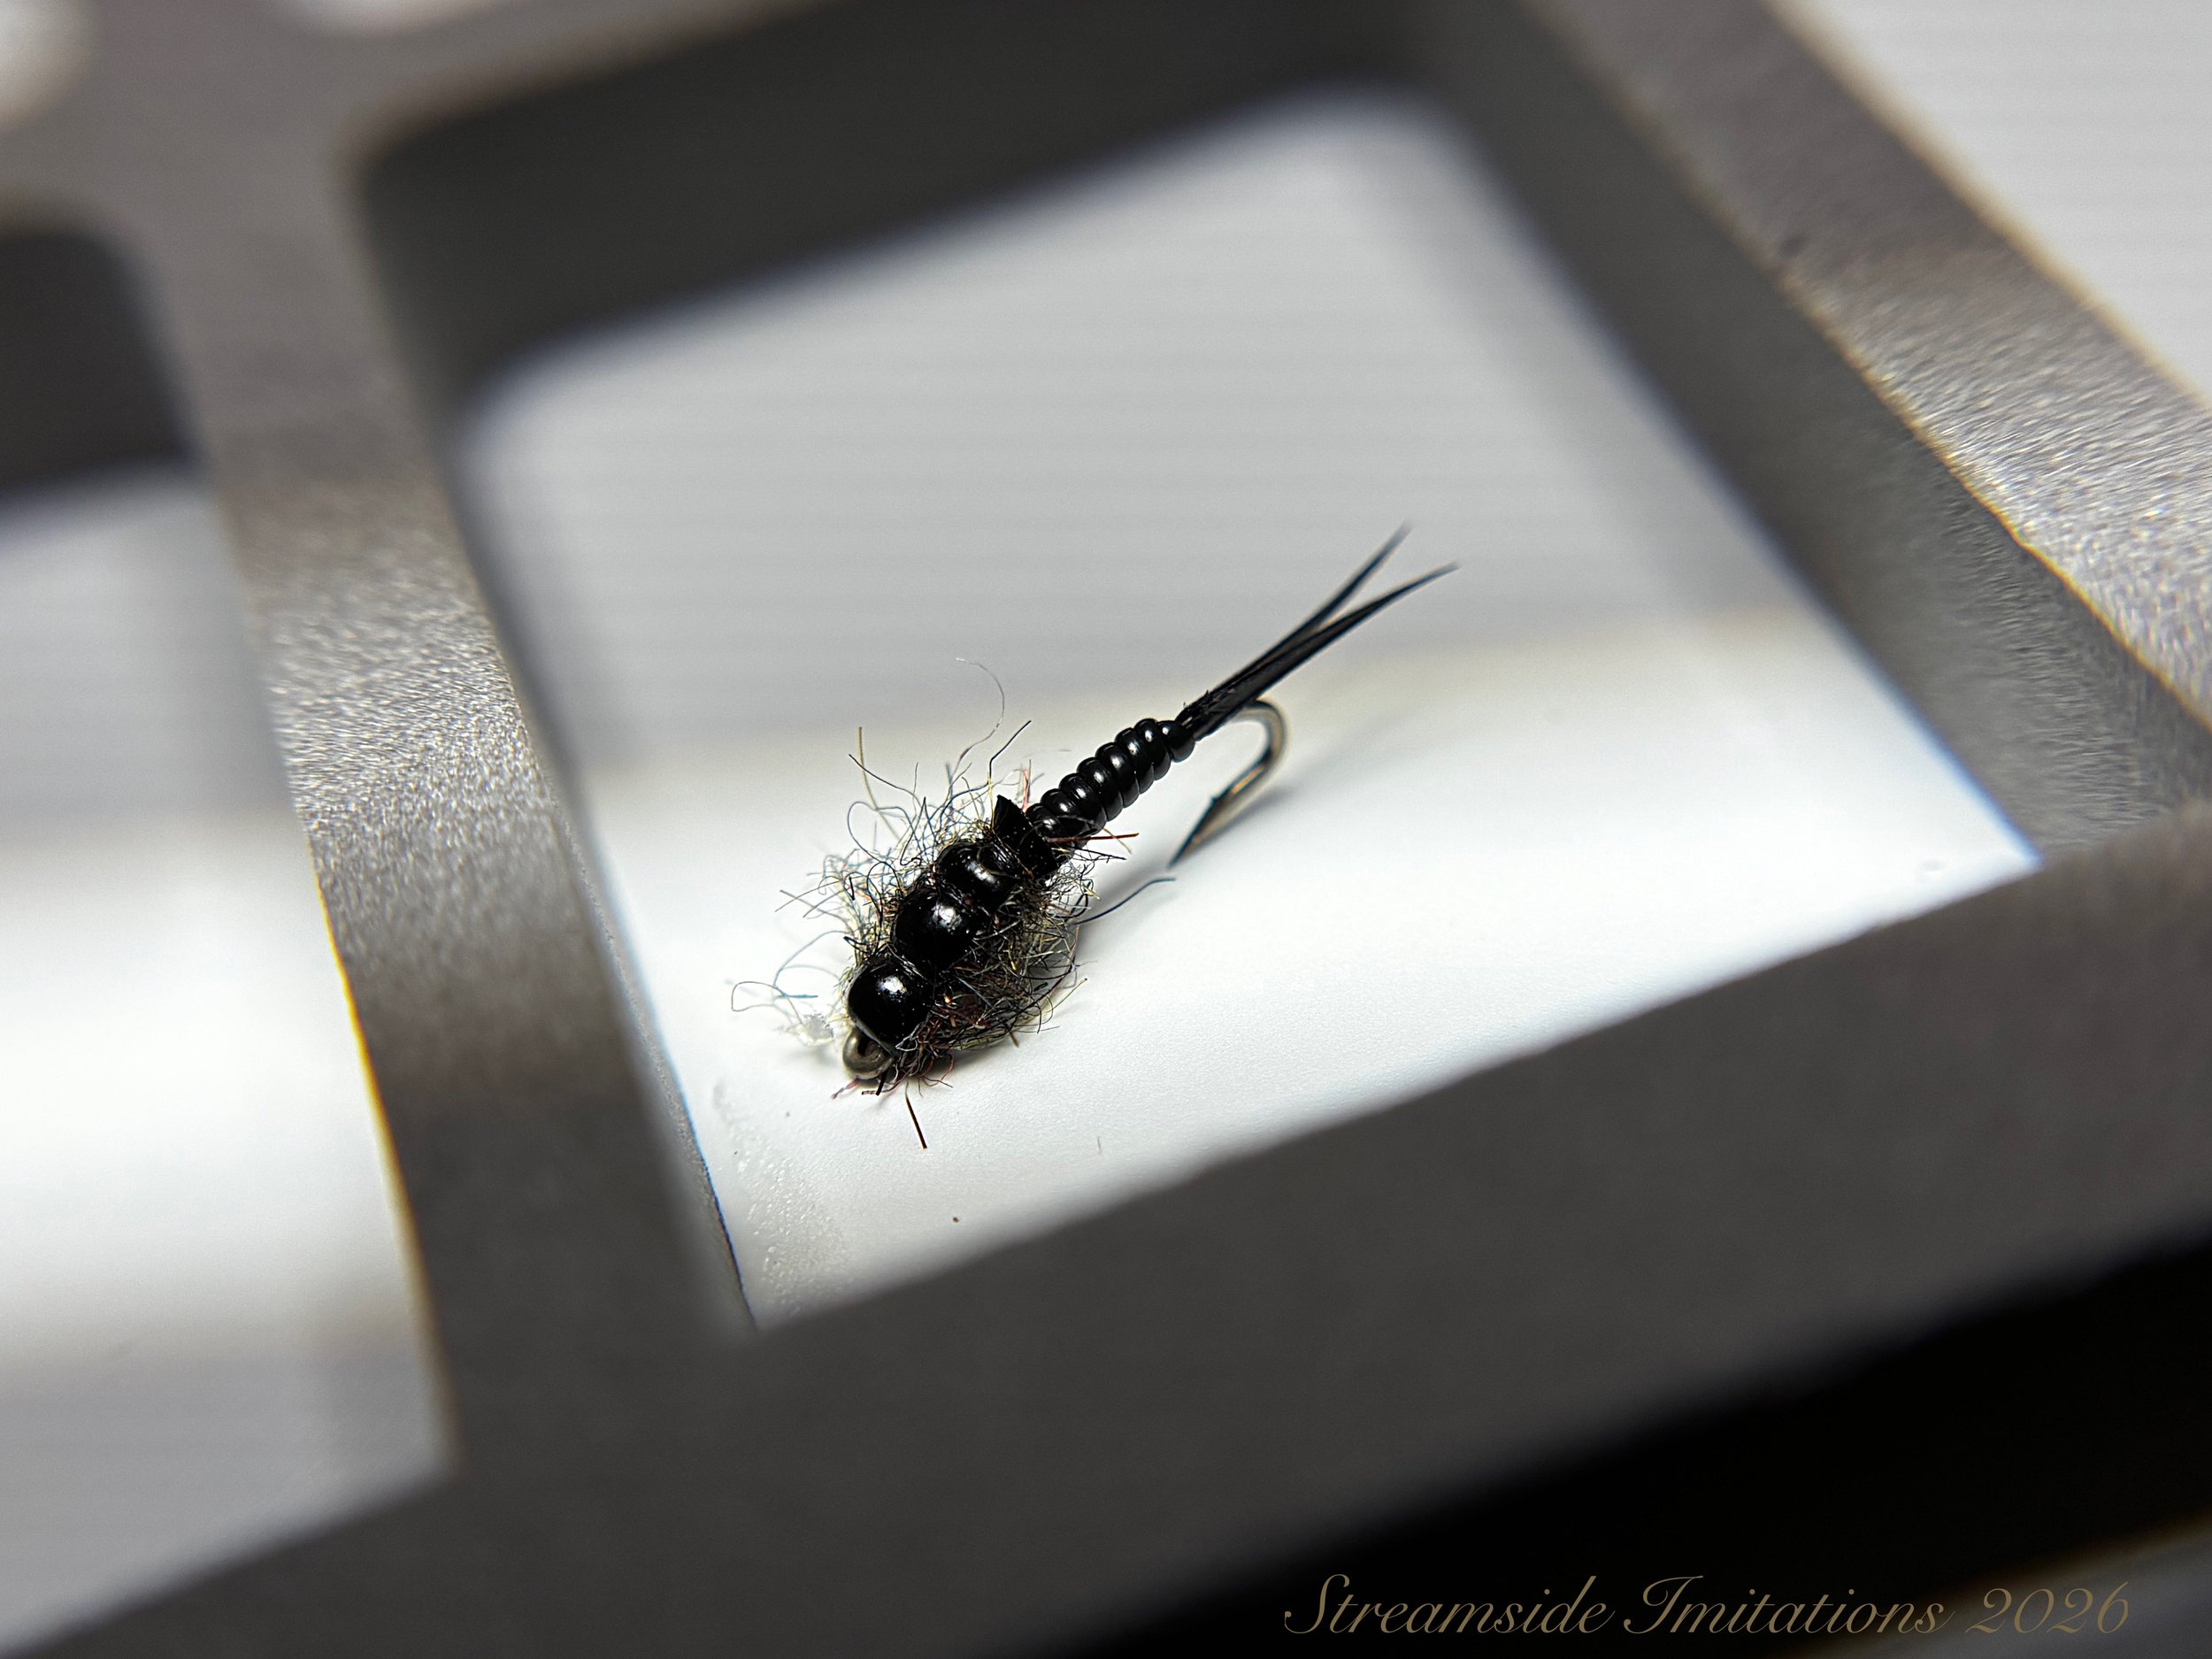
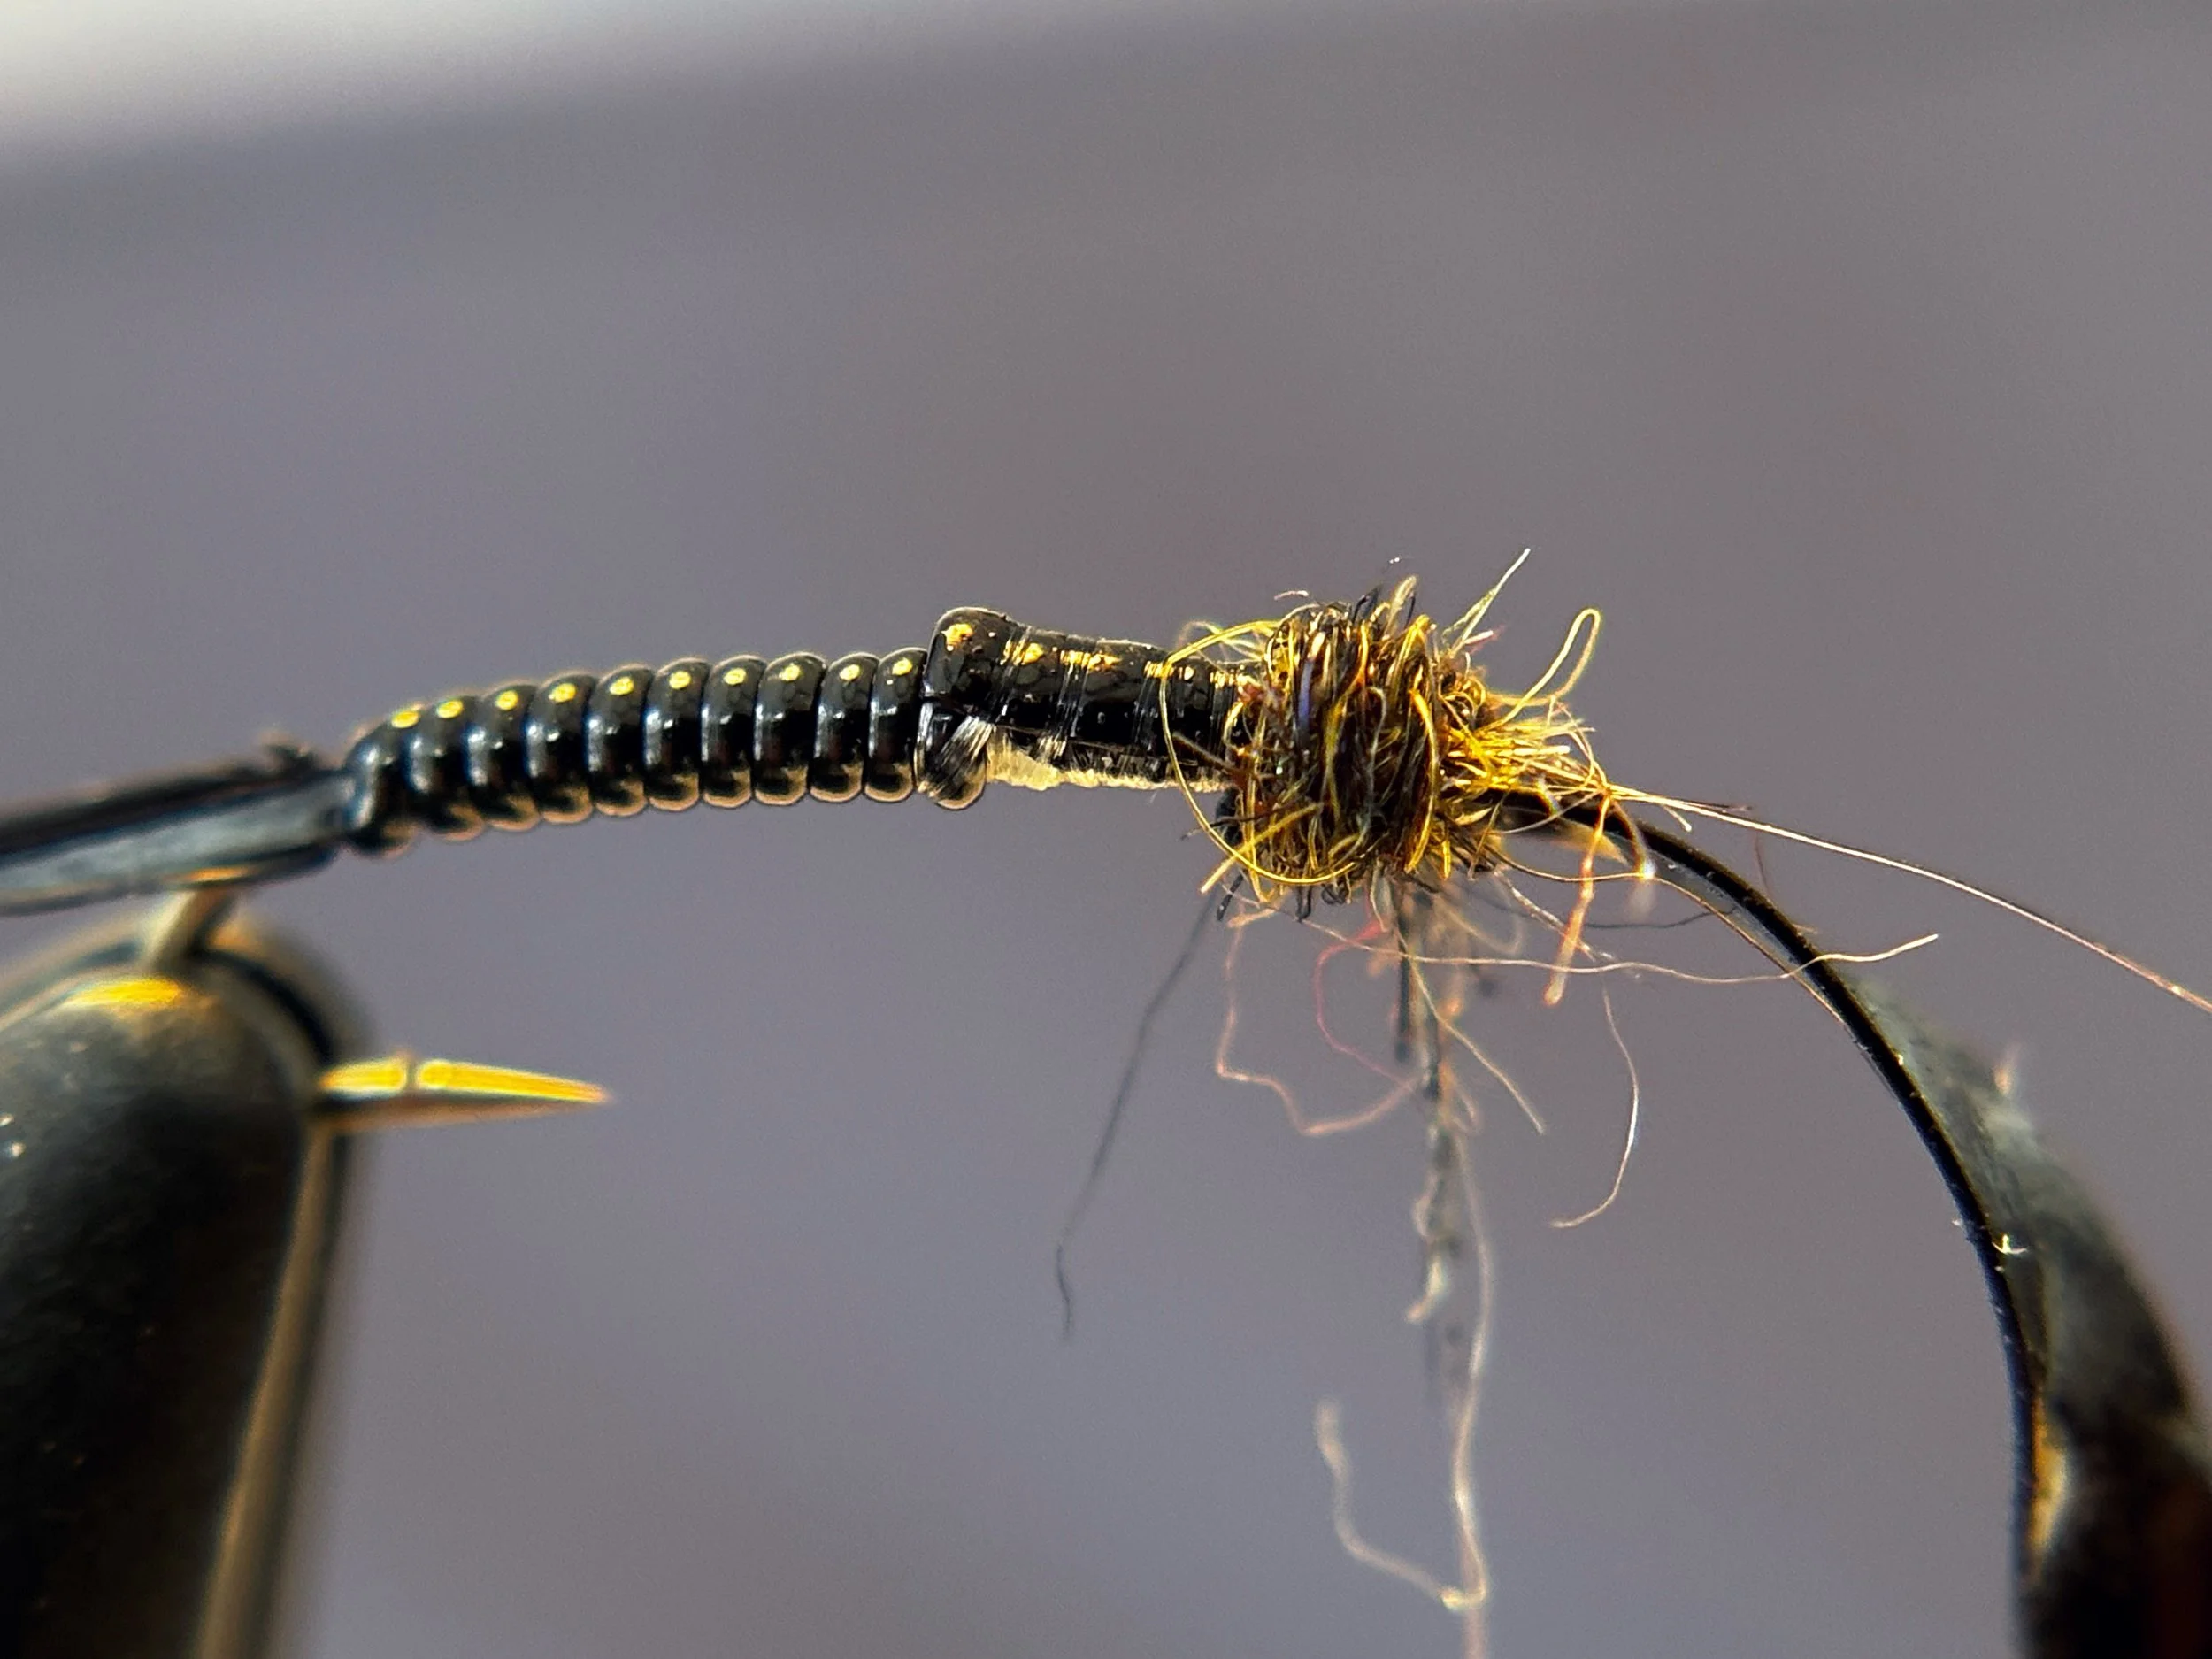
The Early Black Stonefly: Winter’s First Hatch - J. Deshefy Jr.
Although it occurs during the heart of winter, the early Black Stonefly is widely considered the first true aquatic insect hatch of the year in northeastern trout streams. While air temperatures remain cold and surface activity is minimal, trout are already feeding subsurface on these nymphs as they become increasingly active along the river bottom. For anglers willing to fish through winter and into early spring, few insects are more important.
Early black stoneflies belong primarily to the Capniidae and Taeniopterygidae families, insects uniquely adapted to cold, well-oxygenated water. Unlike many mayflies, which remain relatively dormant during winter, stonefly nymphs continue to develop slowly beneath the ice-cold flows. As water temperatures begin to stabilize in the upper 30s to low 40s (°F), nymphal movement increases noticeably, resulting in more frequent drift events and increased trout feeding activity.
This activity is most pronounced during the warmest part of the day. On typical winter days, that window usually falls between late morning and mid-afternoon, when sunlight slightly elevates water temperatures—sometimes by only a degree or two. Those marginal increases are often enough to trigger stonefly movement, especially in riffle transitions, inside seams, and along the softer edges of faster current. Trout respond by feeding tight to the bottom, conserving energy while targeting drifting nymphs.
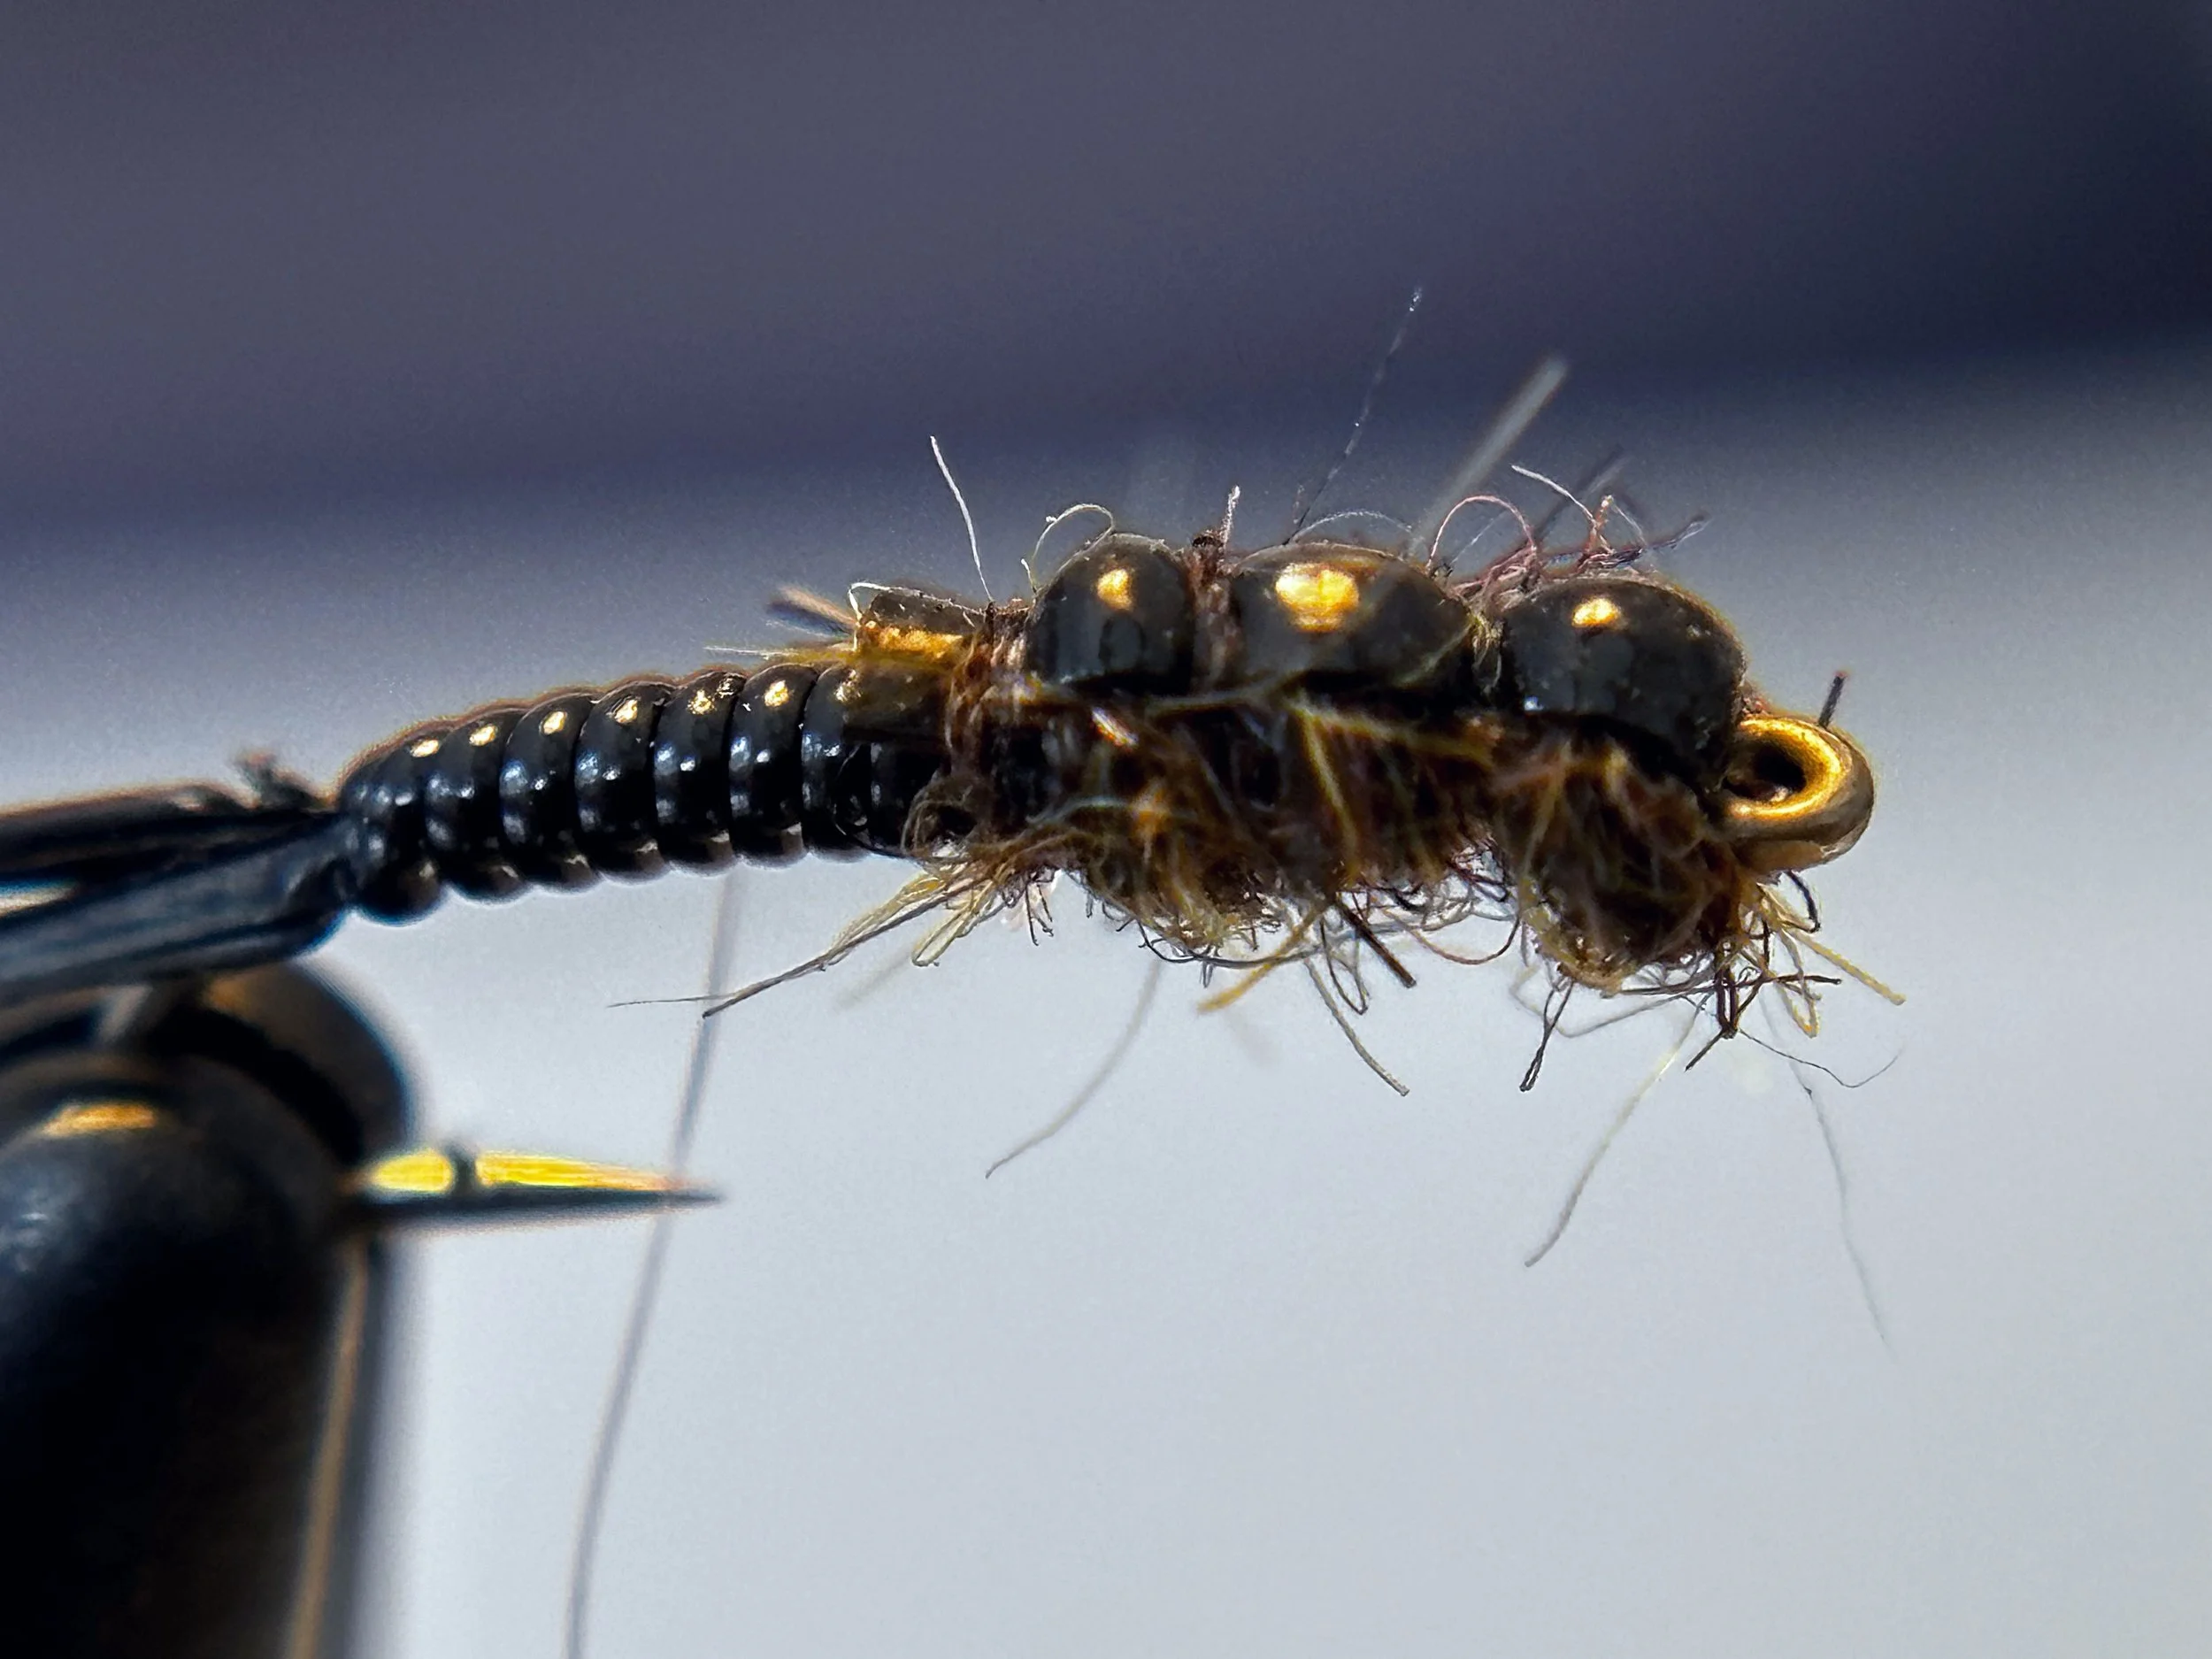
From a biological standpoint, early black stonefly nymphs are defined by their slim, elongated bodies, dark coloration, and distinct segmentation. Strong legs allow them to cling to rock and gravel substrates, but when dislodged, they tumble naturally along the streambed. This behavior makes them highly vulnerable to trout and exceptionally effective to imitate with weighted nymph patterns.
During winter and early spring, food sources are limited, and trout rarely pass up an easy, protein-rich meal. The early Black Stonefly fills that role consistently. Patterns that emphasize a narrow profile, dark silhouette, subtle segmentation, and proper weight to maintain bottom contact closely match the natural insect and excel when other options fail.
For anglers fishing cold water, the early Black Stonefly is not a secondary or situational pattern—it is a foundational one. Carrying several variations of this nymph can mean the difference between a slow winter day and consistent success when conditions are at their most challenging
Step 1
Place a Dai-Riki size 18 (or hook of preference)securely in your tying vise.
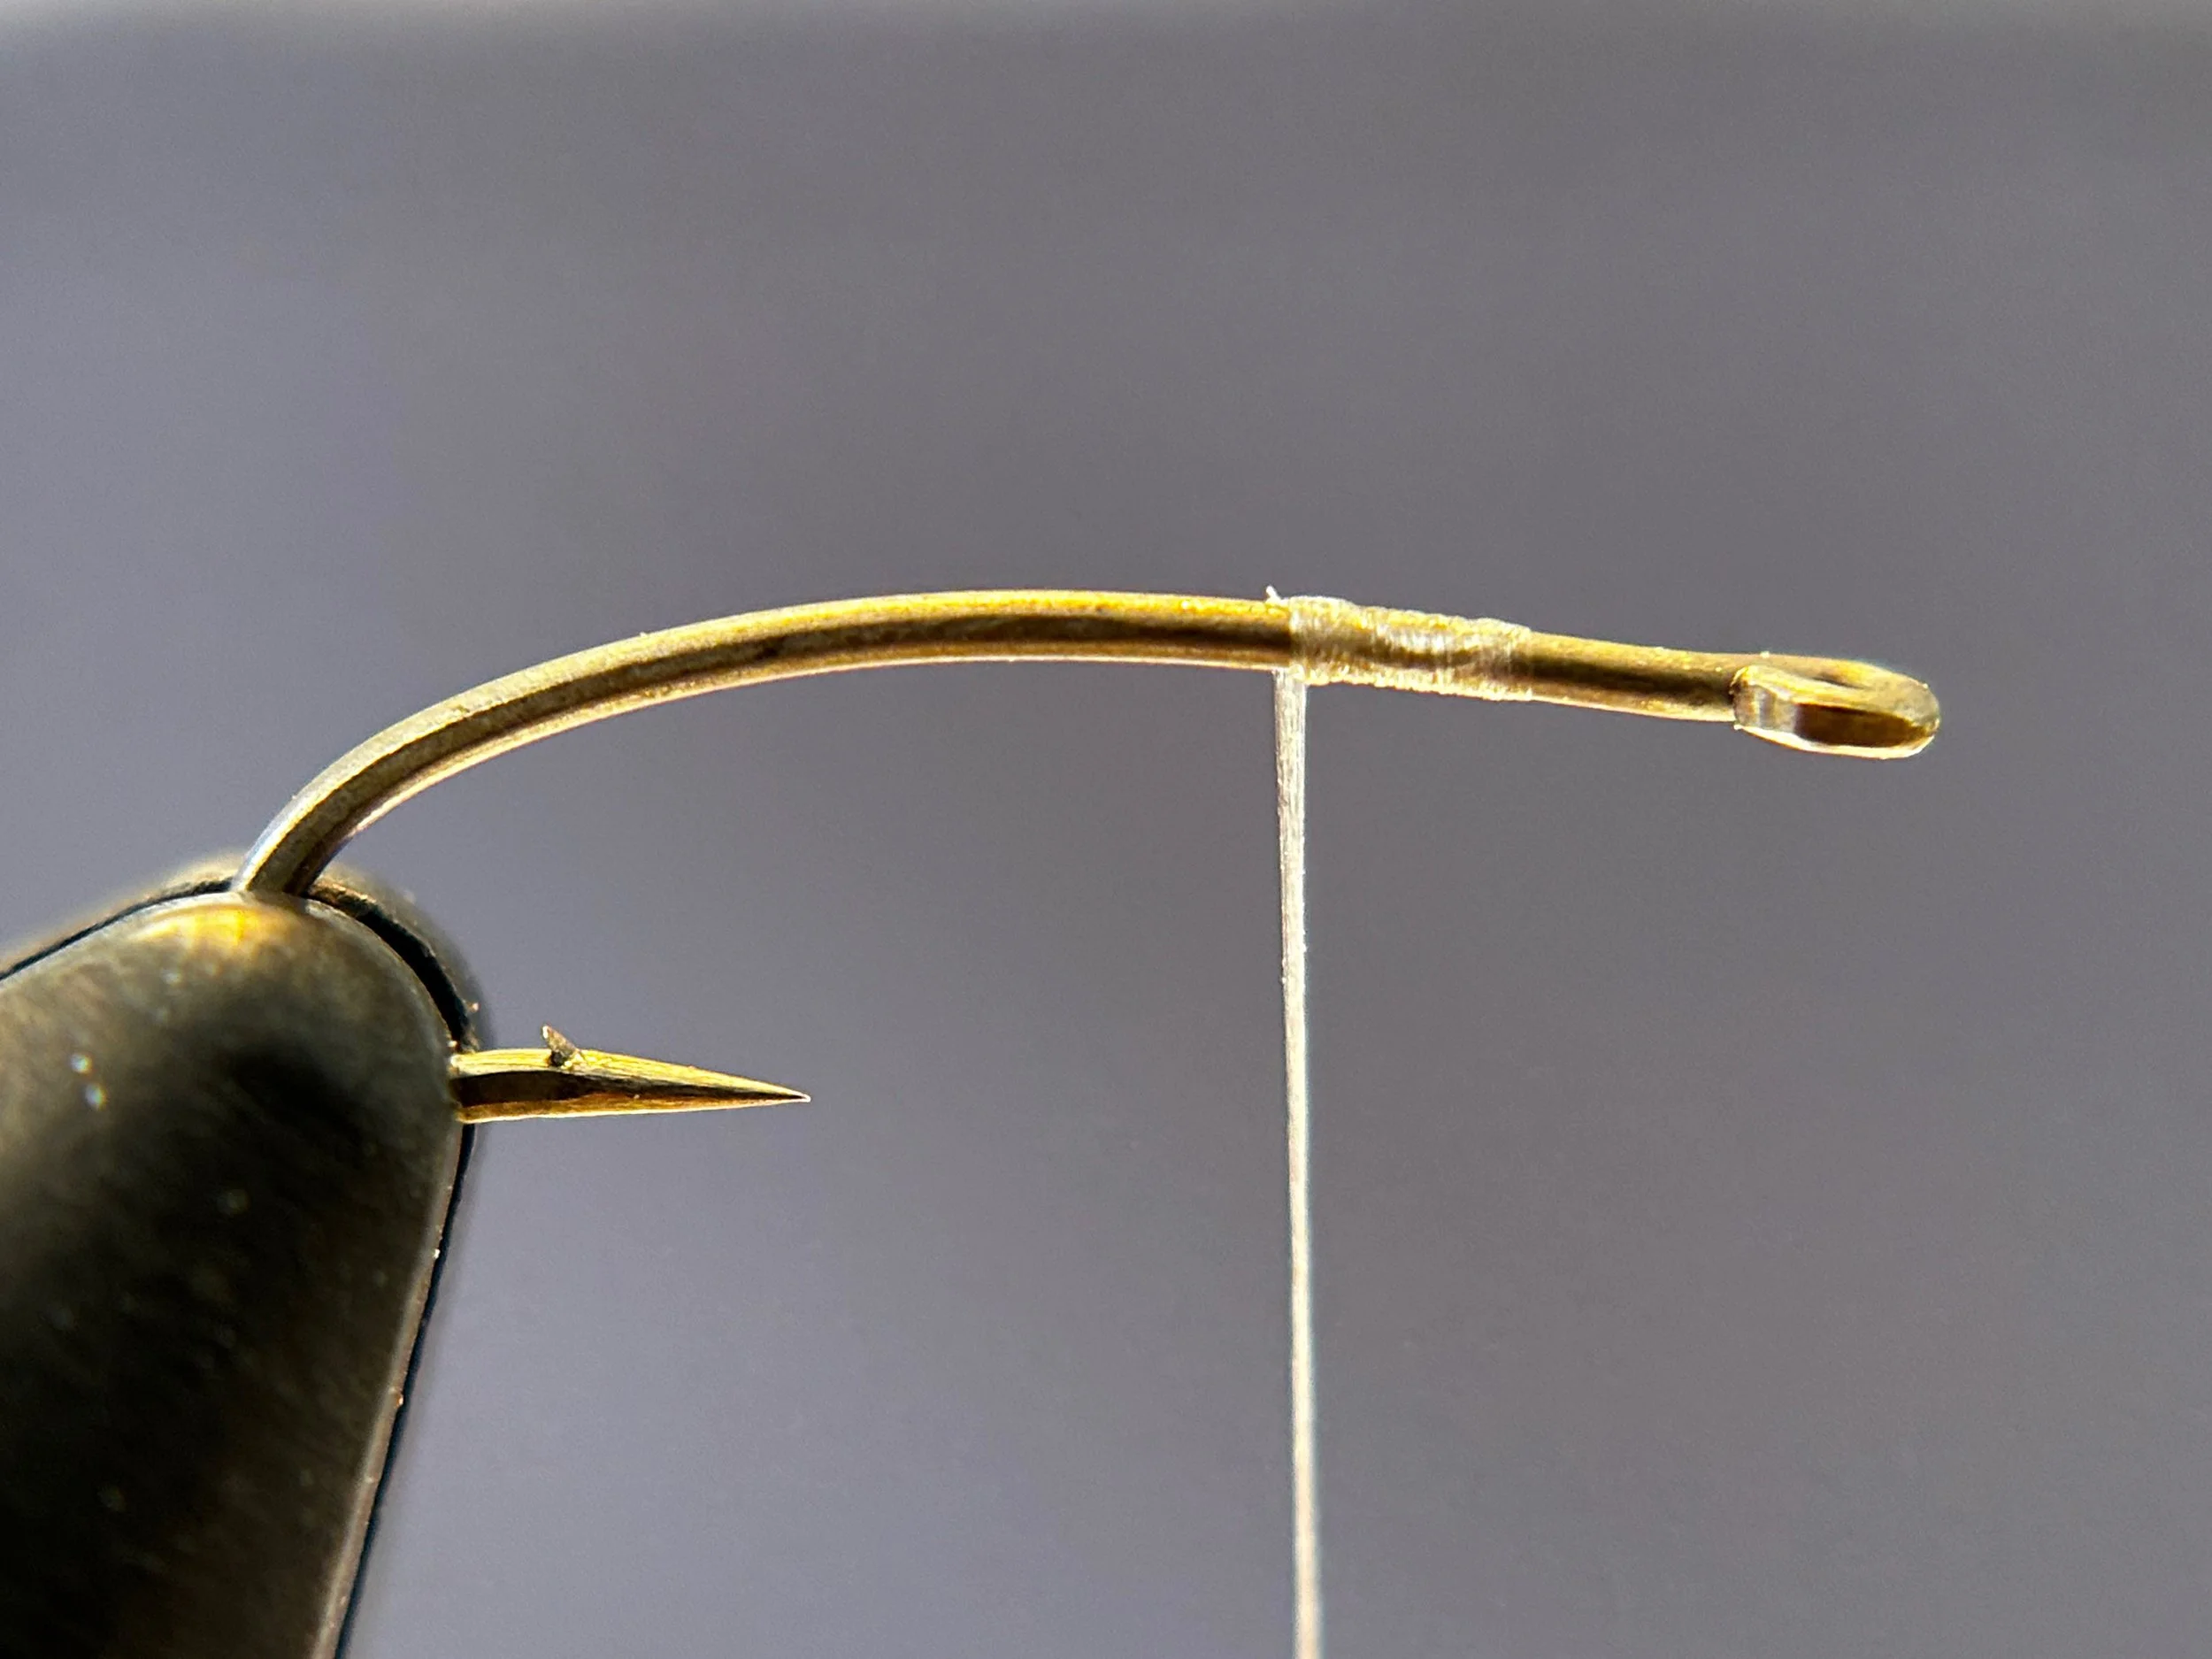
Step 2
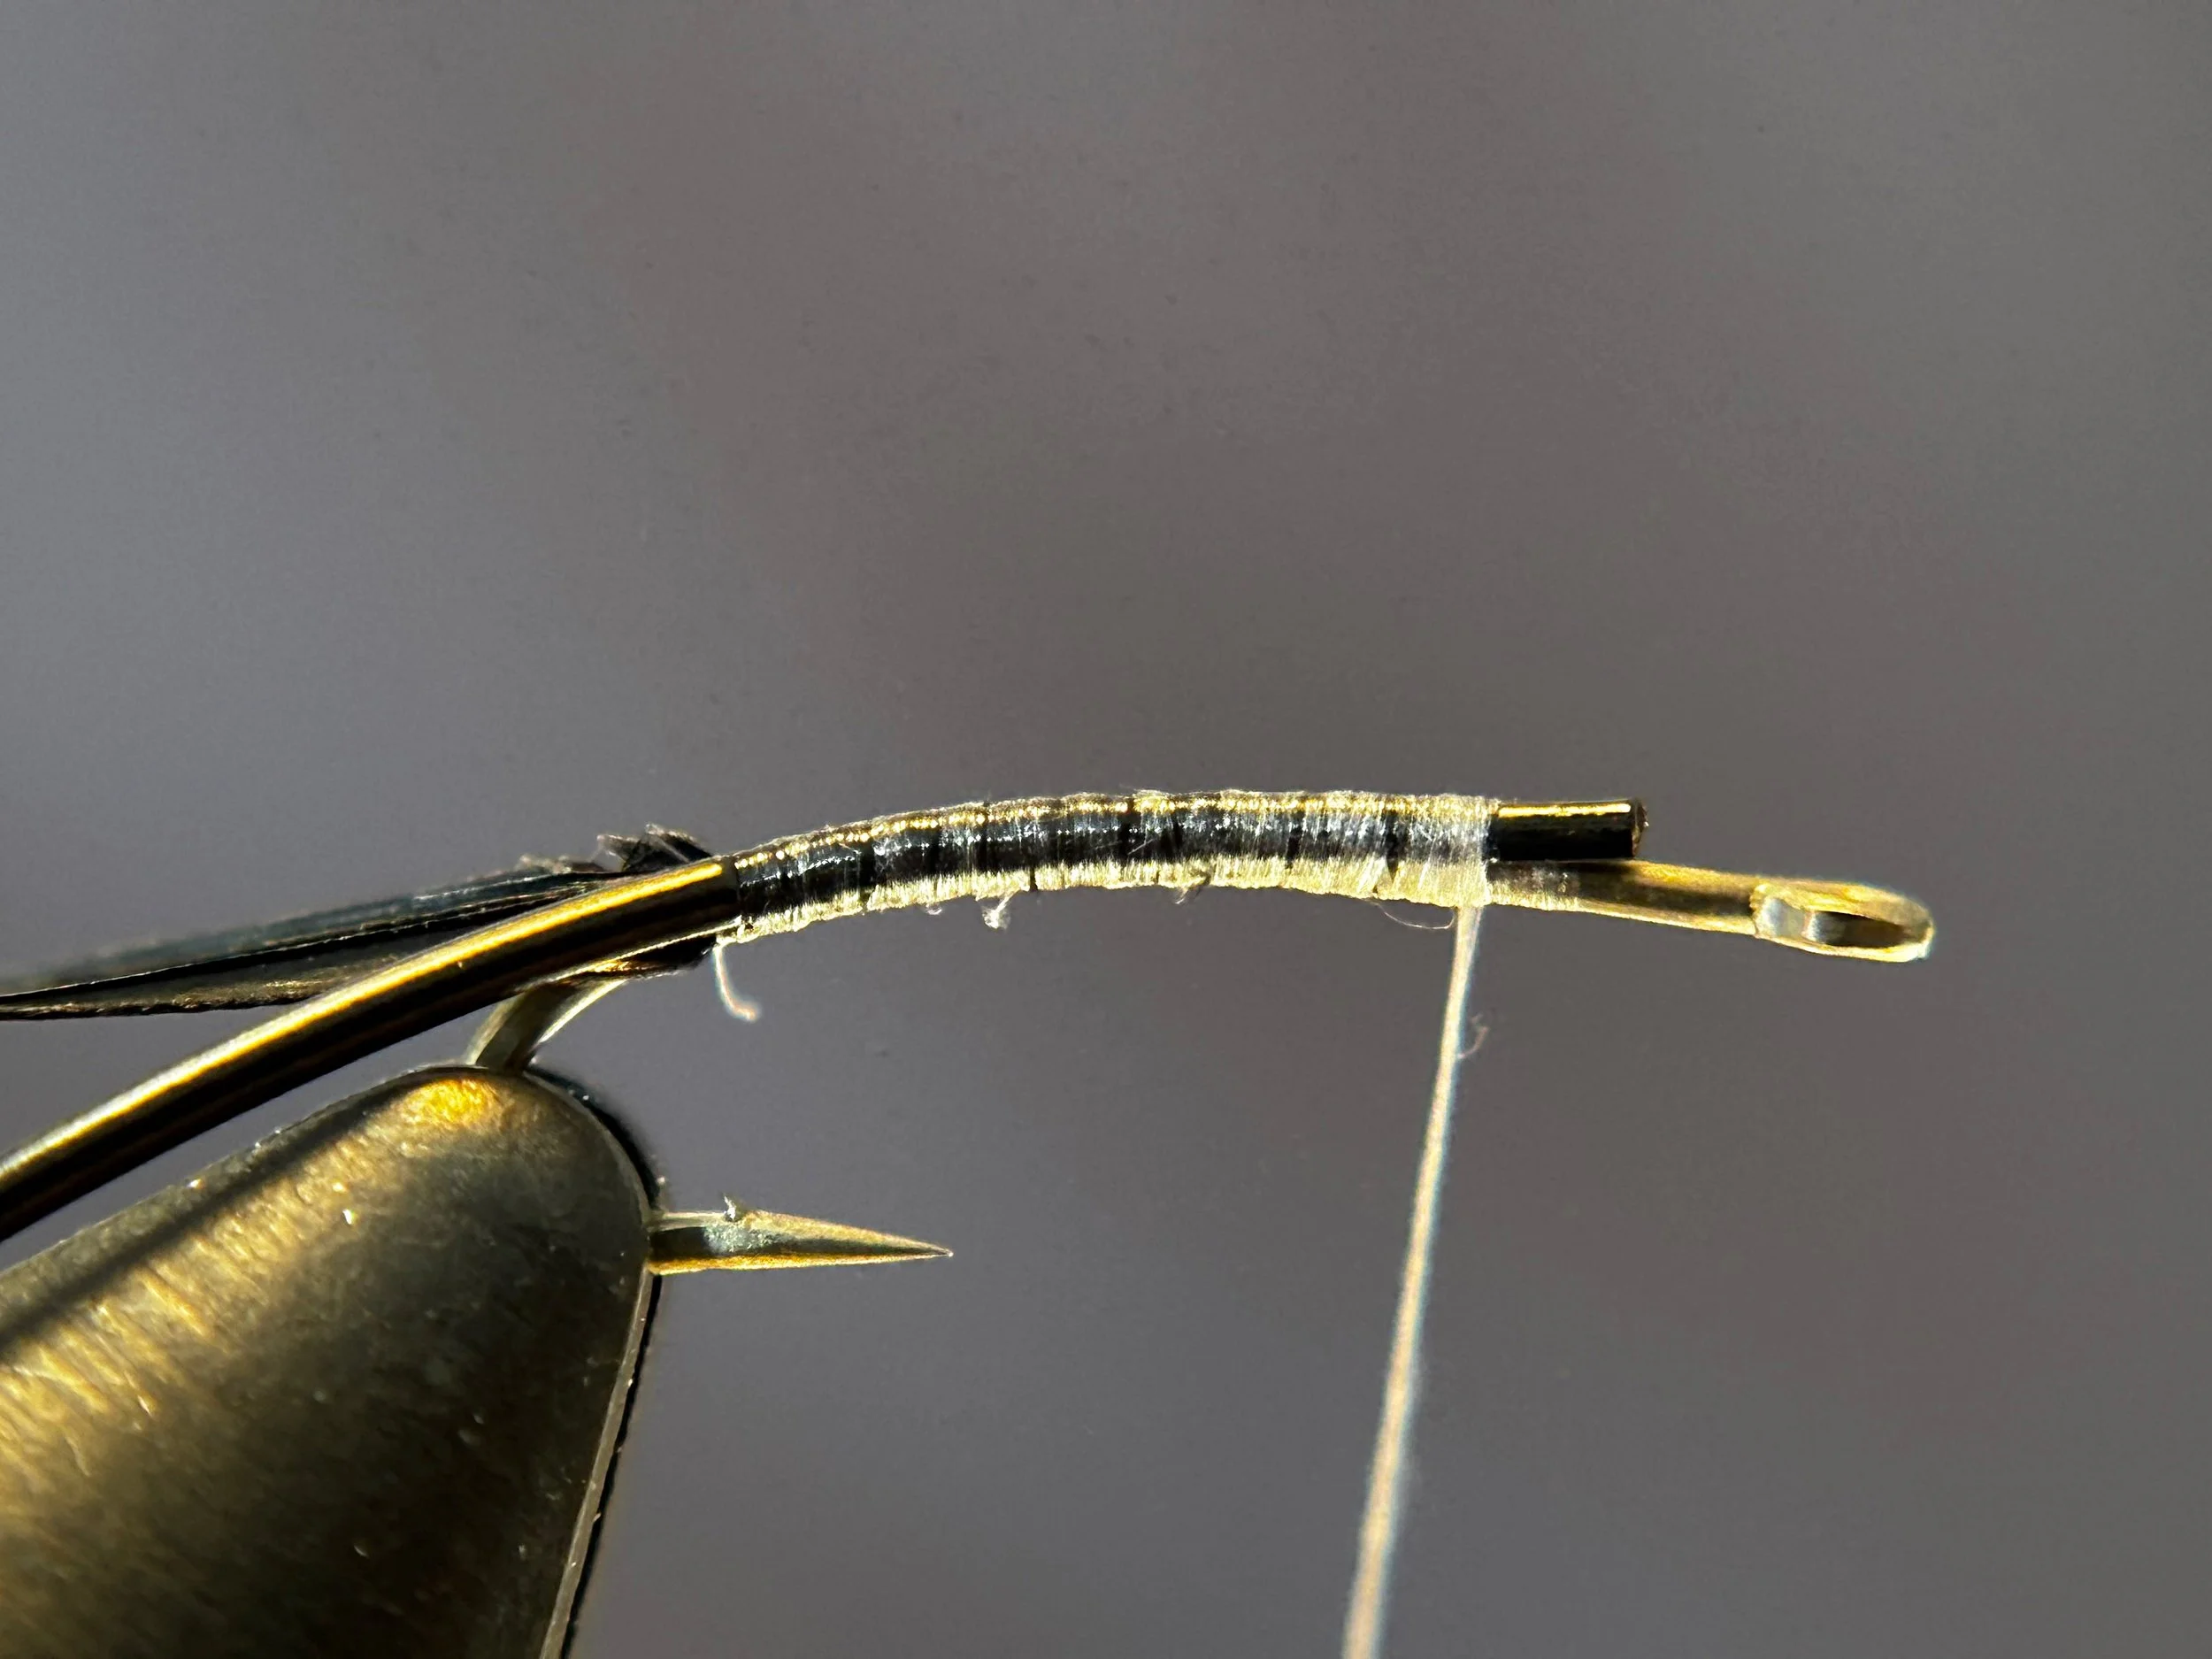
Start your thread Semperfli Nano Silk 30 Denier/18/0 in this case, one hook-eye length behind the eye. (If black thread is unavailable, white thread may be used and darkened with a black permanent marker.) Build a smooth thread base with touching wraps down the shank to the barb of the hook.
Step 3
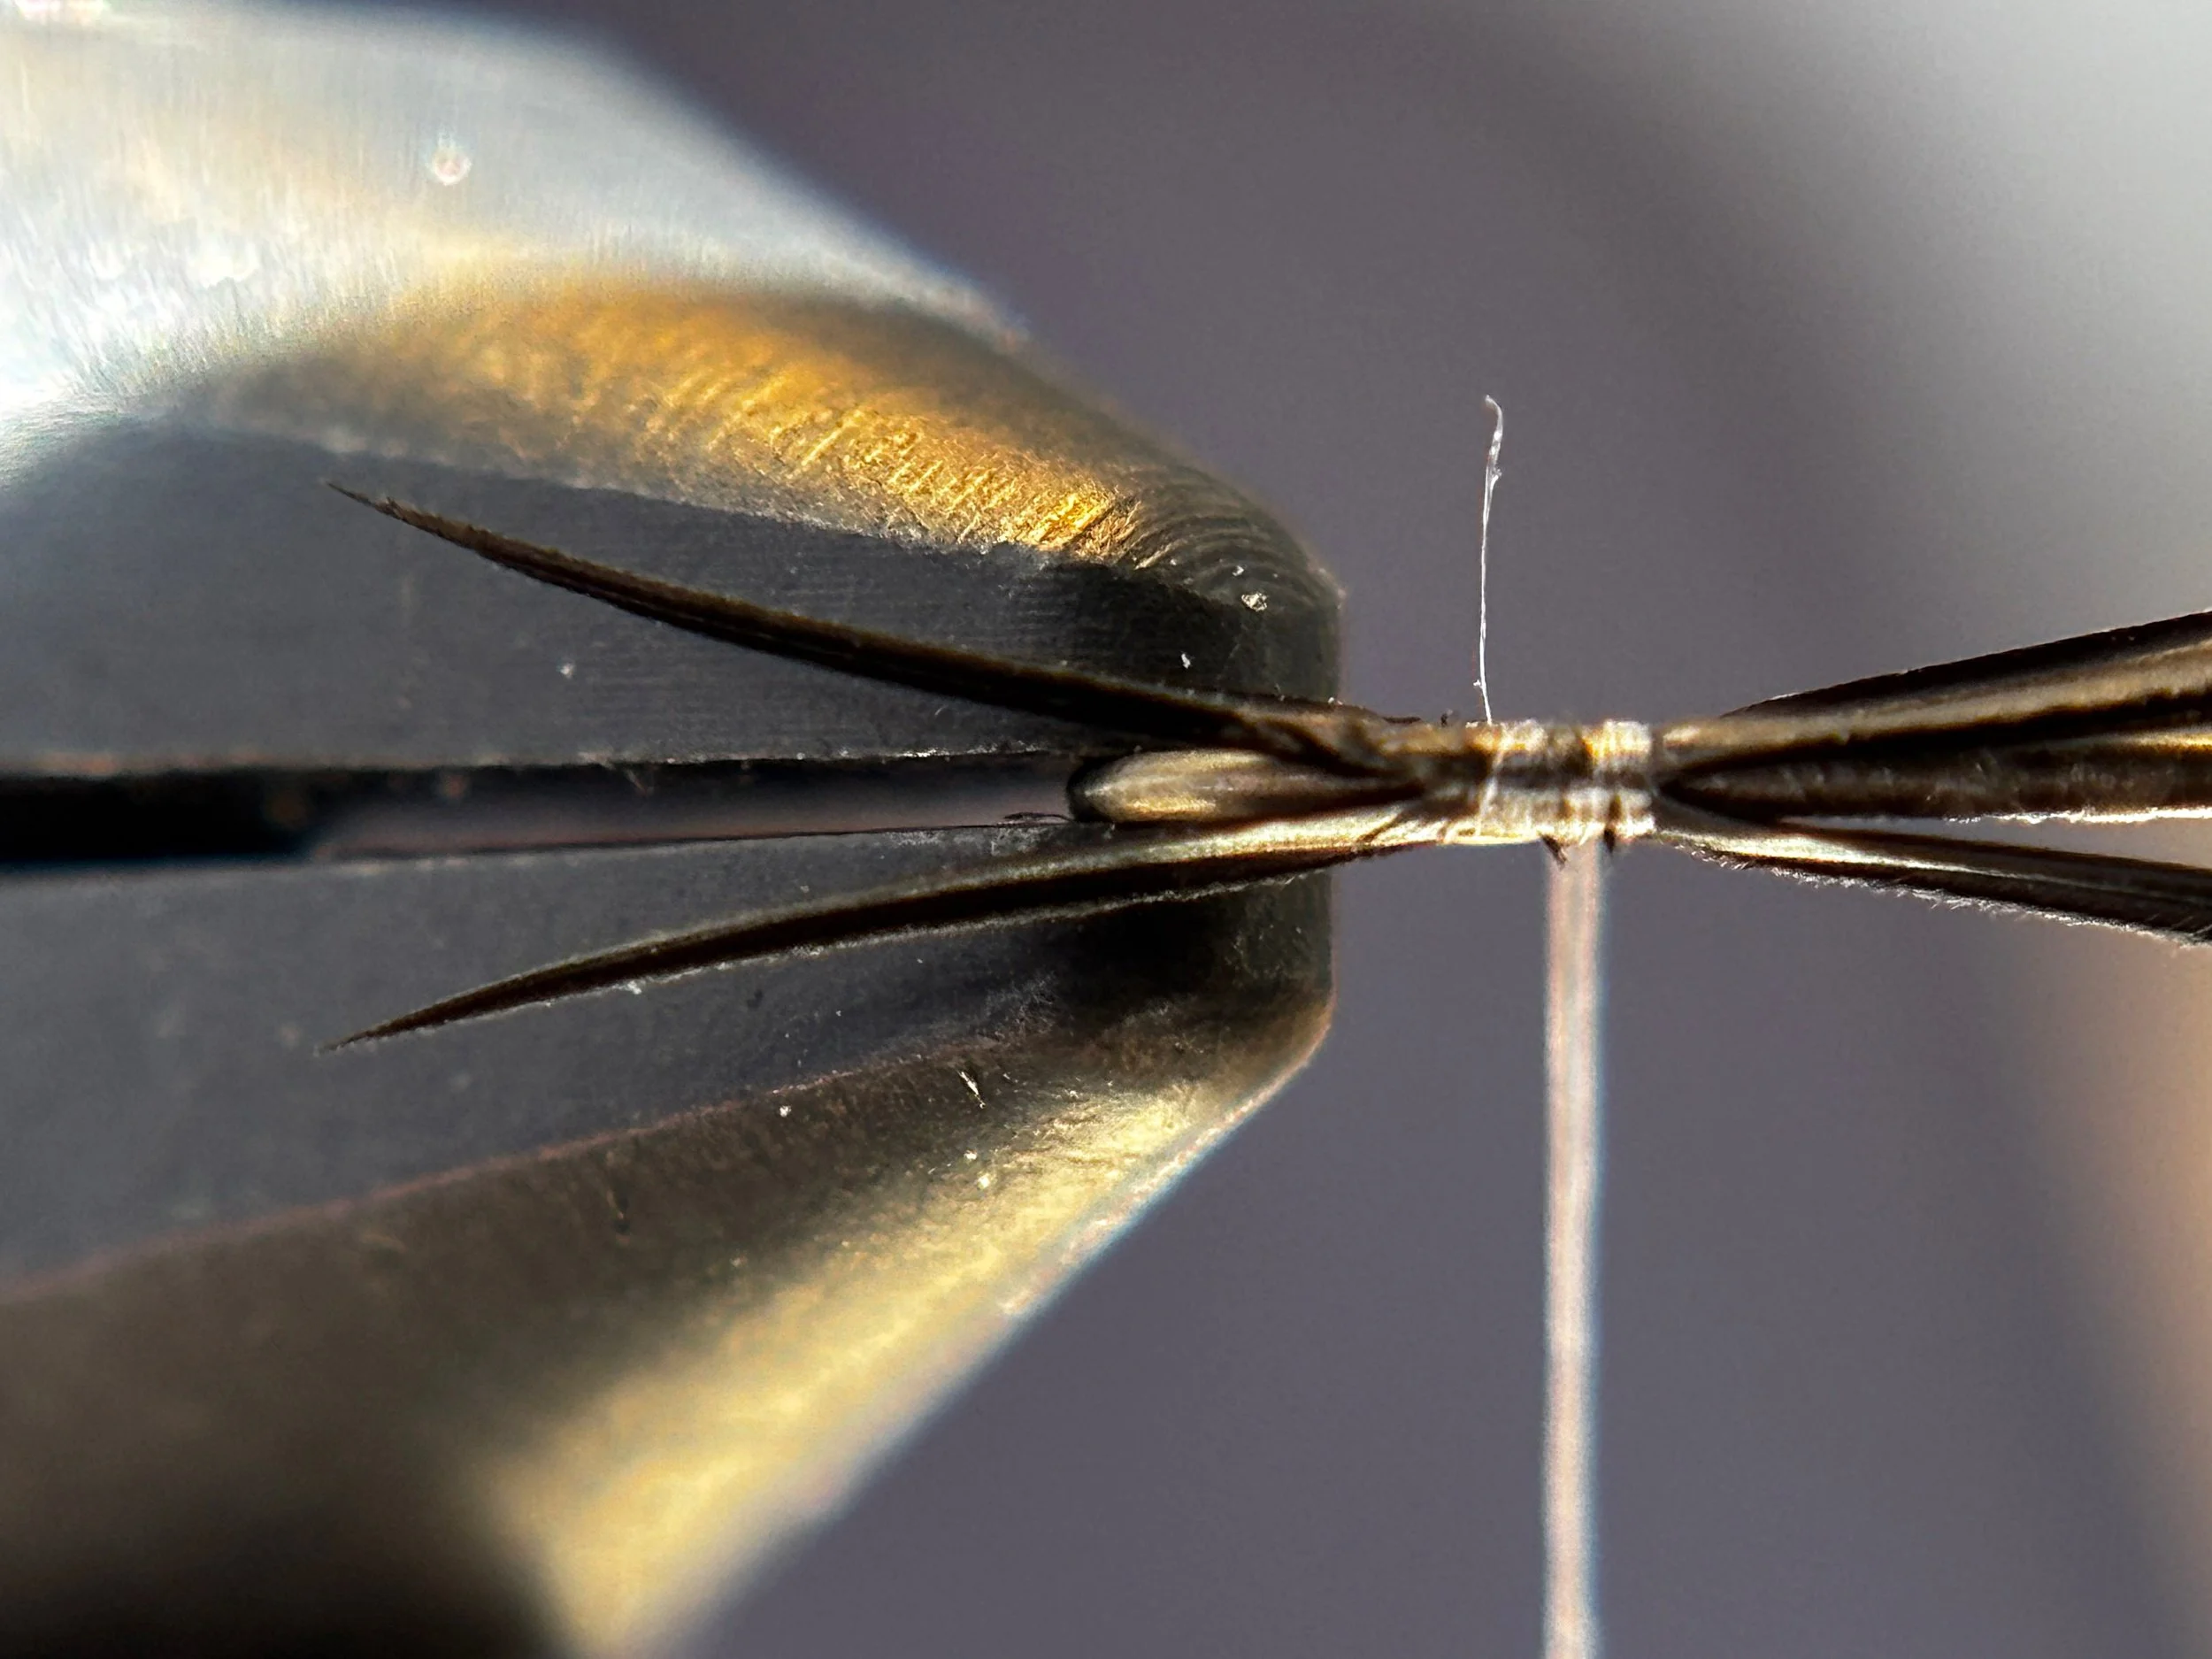
Tie in two black goose biots at the rear of the hook, positioning them to extend approximately half the length of the hook shank. Secure firmly, then return the thread forward to the original tie in position just behind the hook eye.
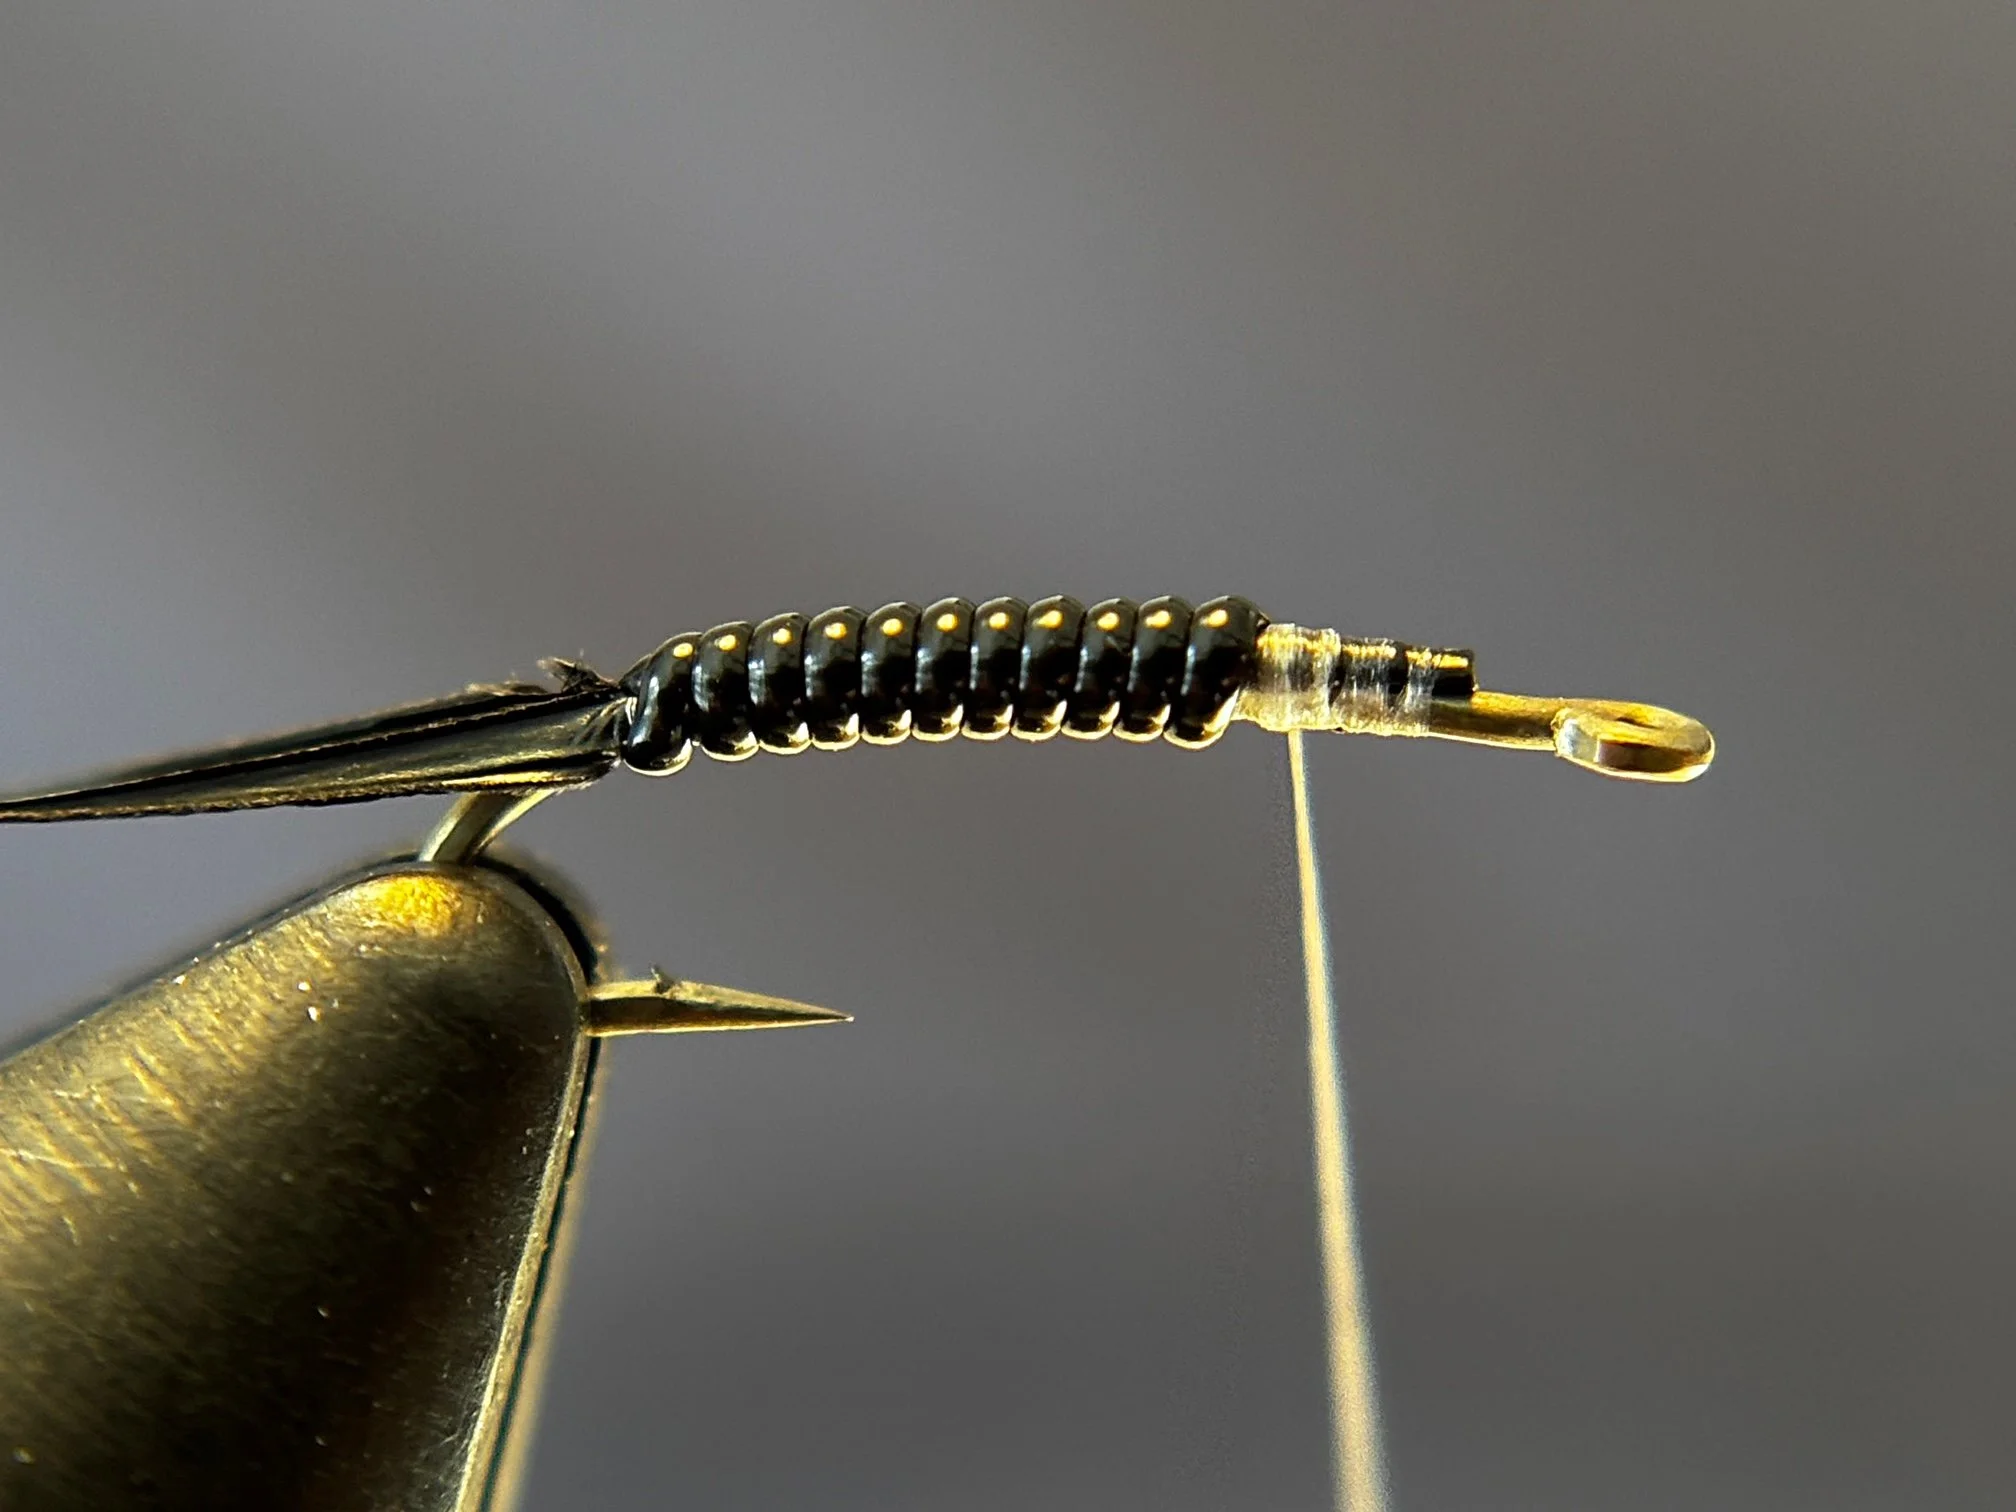
Step 4
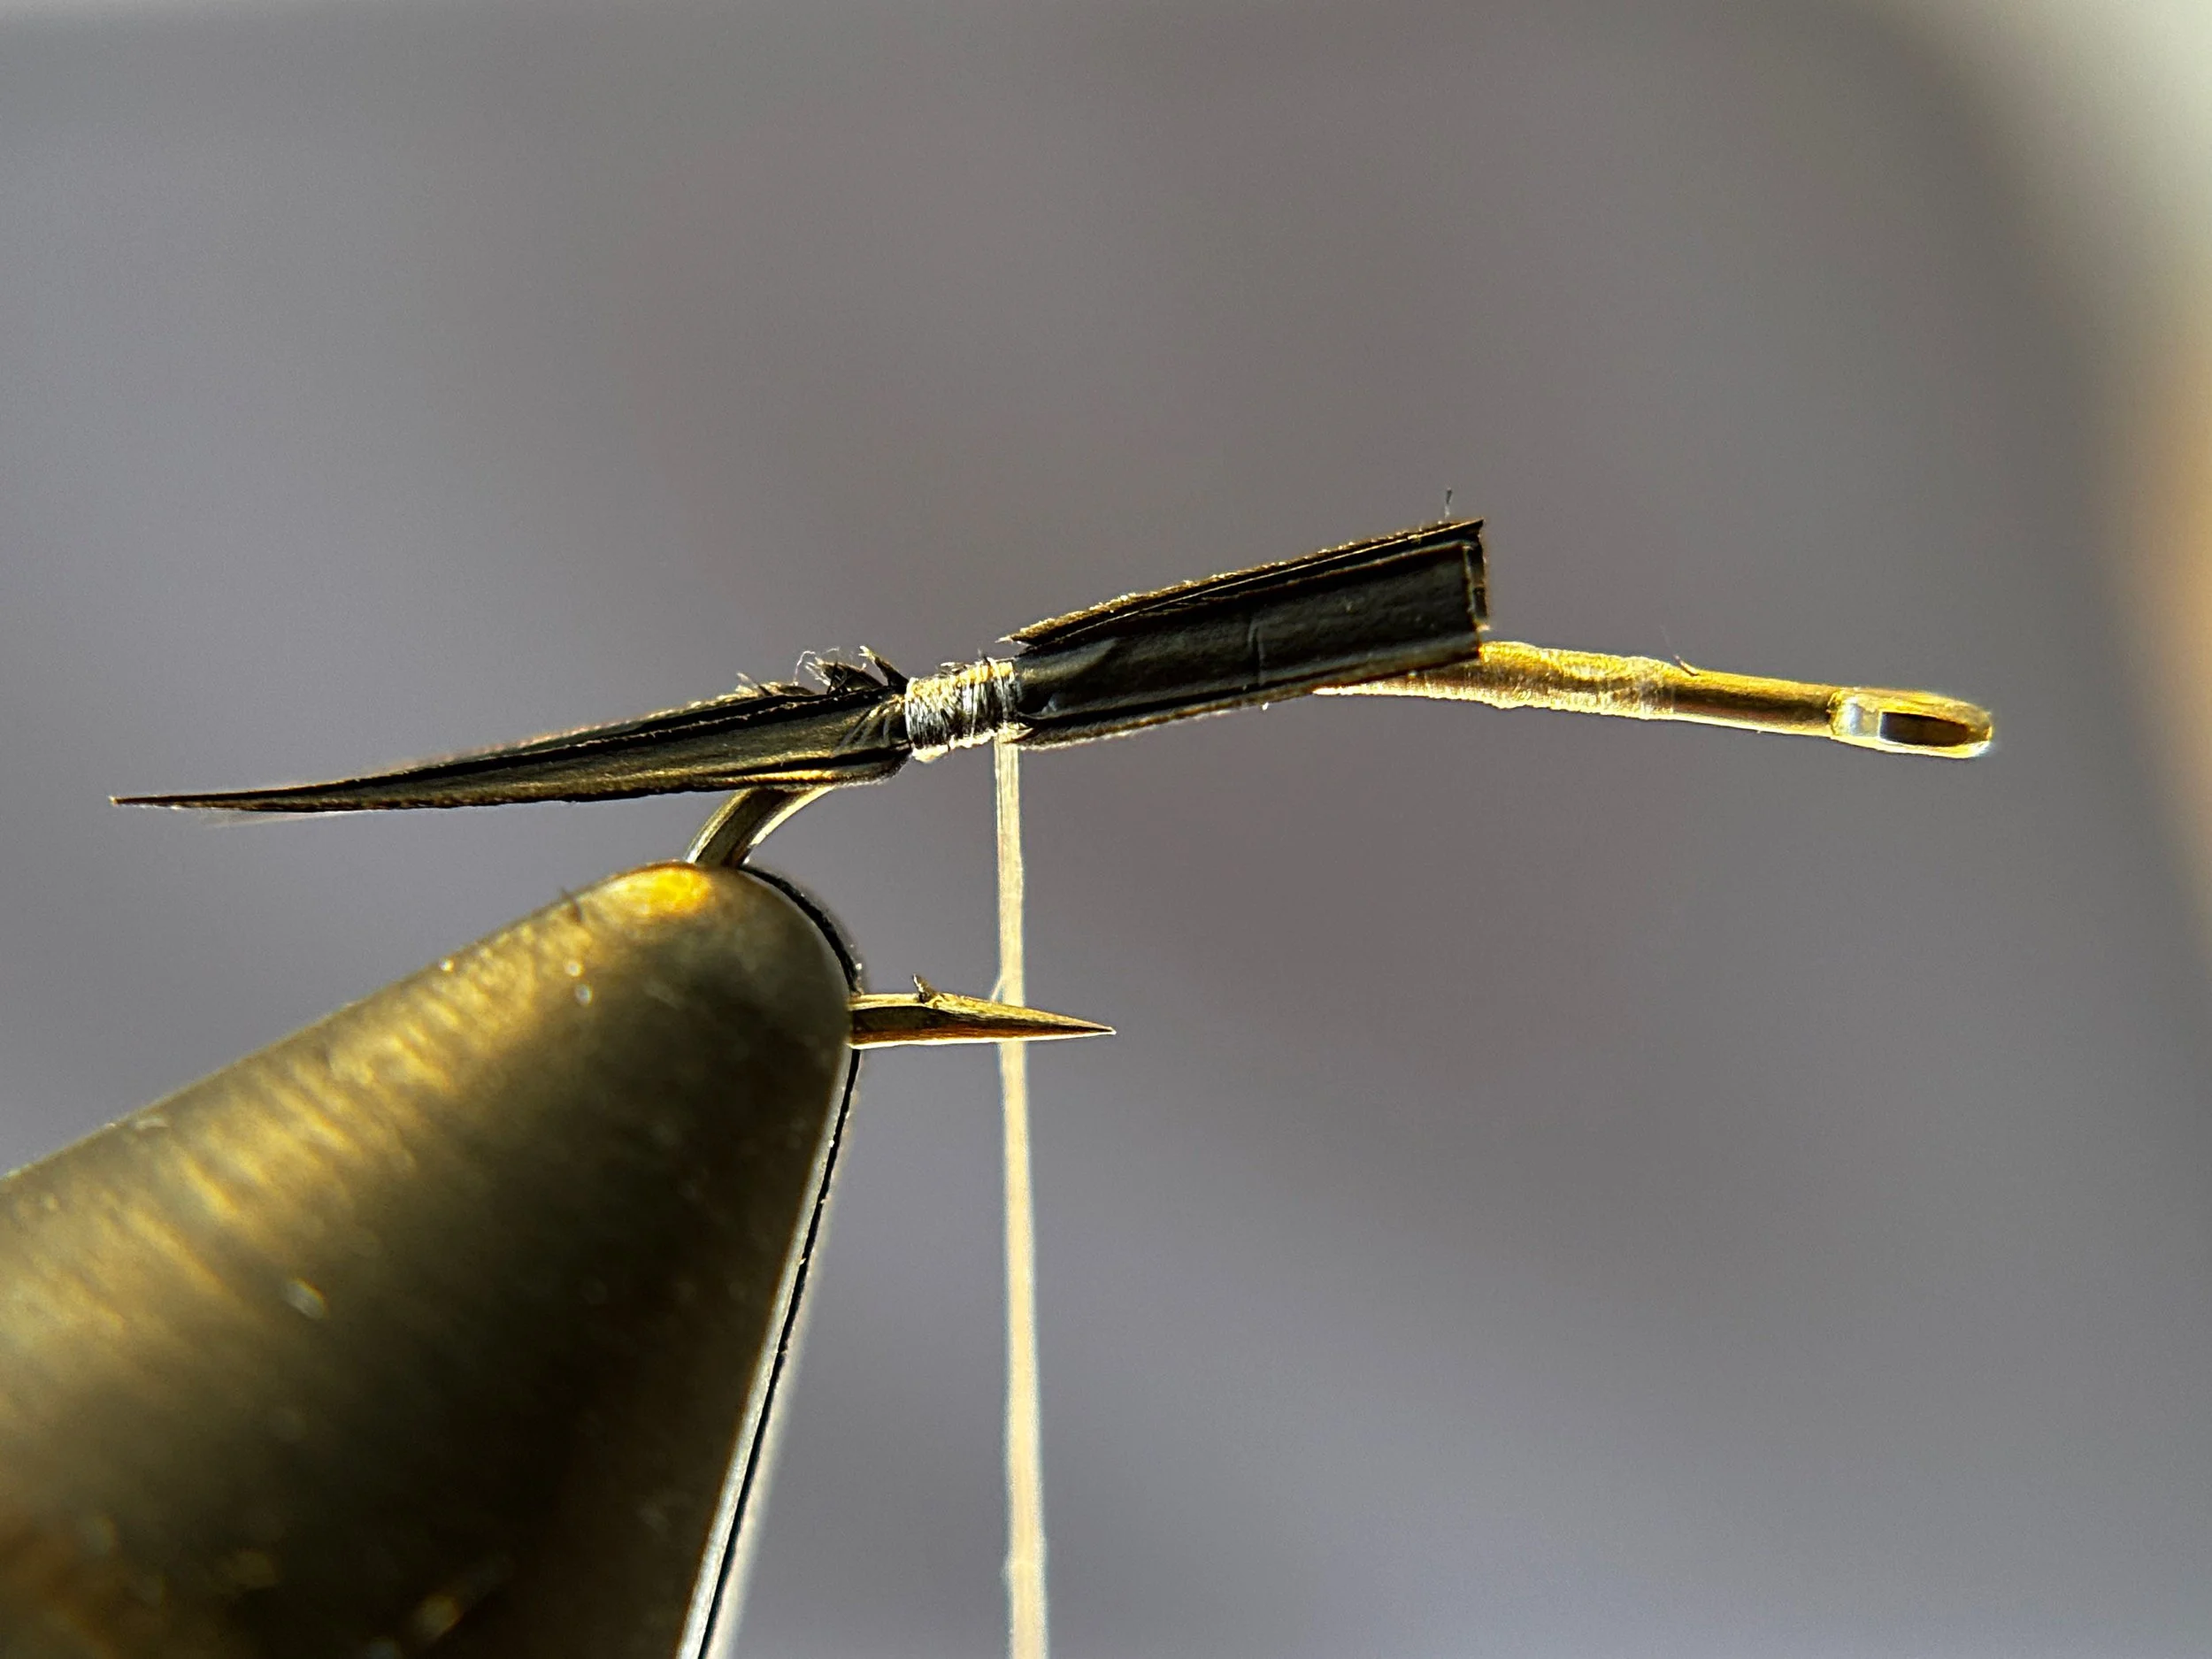
Tie in a short length of UTC Vinyl Rib, size Medium, in black. Secure the material and bind it down smoothly along the shank, stopping just short of the goose biots.
Step 5
Return the thread forward to just behind the hook eye, maintaining a clean, even thread base.
Step 6
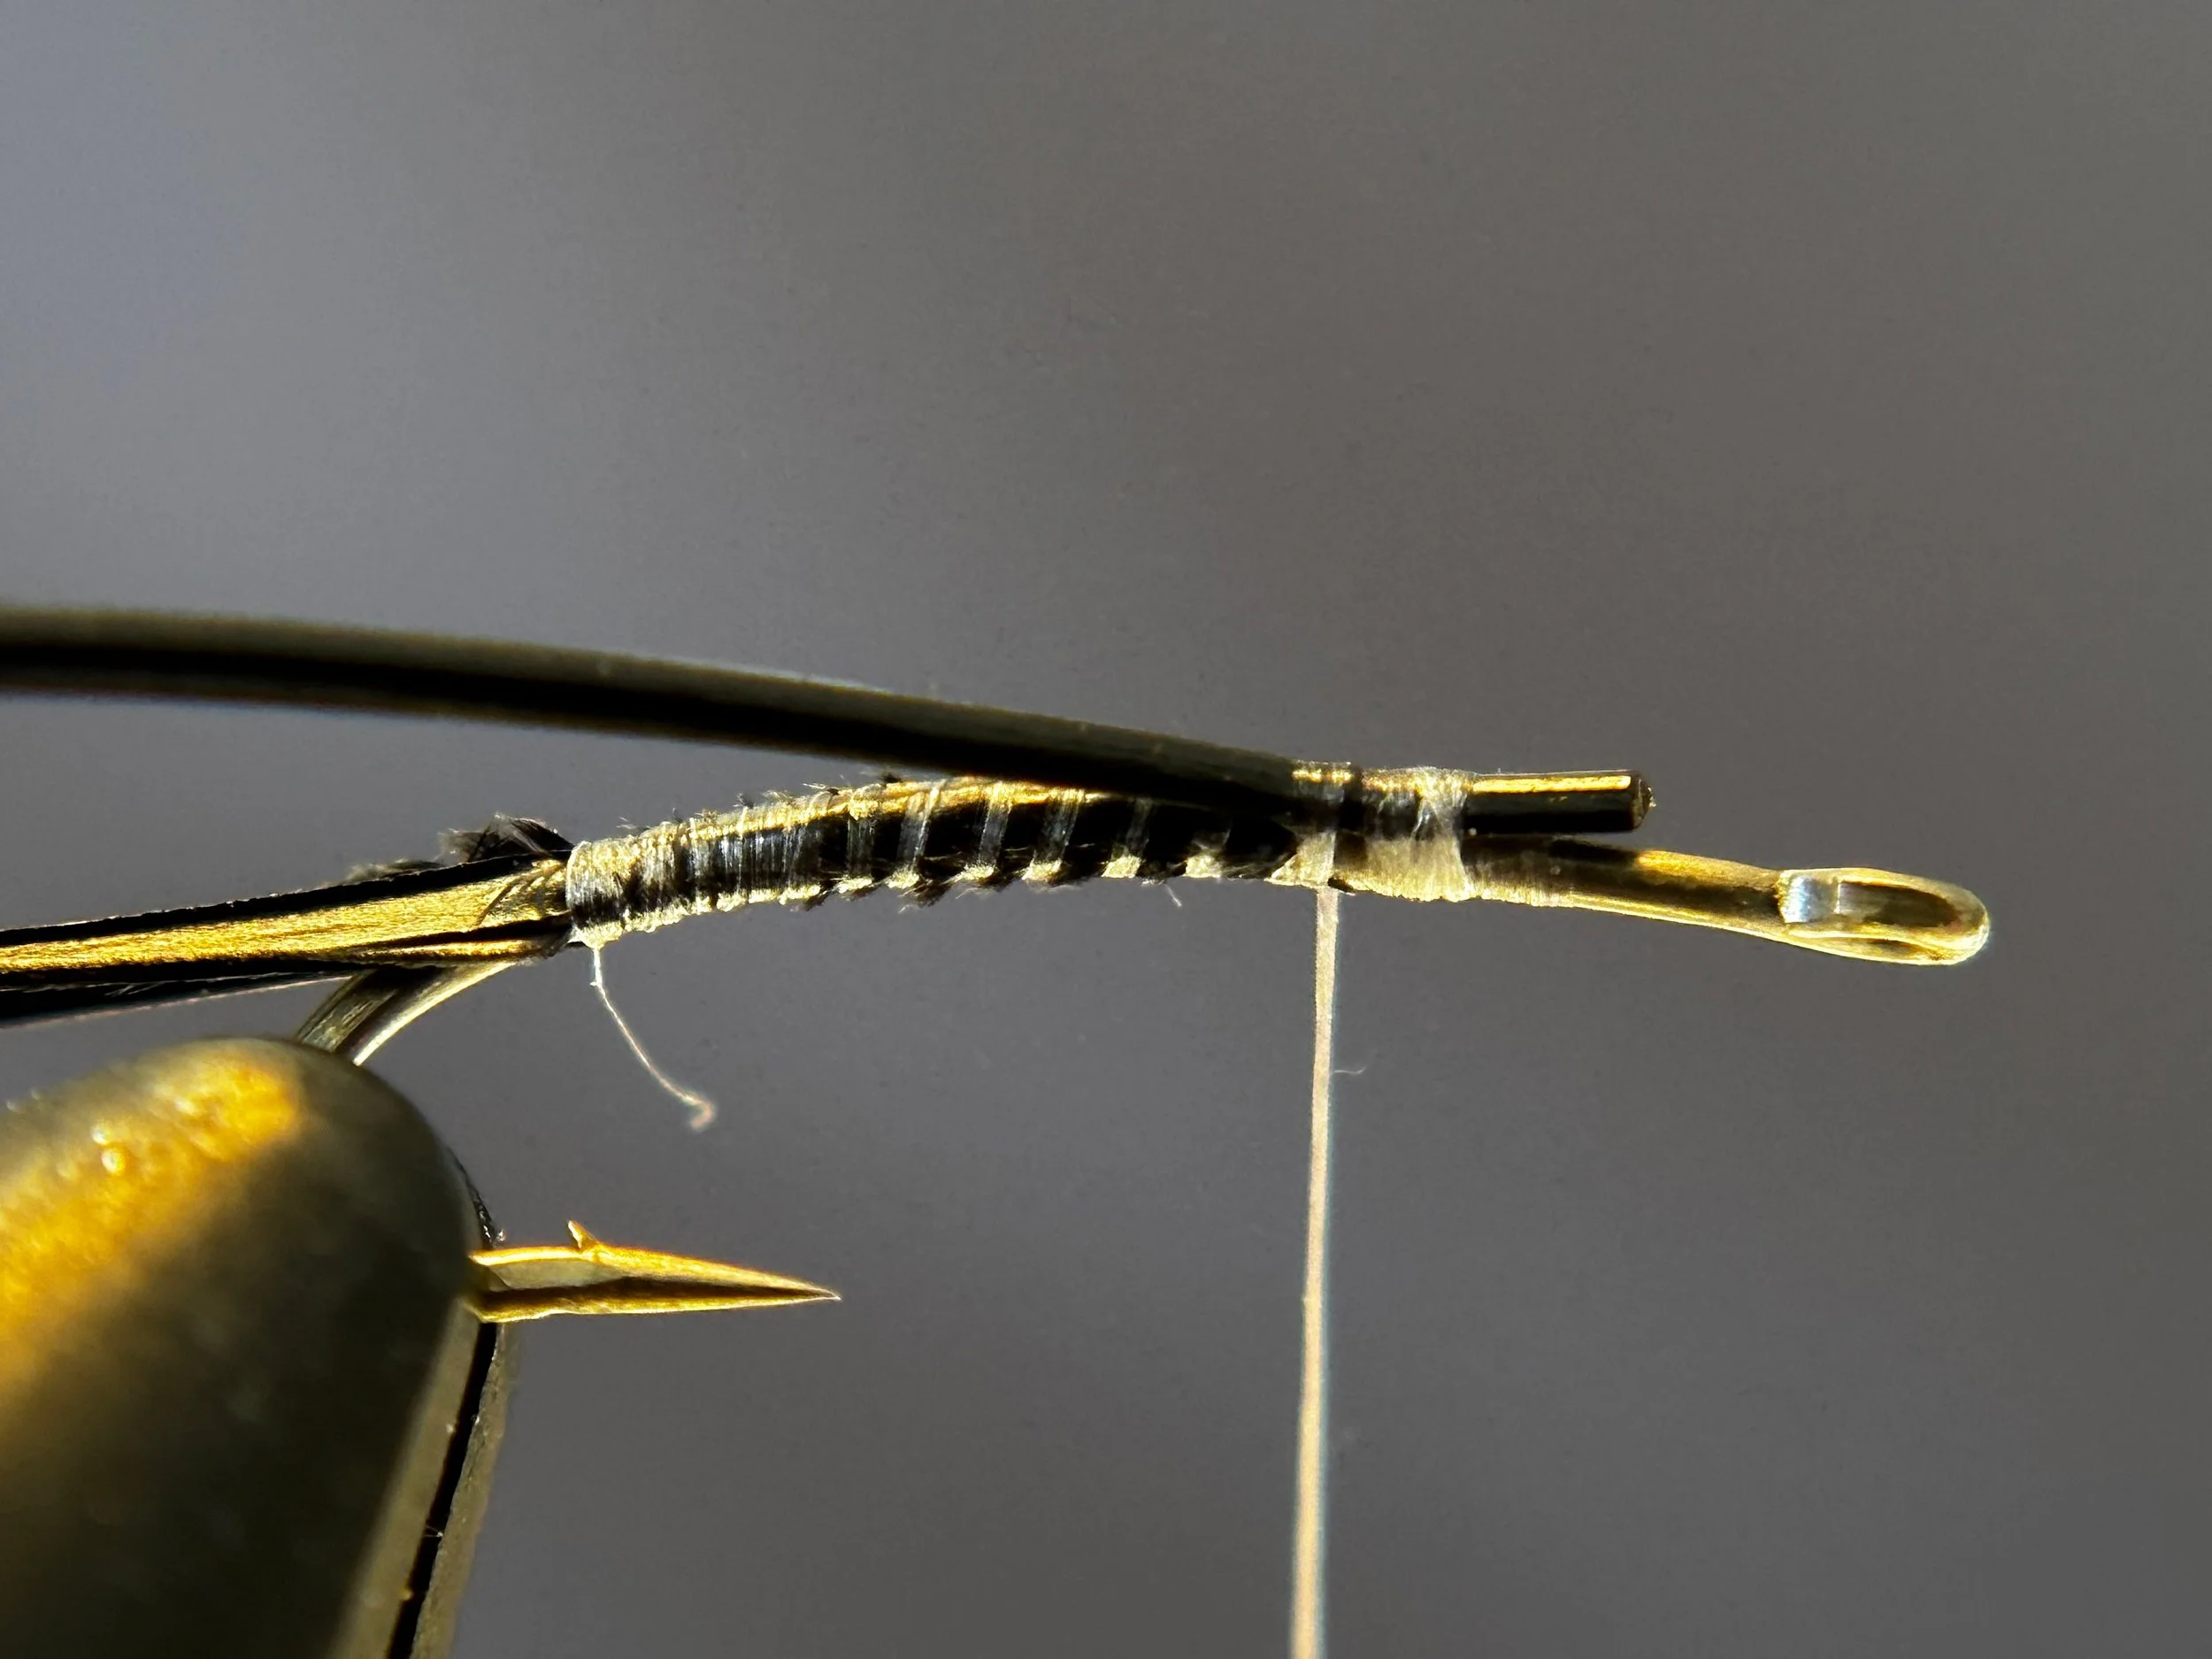
Wrap the vinyl rib forward using firm pressure to slightly condense the material. As segmentation progresses, gradually ease the pressure to allow the rib to widen subtly. Make approximately 10–12 wrapsto form the segmented abdomen and secure the material with a few tight wraps.
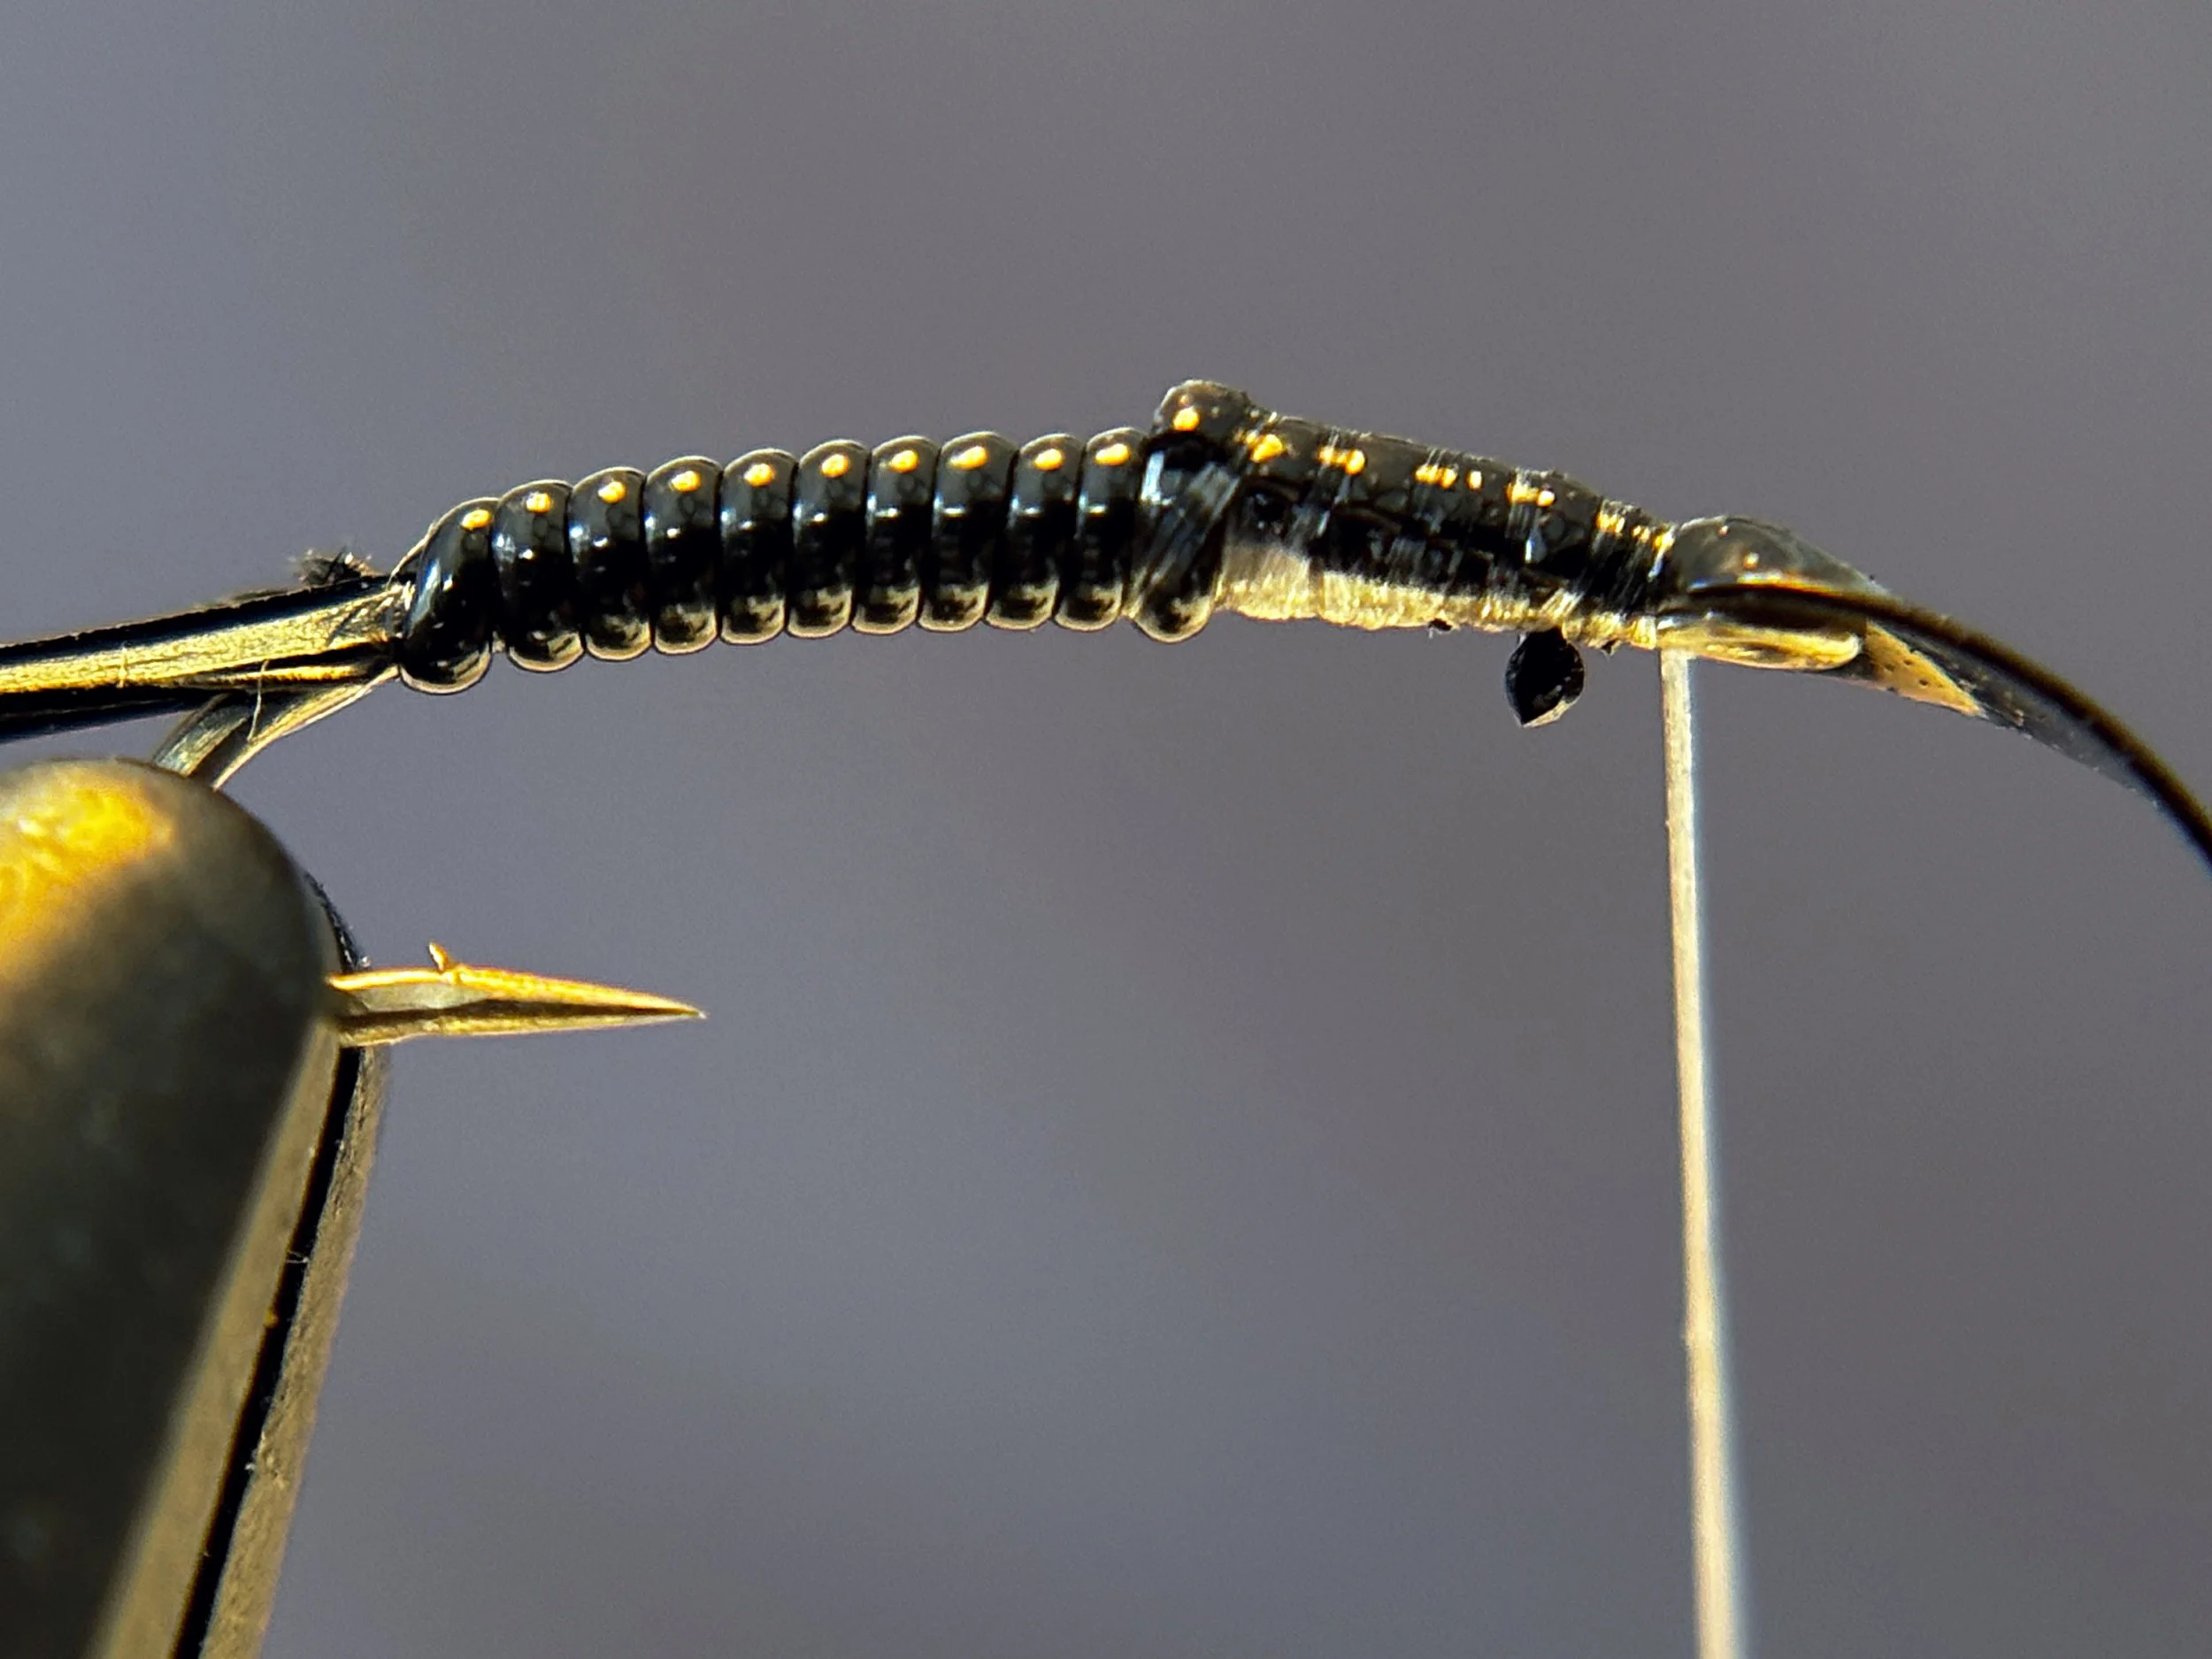
Step 7
Trim any remaining vinyl rib tag ends. Tie in a strip of Wapsi 2mm Black Stone Scud Back where the Vinyl rib ended and bind it rearward along the top of the fly towards the bend of the hook and stop just short of the halfway point, reverse direction and bind the scud back forward again, stopping just behind the hook eye.
Step 8
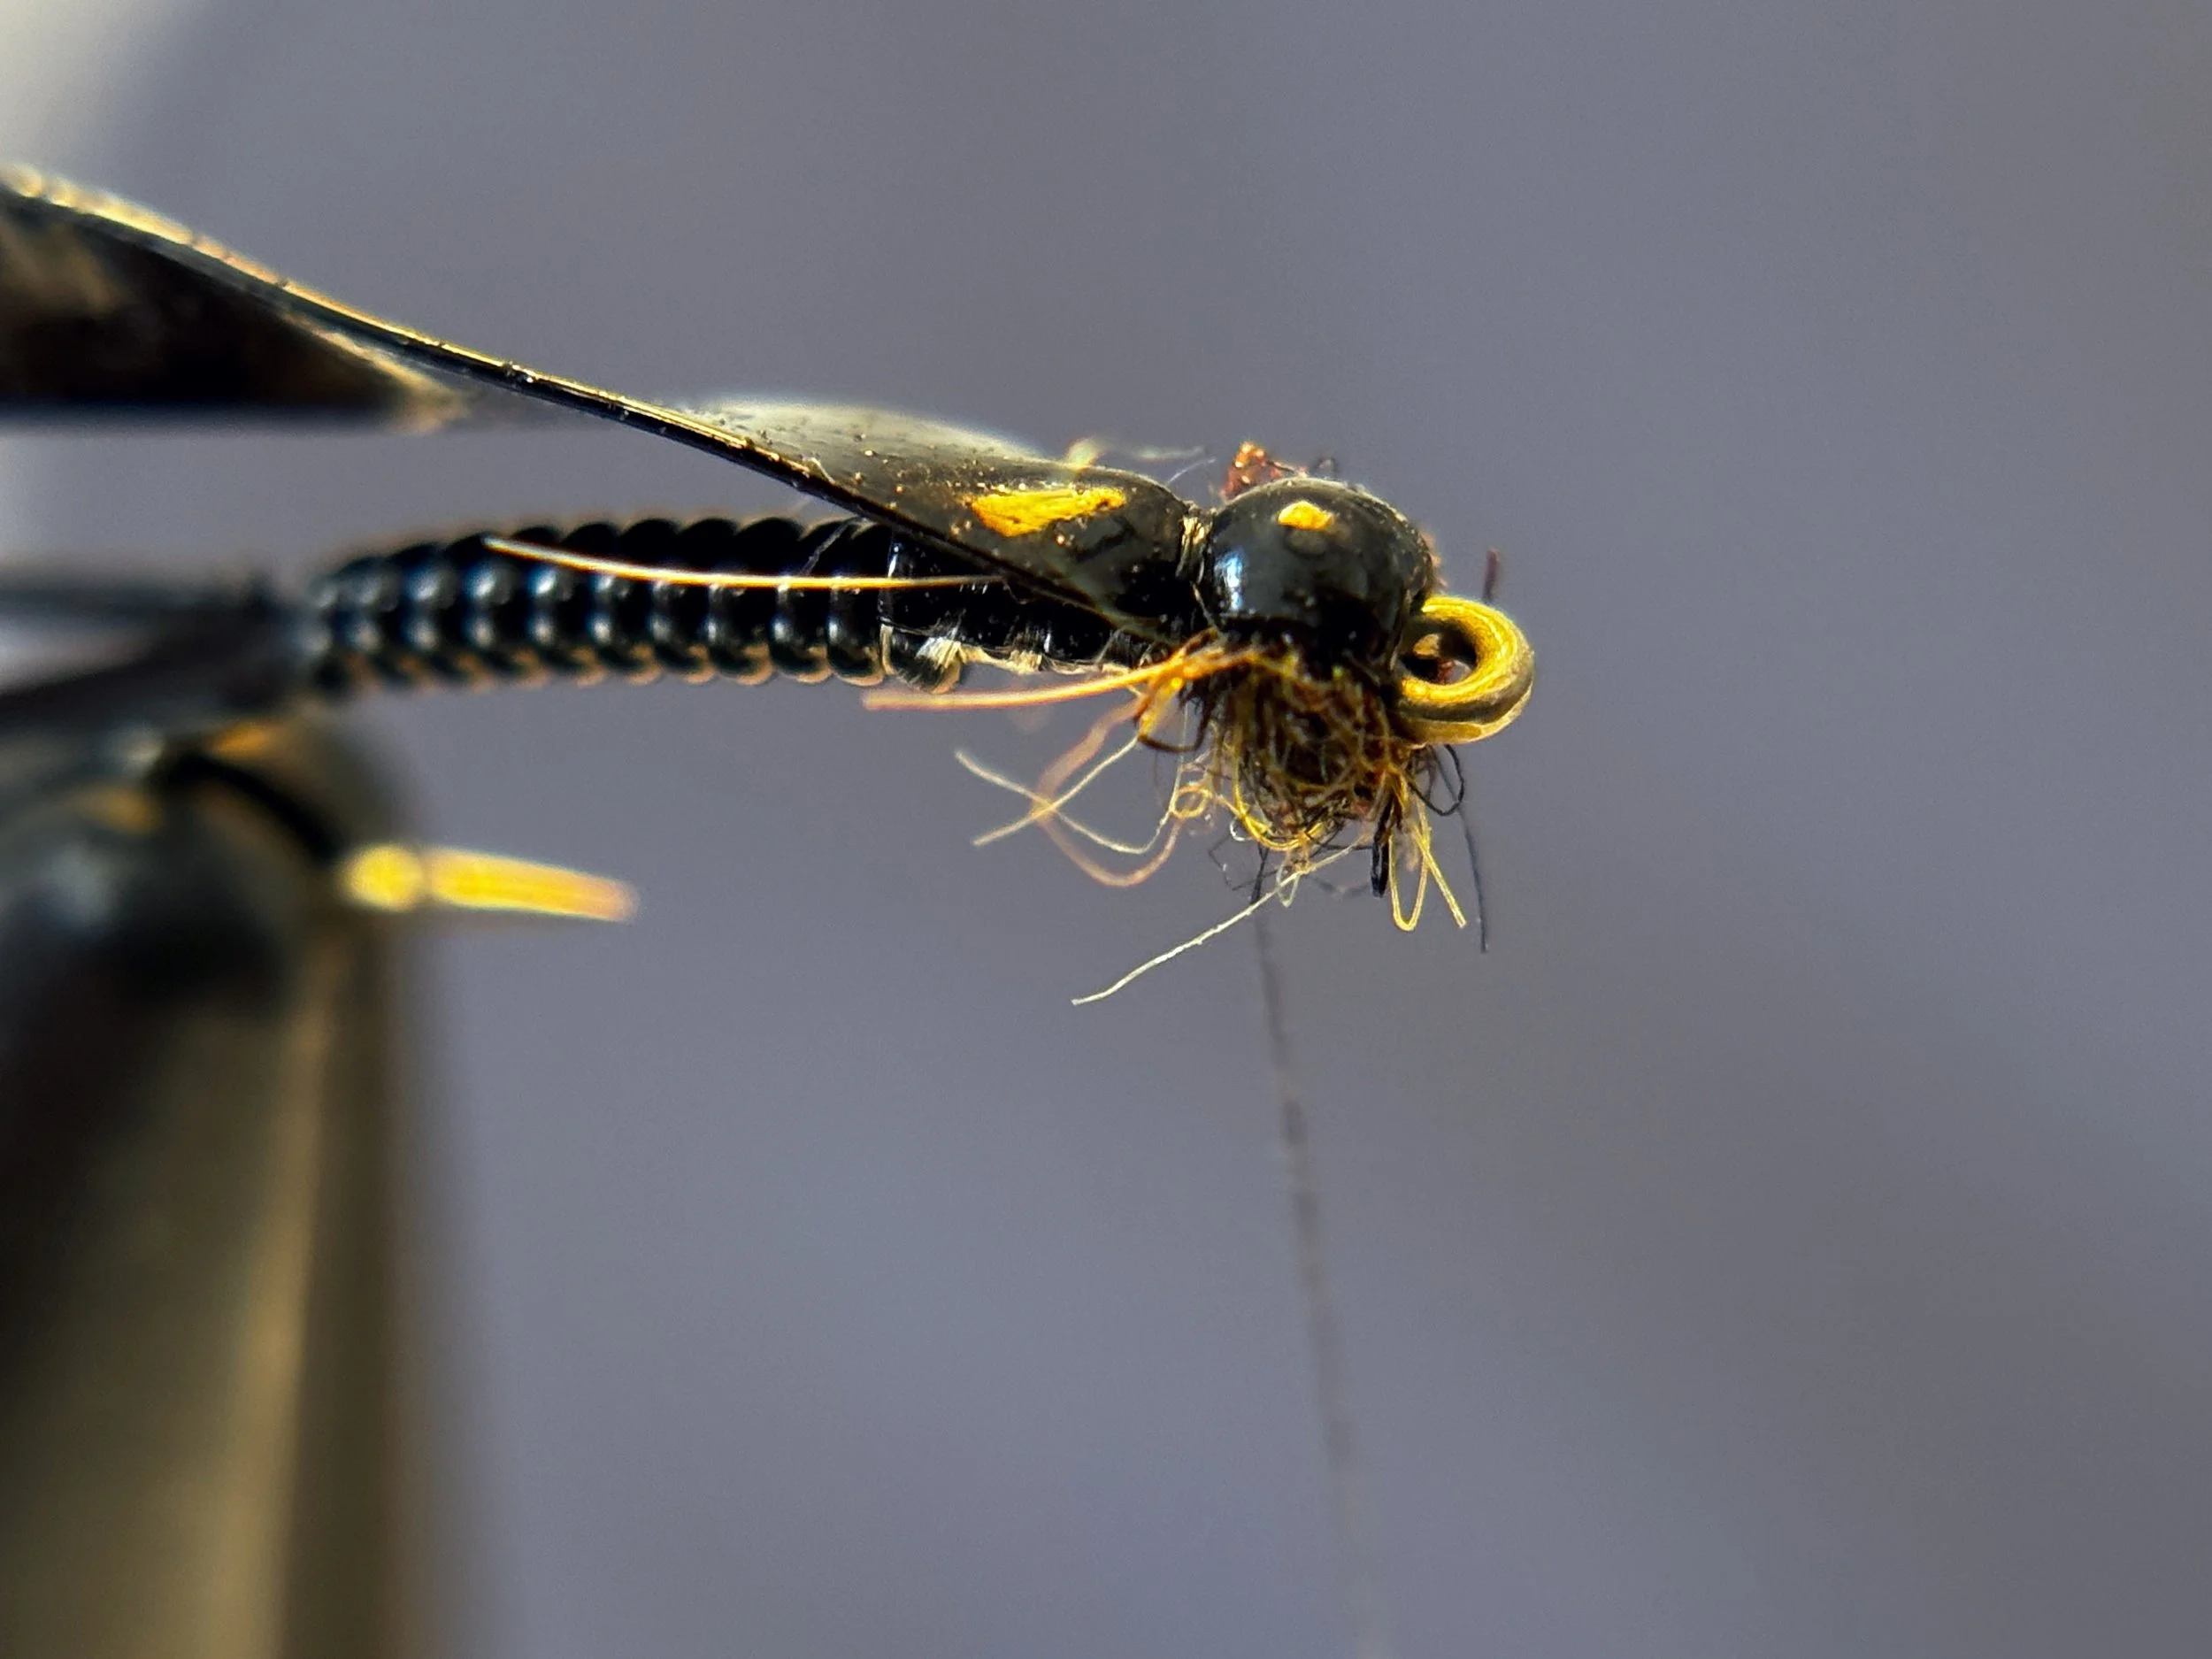
Apply black dubbing to the thread, forming a thin, tightly dubbed noodle approximately one inch in length. Create a small, rounded head by wrapping the dubbing directly behind the hook eye. Pull the scud back material rearward and spin your bobbin counterclockwise to cord the thread, and secure the segment with three firm wraps to create the head of the fly.
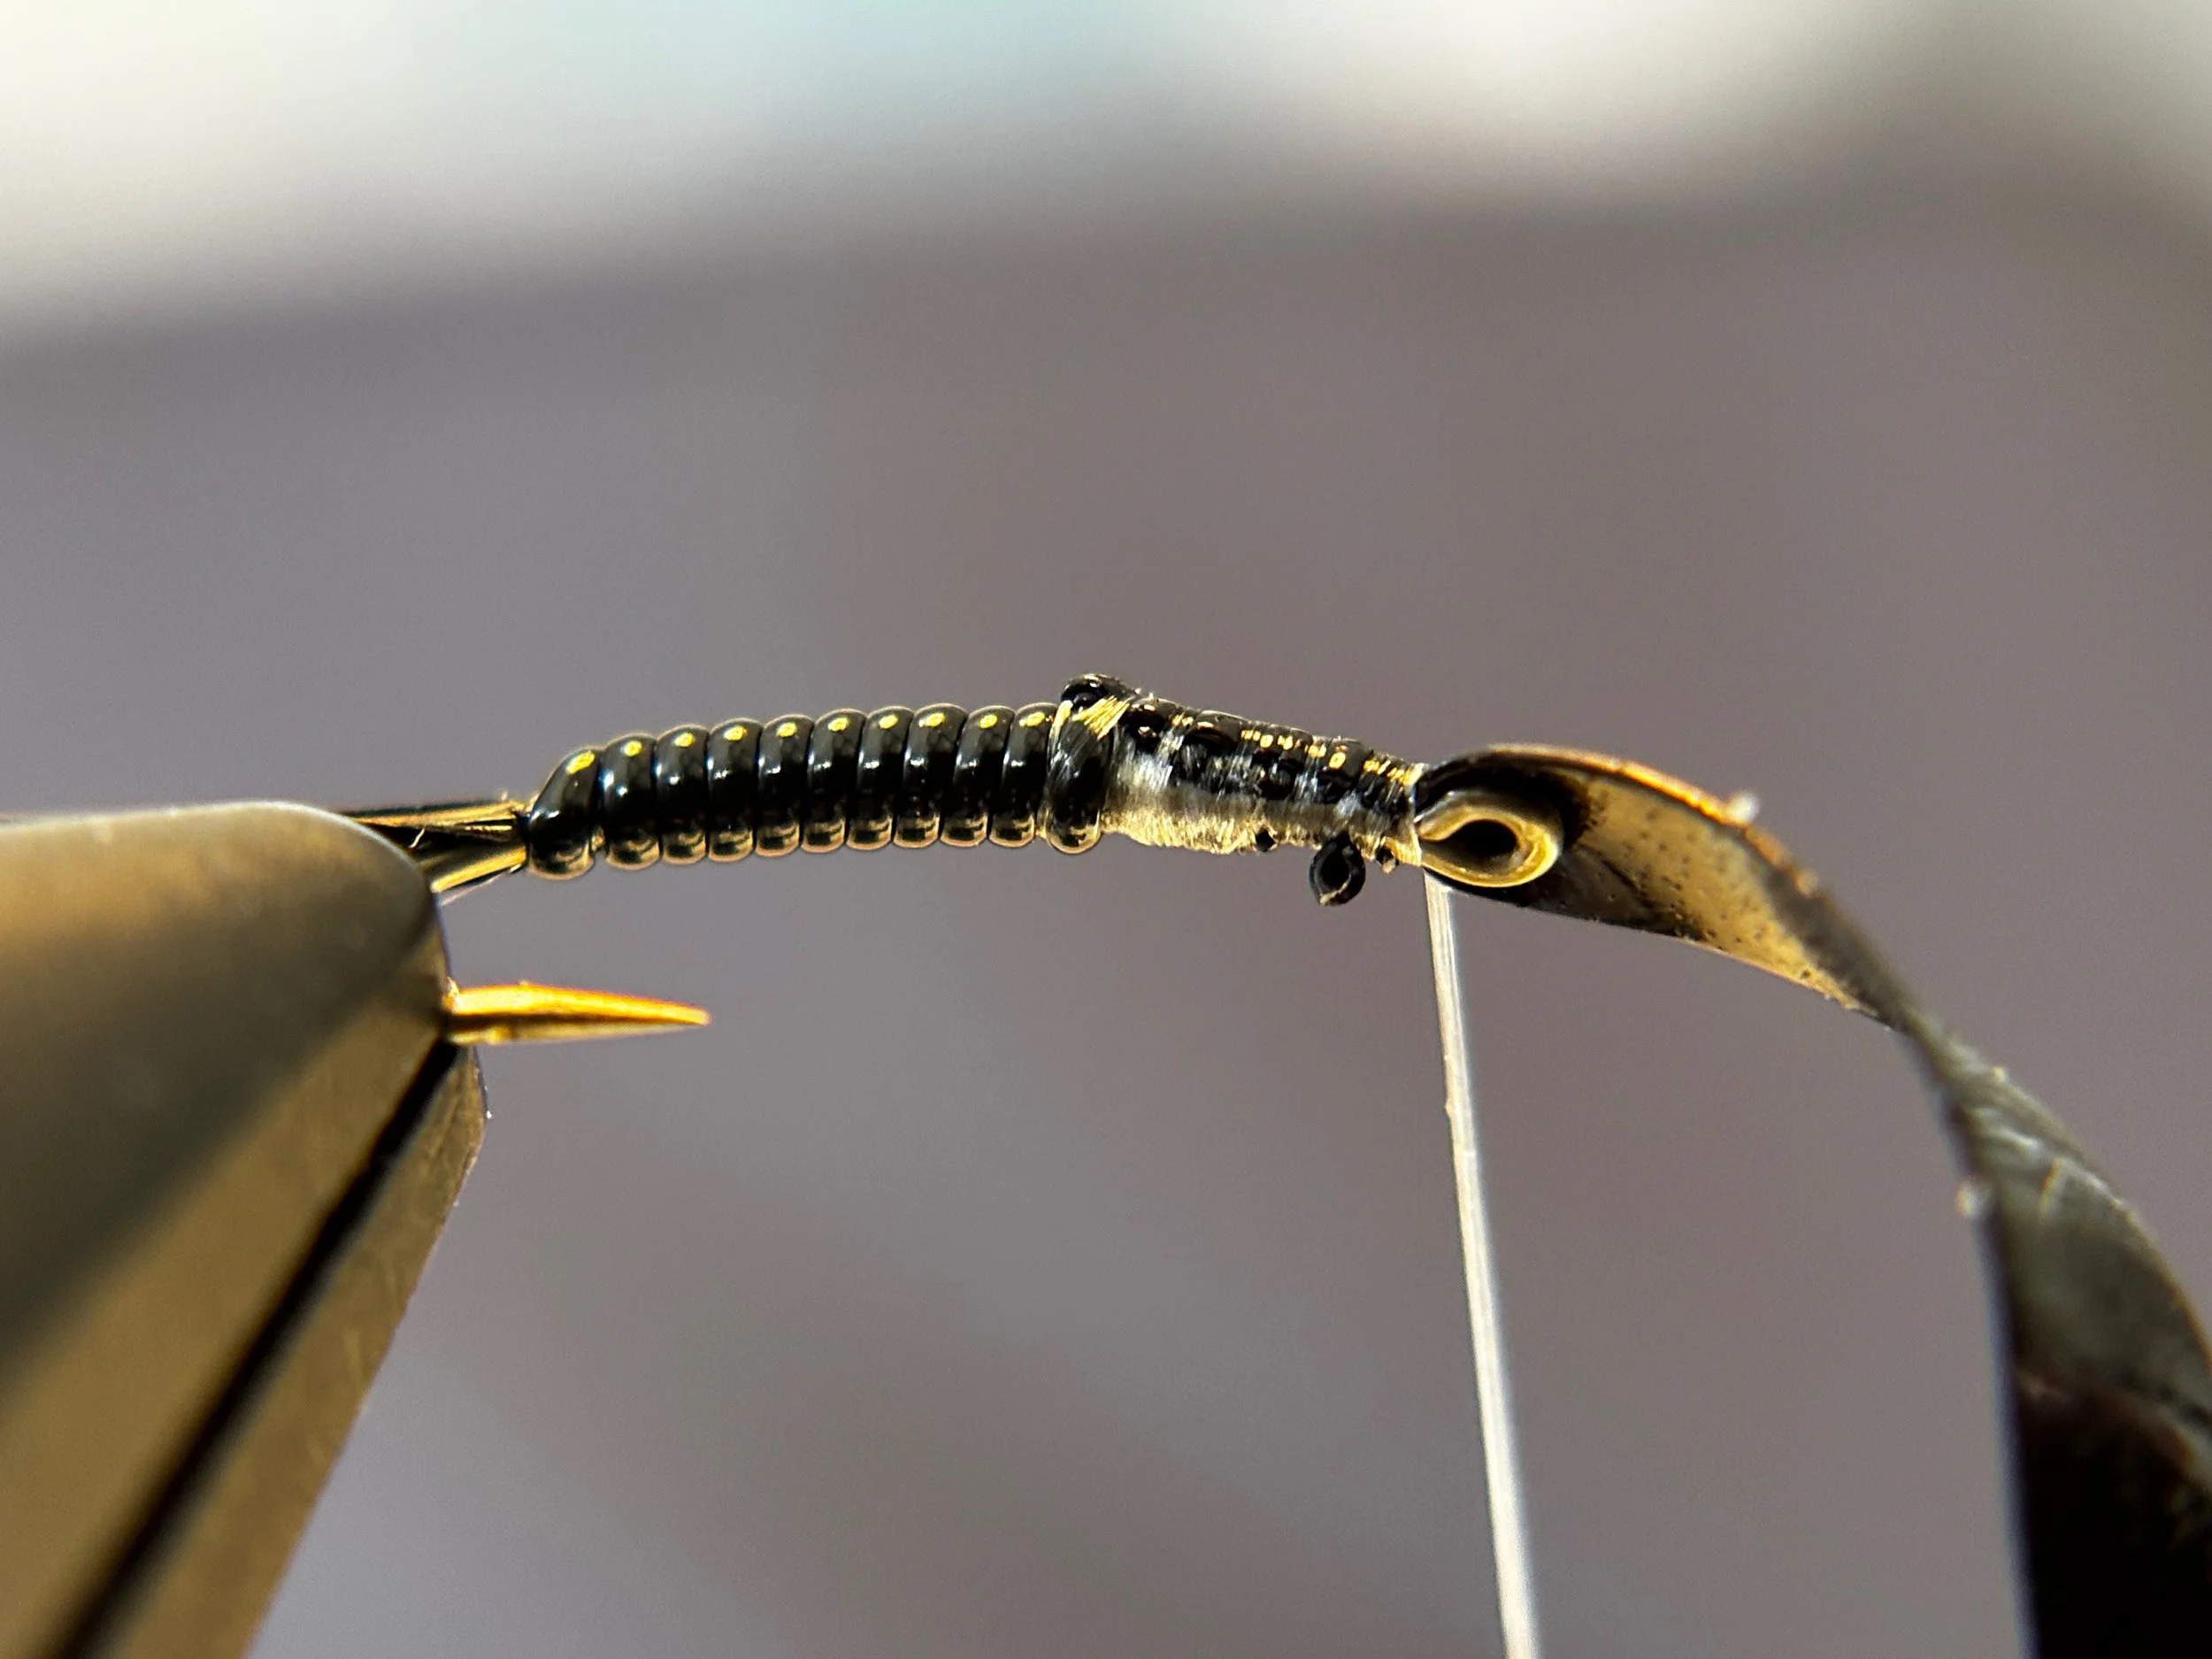
Step 9
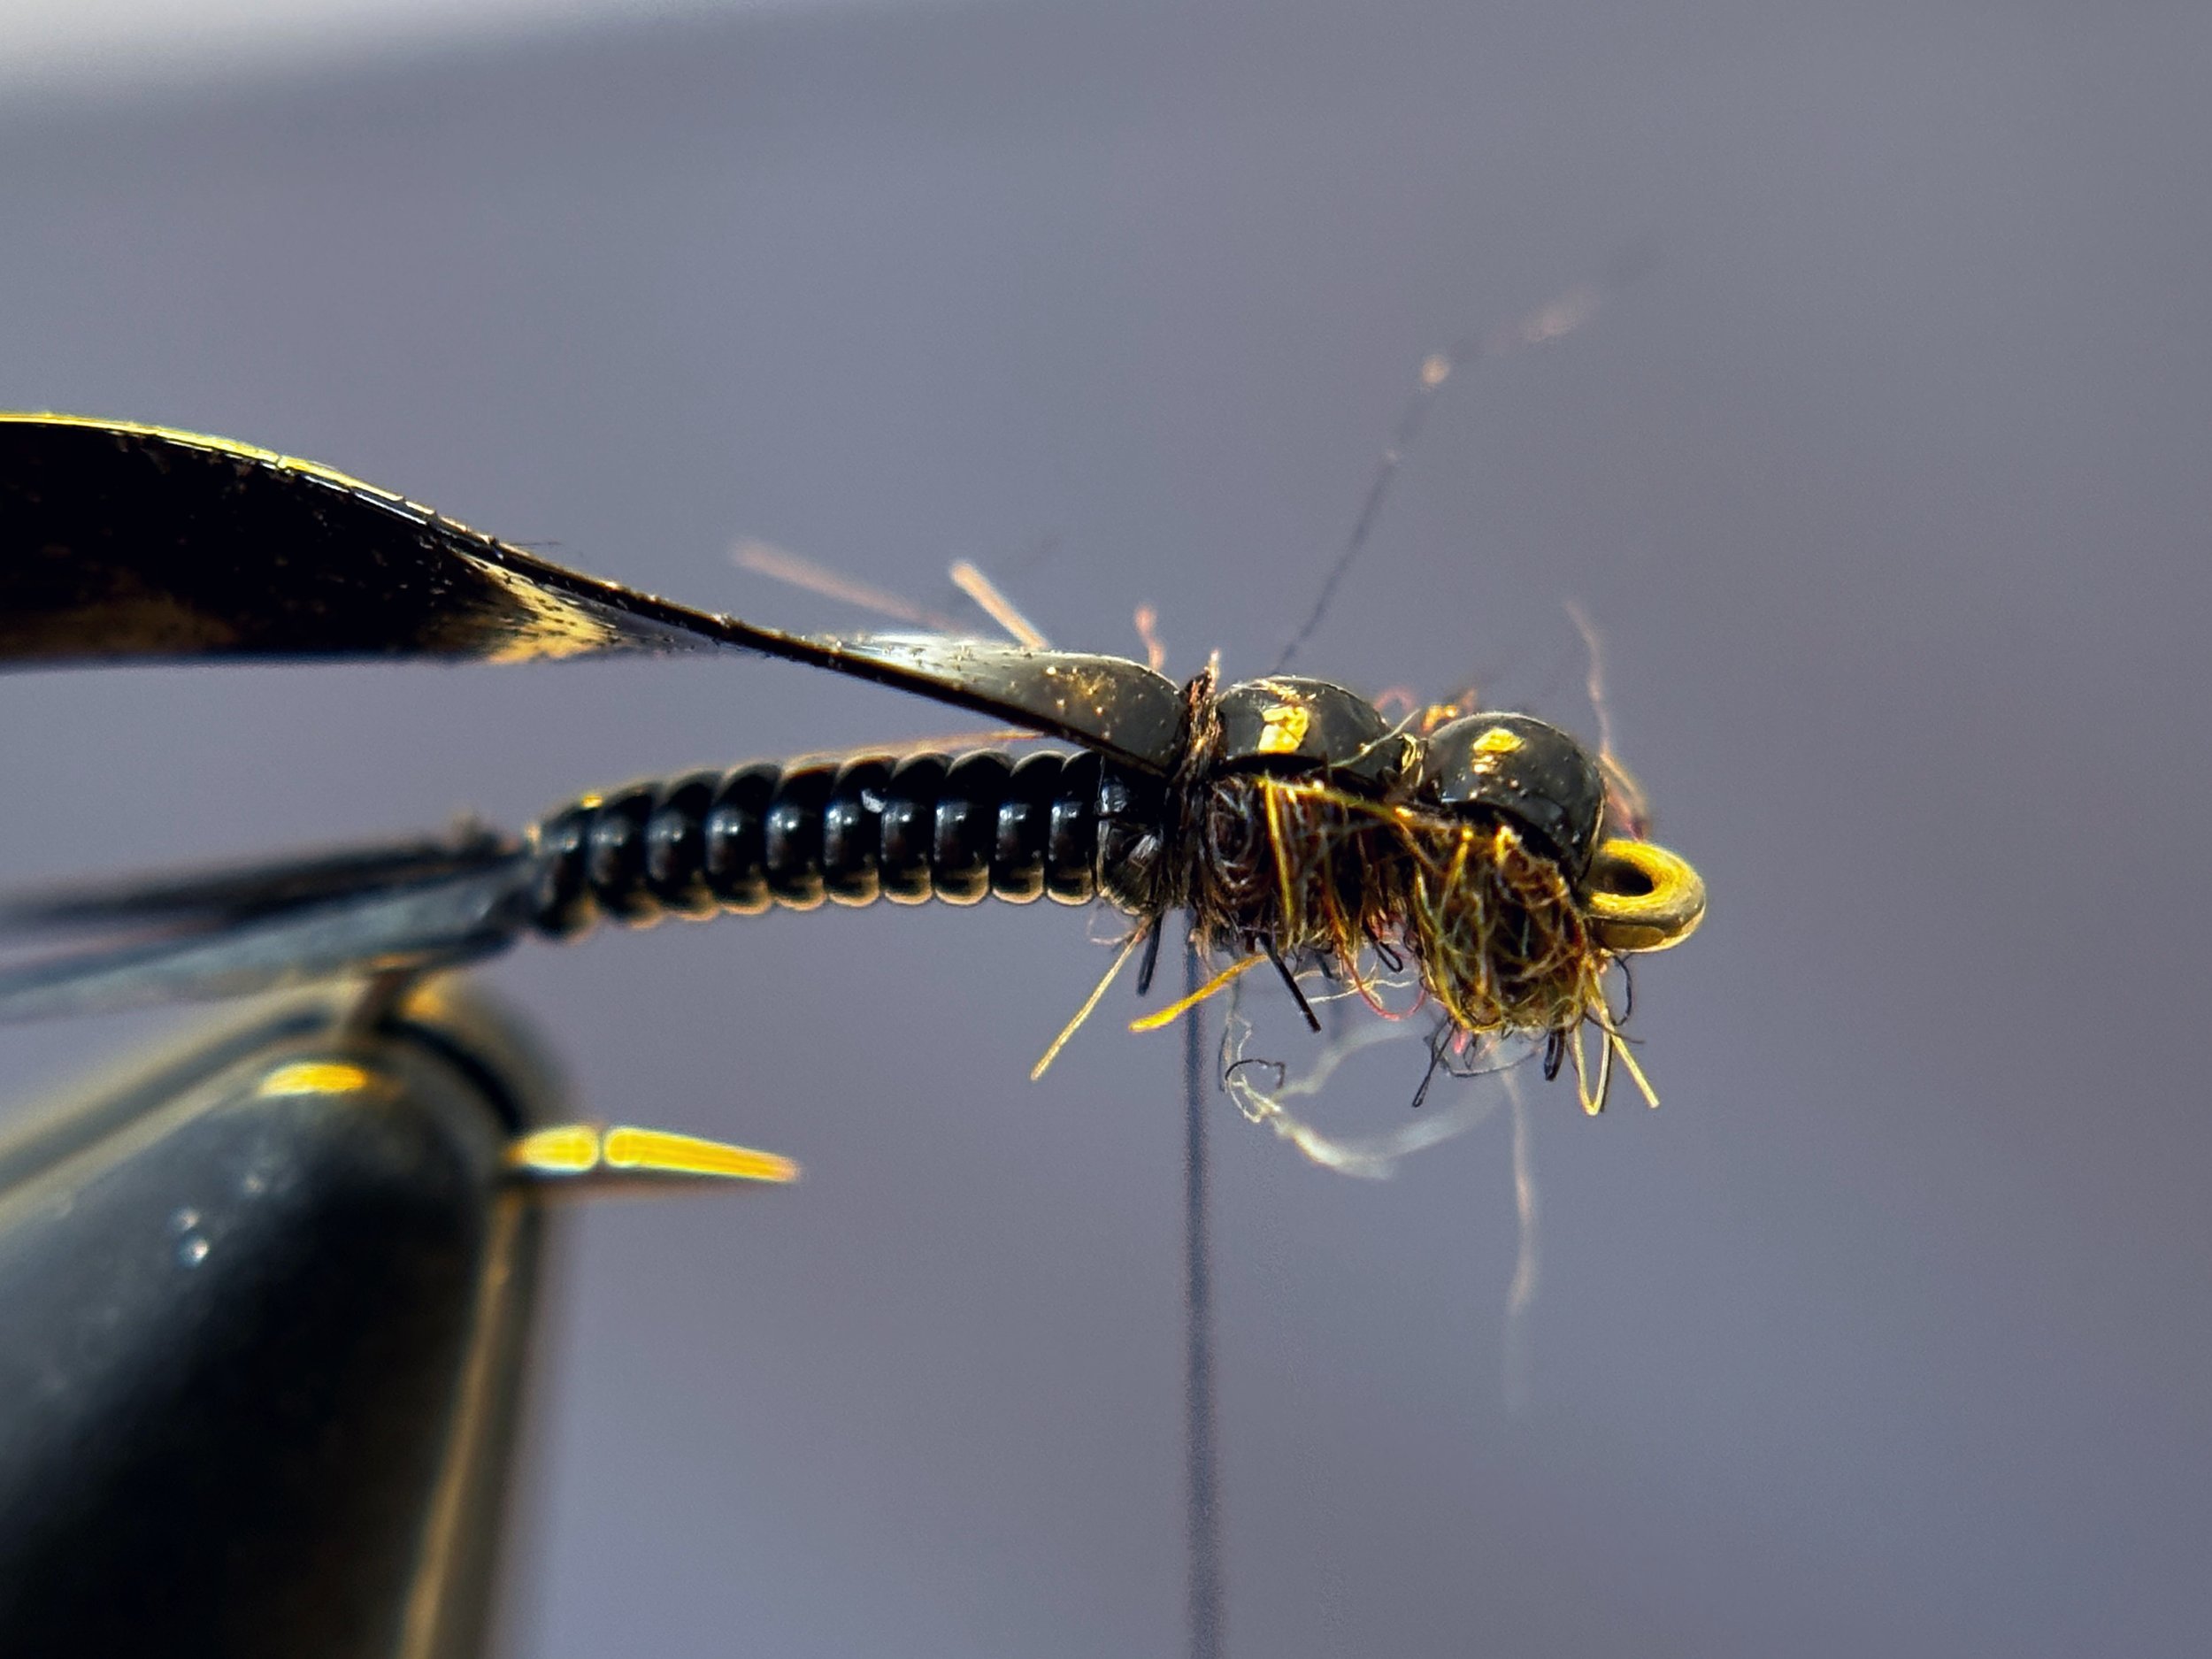
Take a few wraps behind the scud back material and create a slightly thicker dubbing noodle to create the thorax segment, giving it a subtly larger silhouette than the head. Pull the scud back over the thorax, counter-twist the thread counterclockwise, and secure firmly.
Repeat this process one final time with a very thin dubbing noodle to form the third and final segment. Once secured, finish the fly with a 4–5 turn whip finish.
Trim the scud back material by pulling it up gently and cutting it clean, leaving a small flat tab.
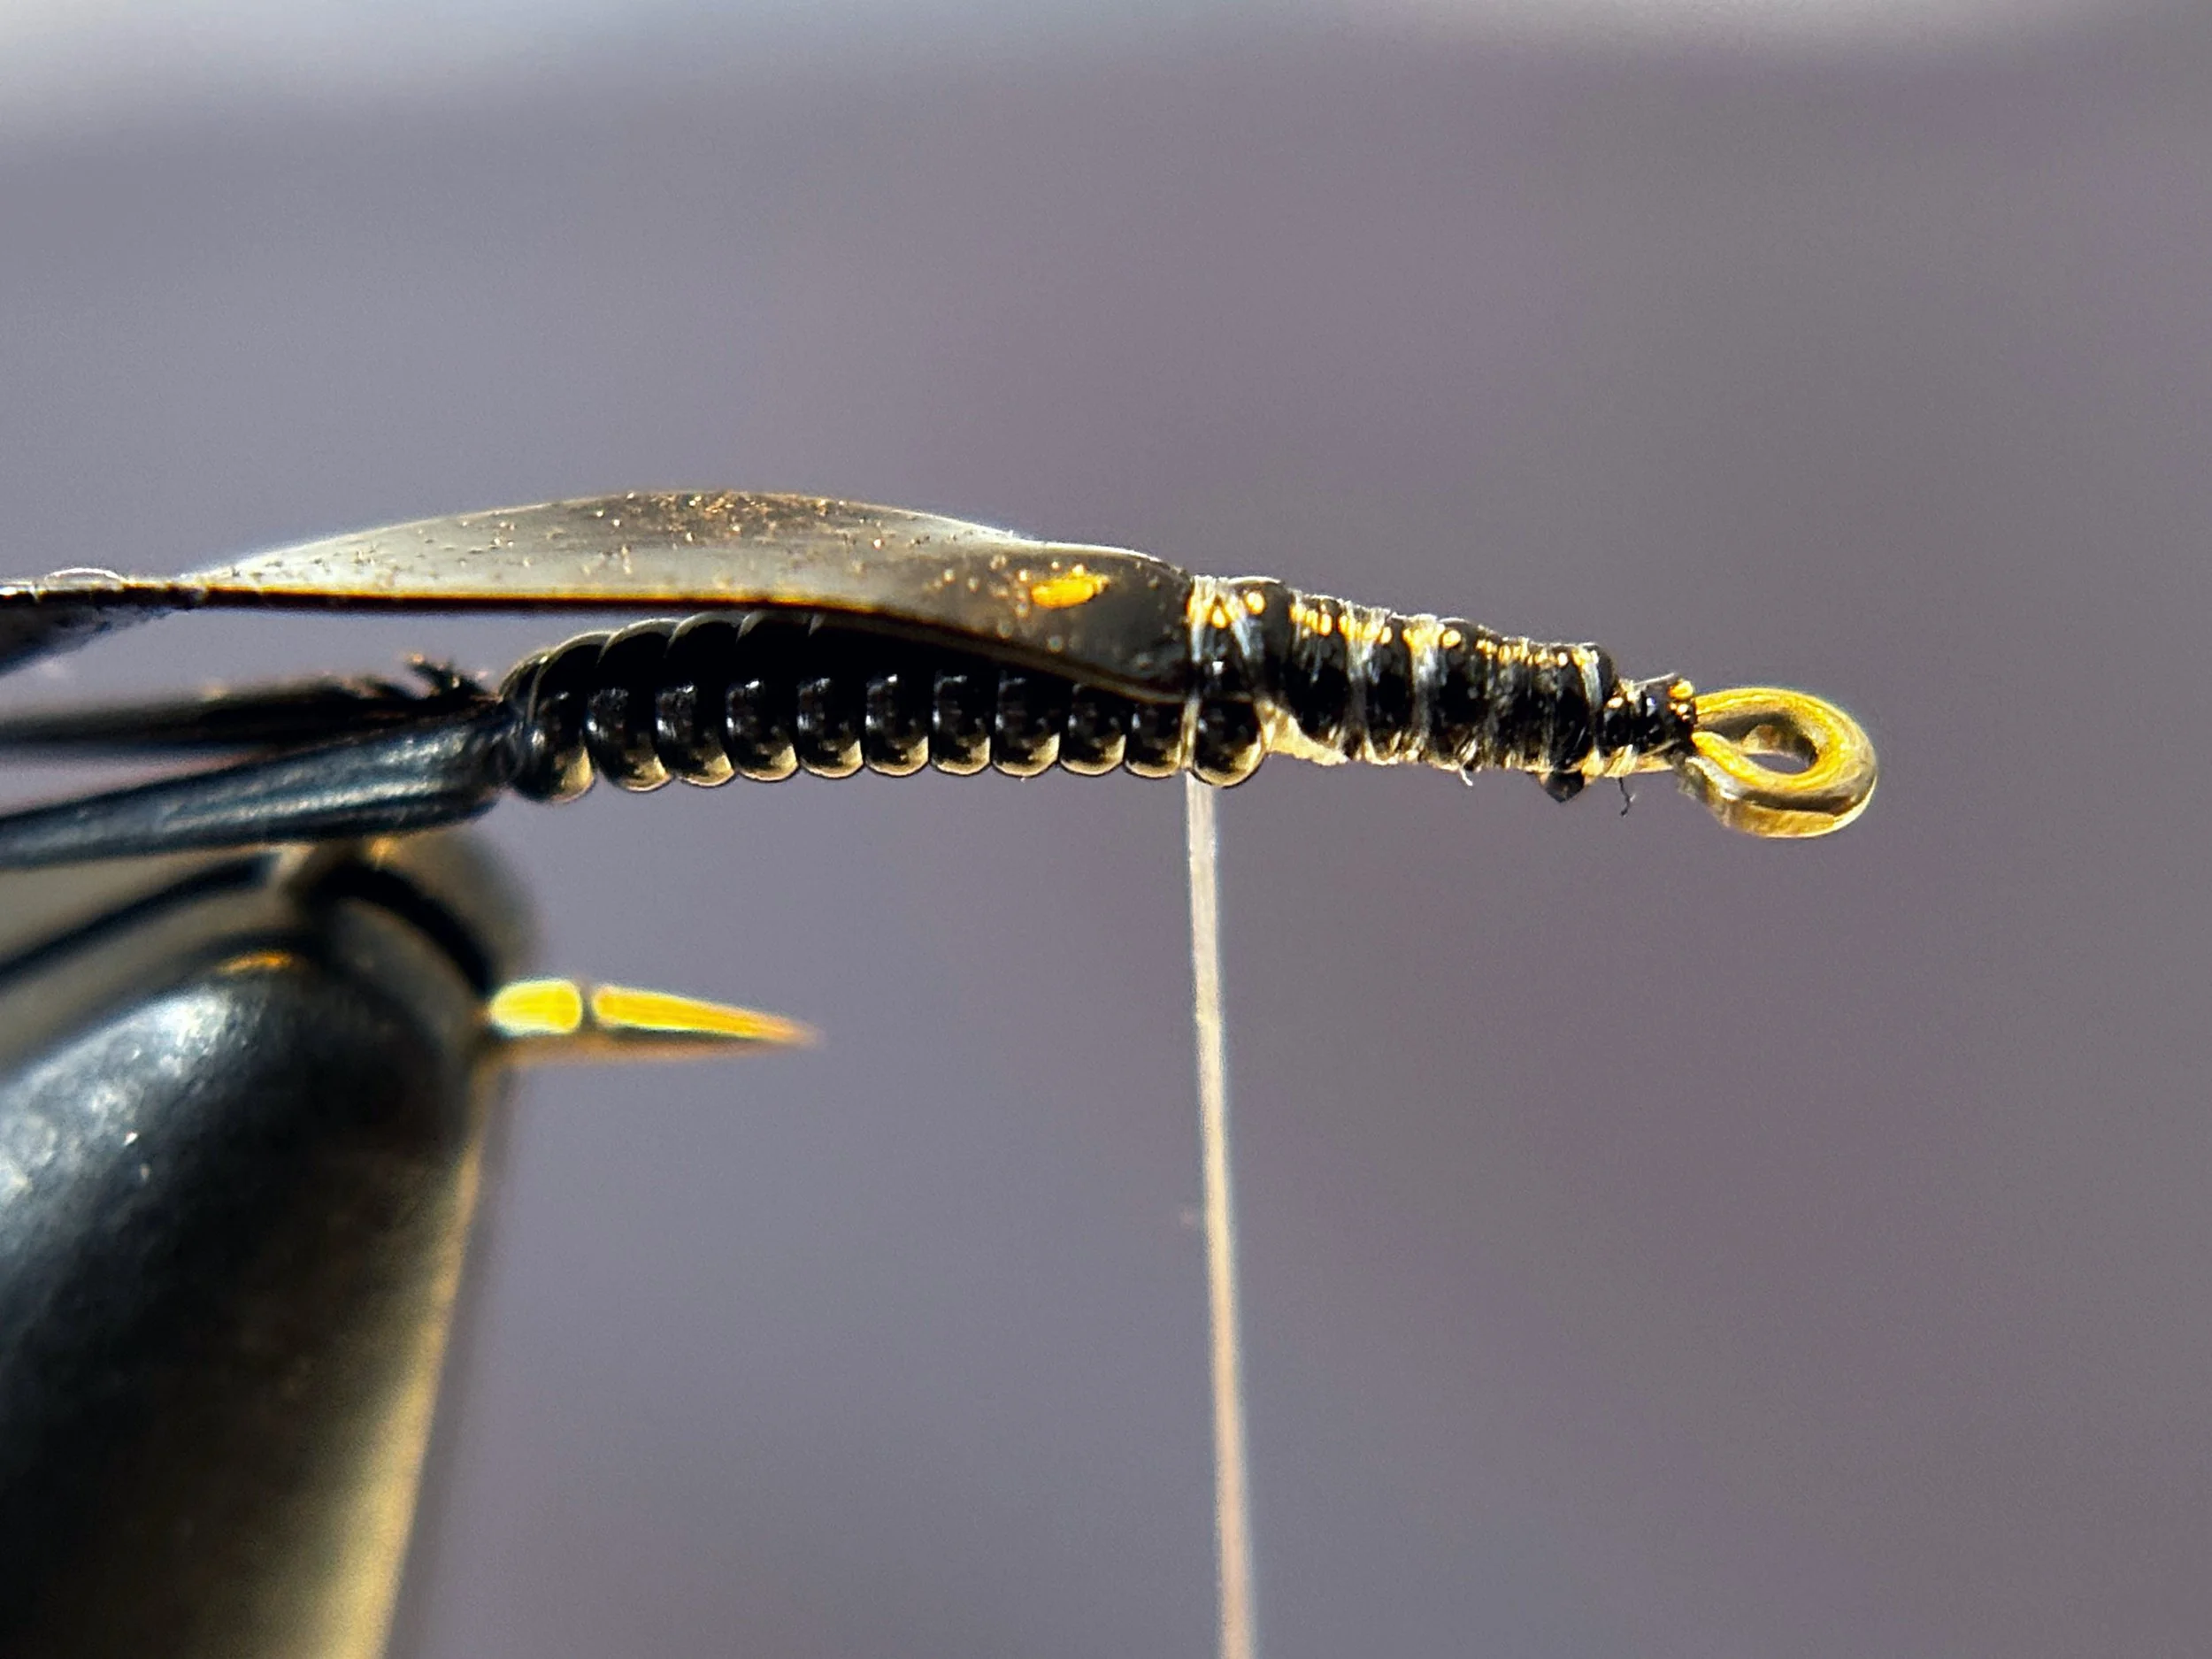
Final Step
Using a bodkin or dubbing needle, lightly tease out the dubbing along the underside and sides of the fly to create legs and movement. Adjust to taste
Hook Options-
Dad-Riki #270
Daiichi 1270, 1260, 1760
Tiemco 200R
Firehole 718
Saber #7015
For steelhead I lean to the Daiichi 1760 or Firehole 718
Dubbing-
I use a custom blend of Dave Whitlock’s SLF Pattern Blends in Dark Stone Nymph and a touch of brown dubbing

New Jersey Fly Tyers Guild Newsletter
January 2026
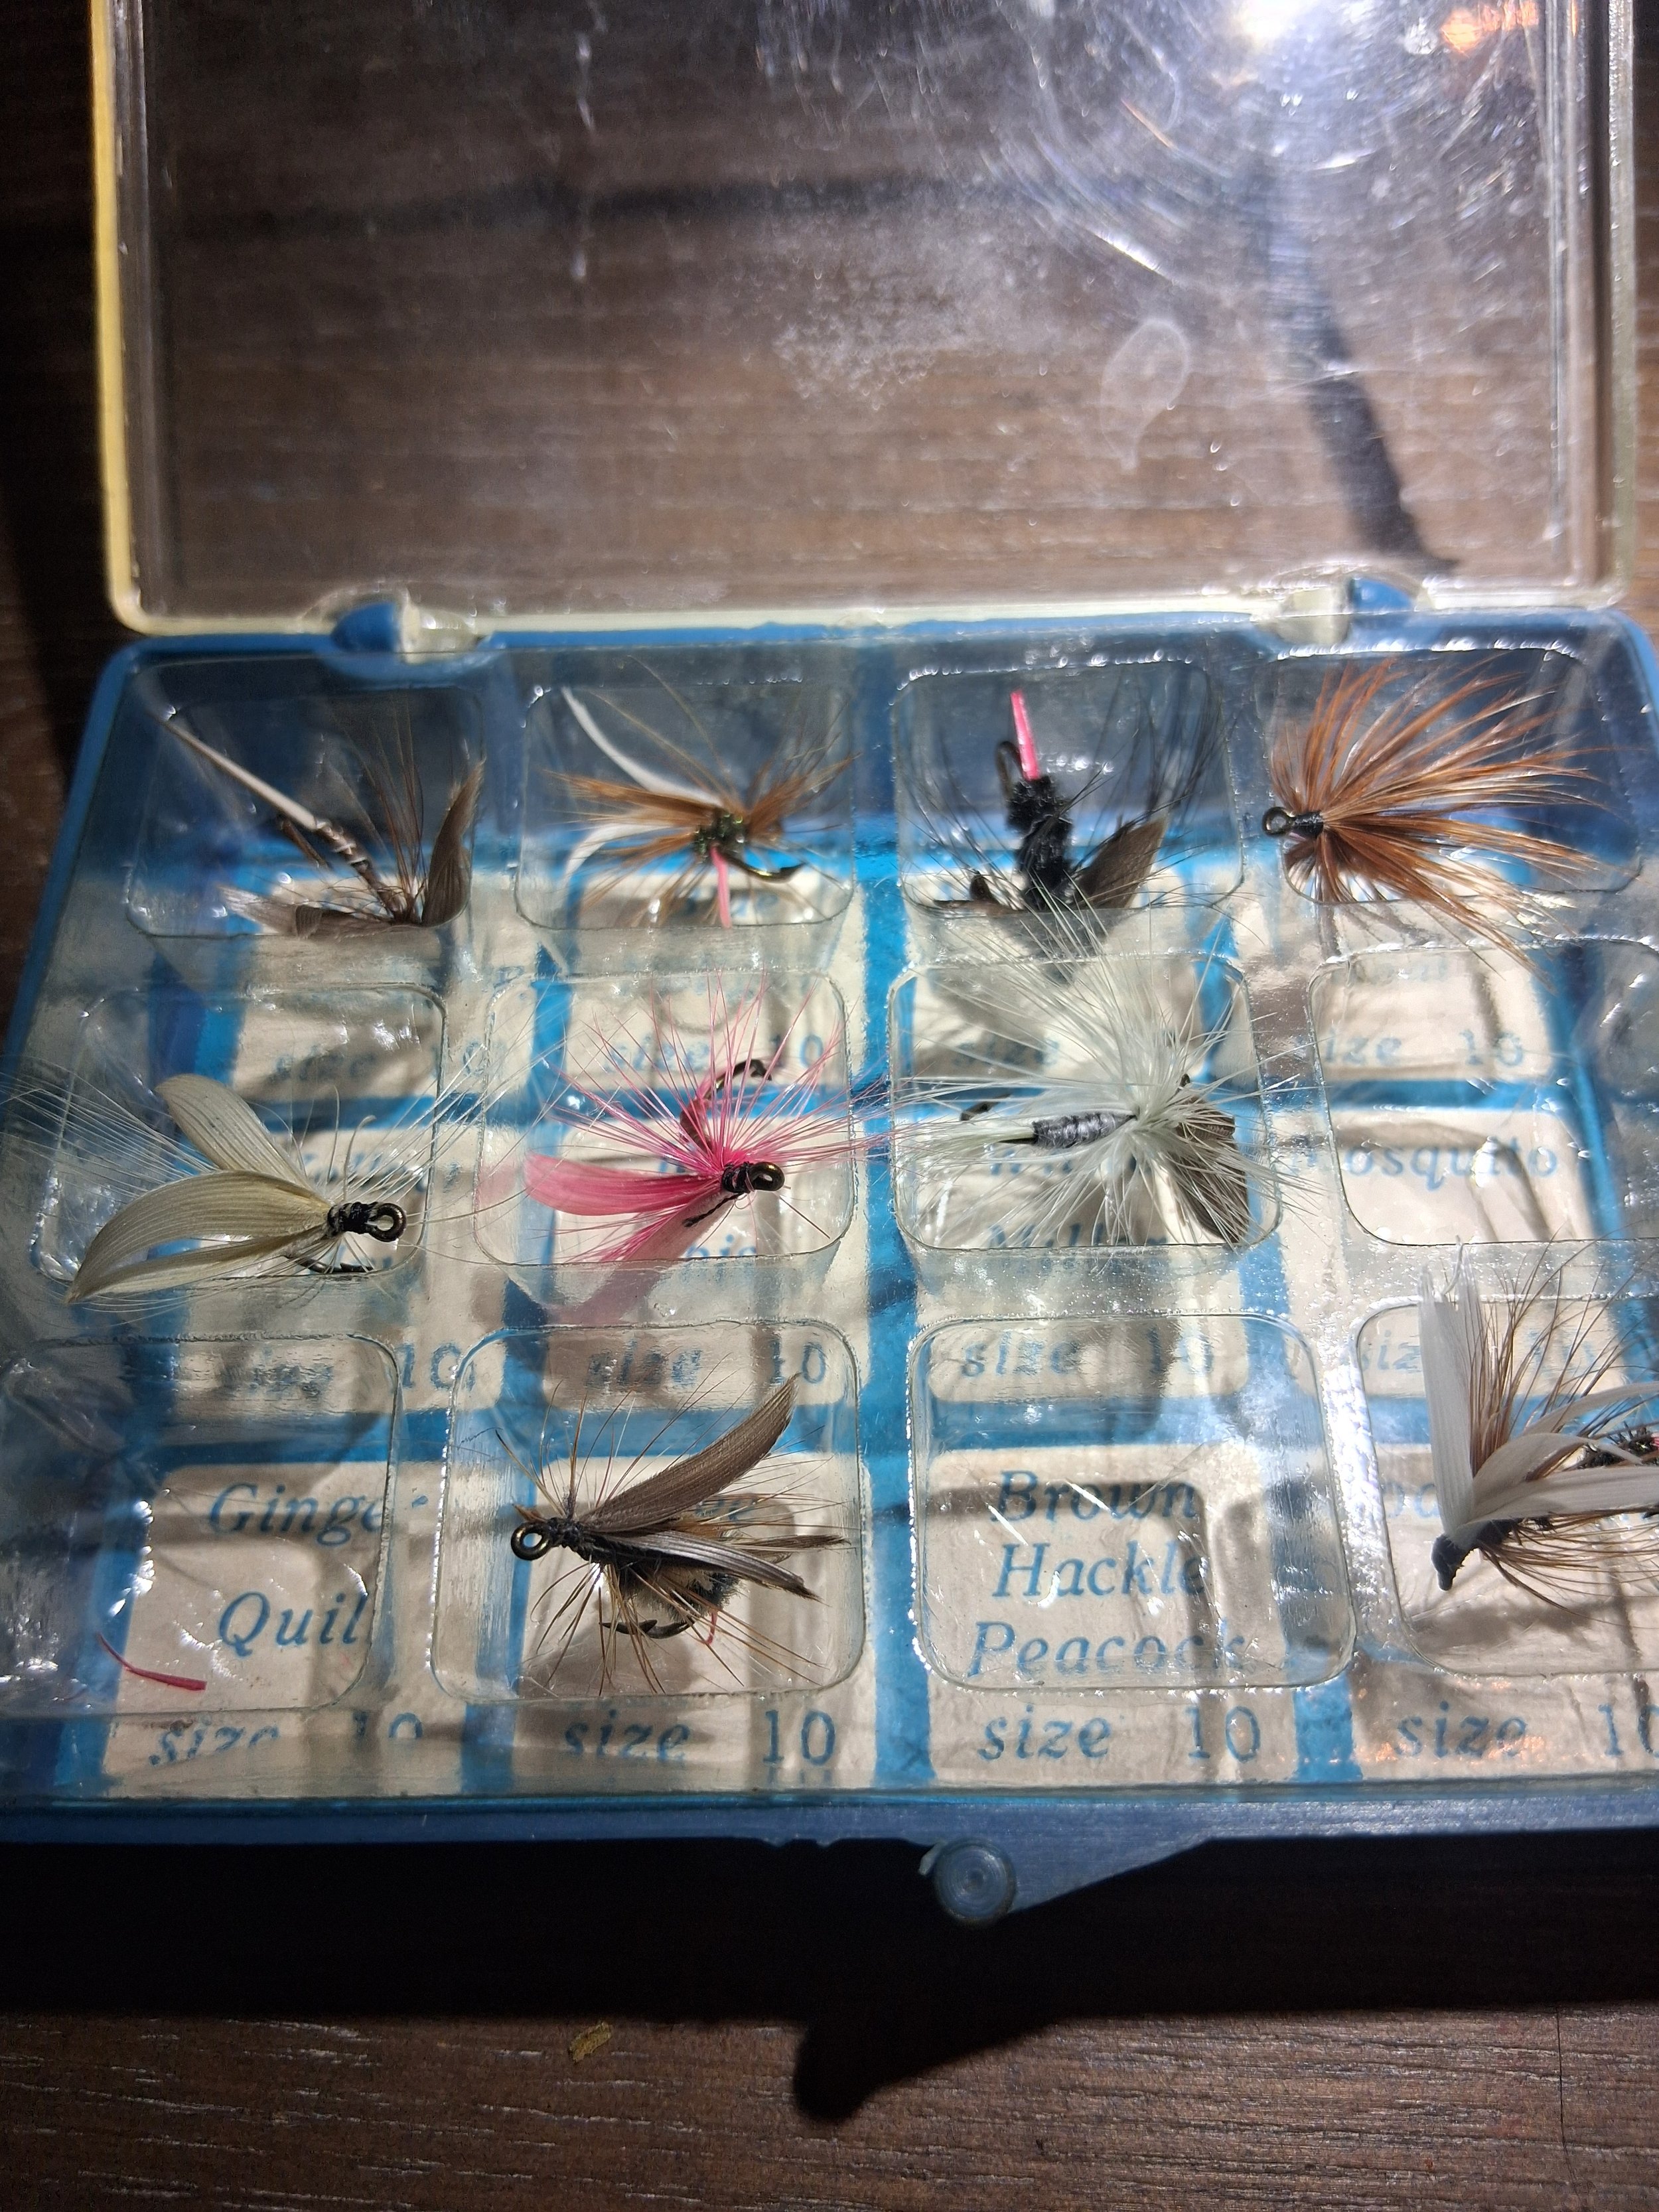
My first fishing flies were in a plastic disc I found in my grandfather's tackle box of conventional lures and hooks. I'd fished for trout with him for years, and never noticed the circular container. It may have been there for decades. Some of the flies were embedded into the melted plastic of the disc, but a few had remained intact; one of these was a bumble-bee. Armed with the disc and the rod and reel I found among discarded trolling rods and forgotten poles of various lengths I went off to find some fish for the first time with a fly rod.
Recently, my aunt mentioned some flies she found and wondered if they came over with her family on their voyage to Canada from Scotland. They may have come with her to New Jersey where she met my uncle in the sixties or seventies. Of course I was intrigued and wondered why this was the first mention of her Scottish ancestors also fishing with flies. My grandfather and uncle strictly used spinning gear and my uncle usually fished from boat by the time I was born. In fact, that one rod, reel, and disc of flies are all the fly tackle I have ever known or seen from my family.
Well, I won't keep you in suspense; I think my aunt was mistaken. The "Scottish flies" are a store bought collection of trout flies, perhaps the "dozen" variety next to the six available in the disc I wish I still had - sticky with plastic melted who-knows-how, but likely just direct exposure to the sun in the back of my grandfather's station wagon that reeked of pipe smoke. The flies were the equivalent of what is available at Walmart or other fishing stores with "some fly stuff."
This box is all size #10 hooks and includes one of the following: Royal Coachman, Blue Uplight, McGinty, Black Gnat, Yellow May, Red Ibis, White Miller, Mosquito, Ginger Quill, Brown Hackle Peacock, a Bee, and a Coachman. How that last one lost its nobility we'll never know as some of the flies are missing and few seem to be in the original place. I am not going to fish these and am going to preserve the box. They may not be a Salmon Fly in the Victorian Sense, but they are flies from a time and place in history - even though I can not verify when or where these actually came from. I'm glad to have them and know that someone my aunt knew and loved had them before me. I'll keep them as examples of what was available to blue collar anglers who got their flies, not from catalogues or family ghillies, but from dime stores and gas stations. They are all in fine, fishing condition.
Fly of the Month:
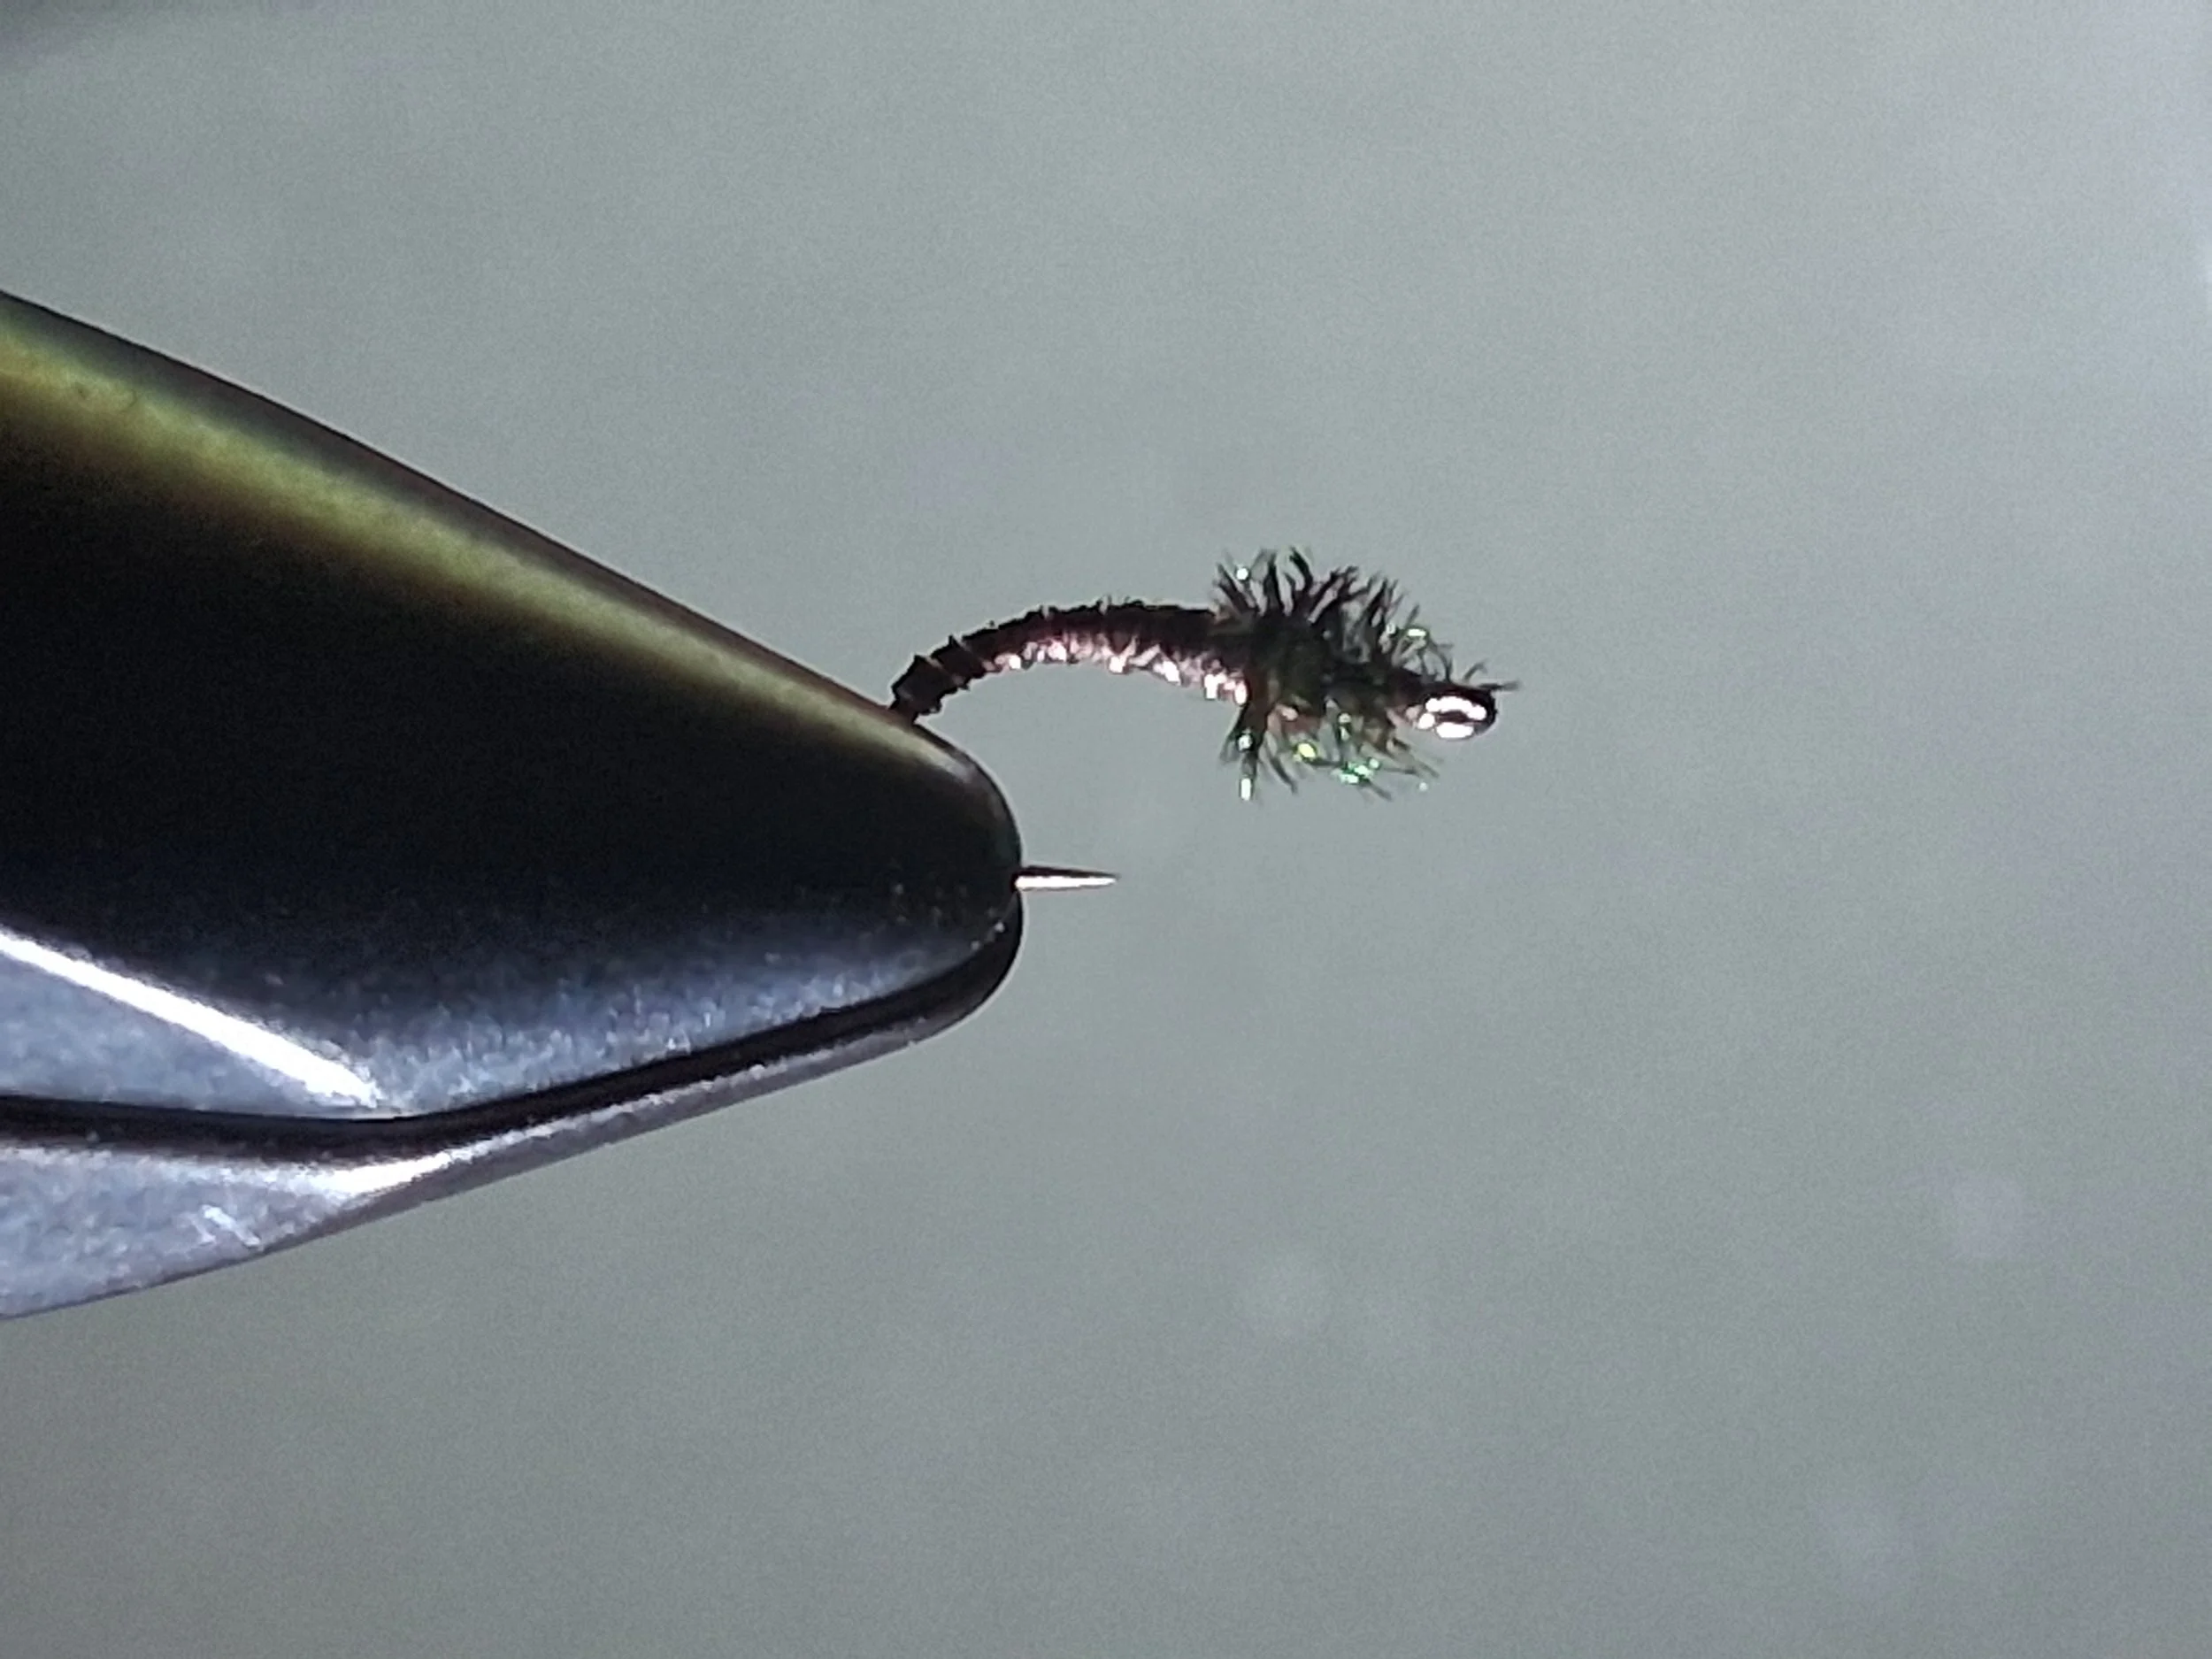
Simple Bugs - Small midge patterns, like the Zebra, Black Beauty,
Lenny's F. L. Recipe
Hook: curved, pupae, or straight in sizes #16 to #32
Thread: brown 6/0
Wire: Copper in SM
Thorax: peacock herl _______________________________________________________
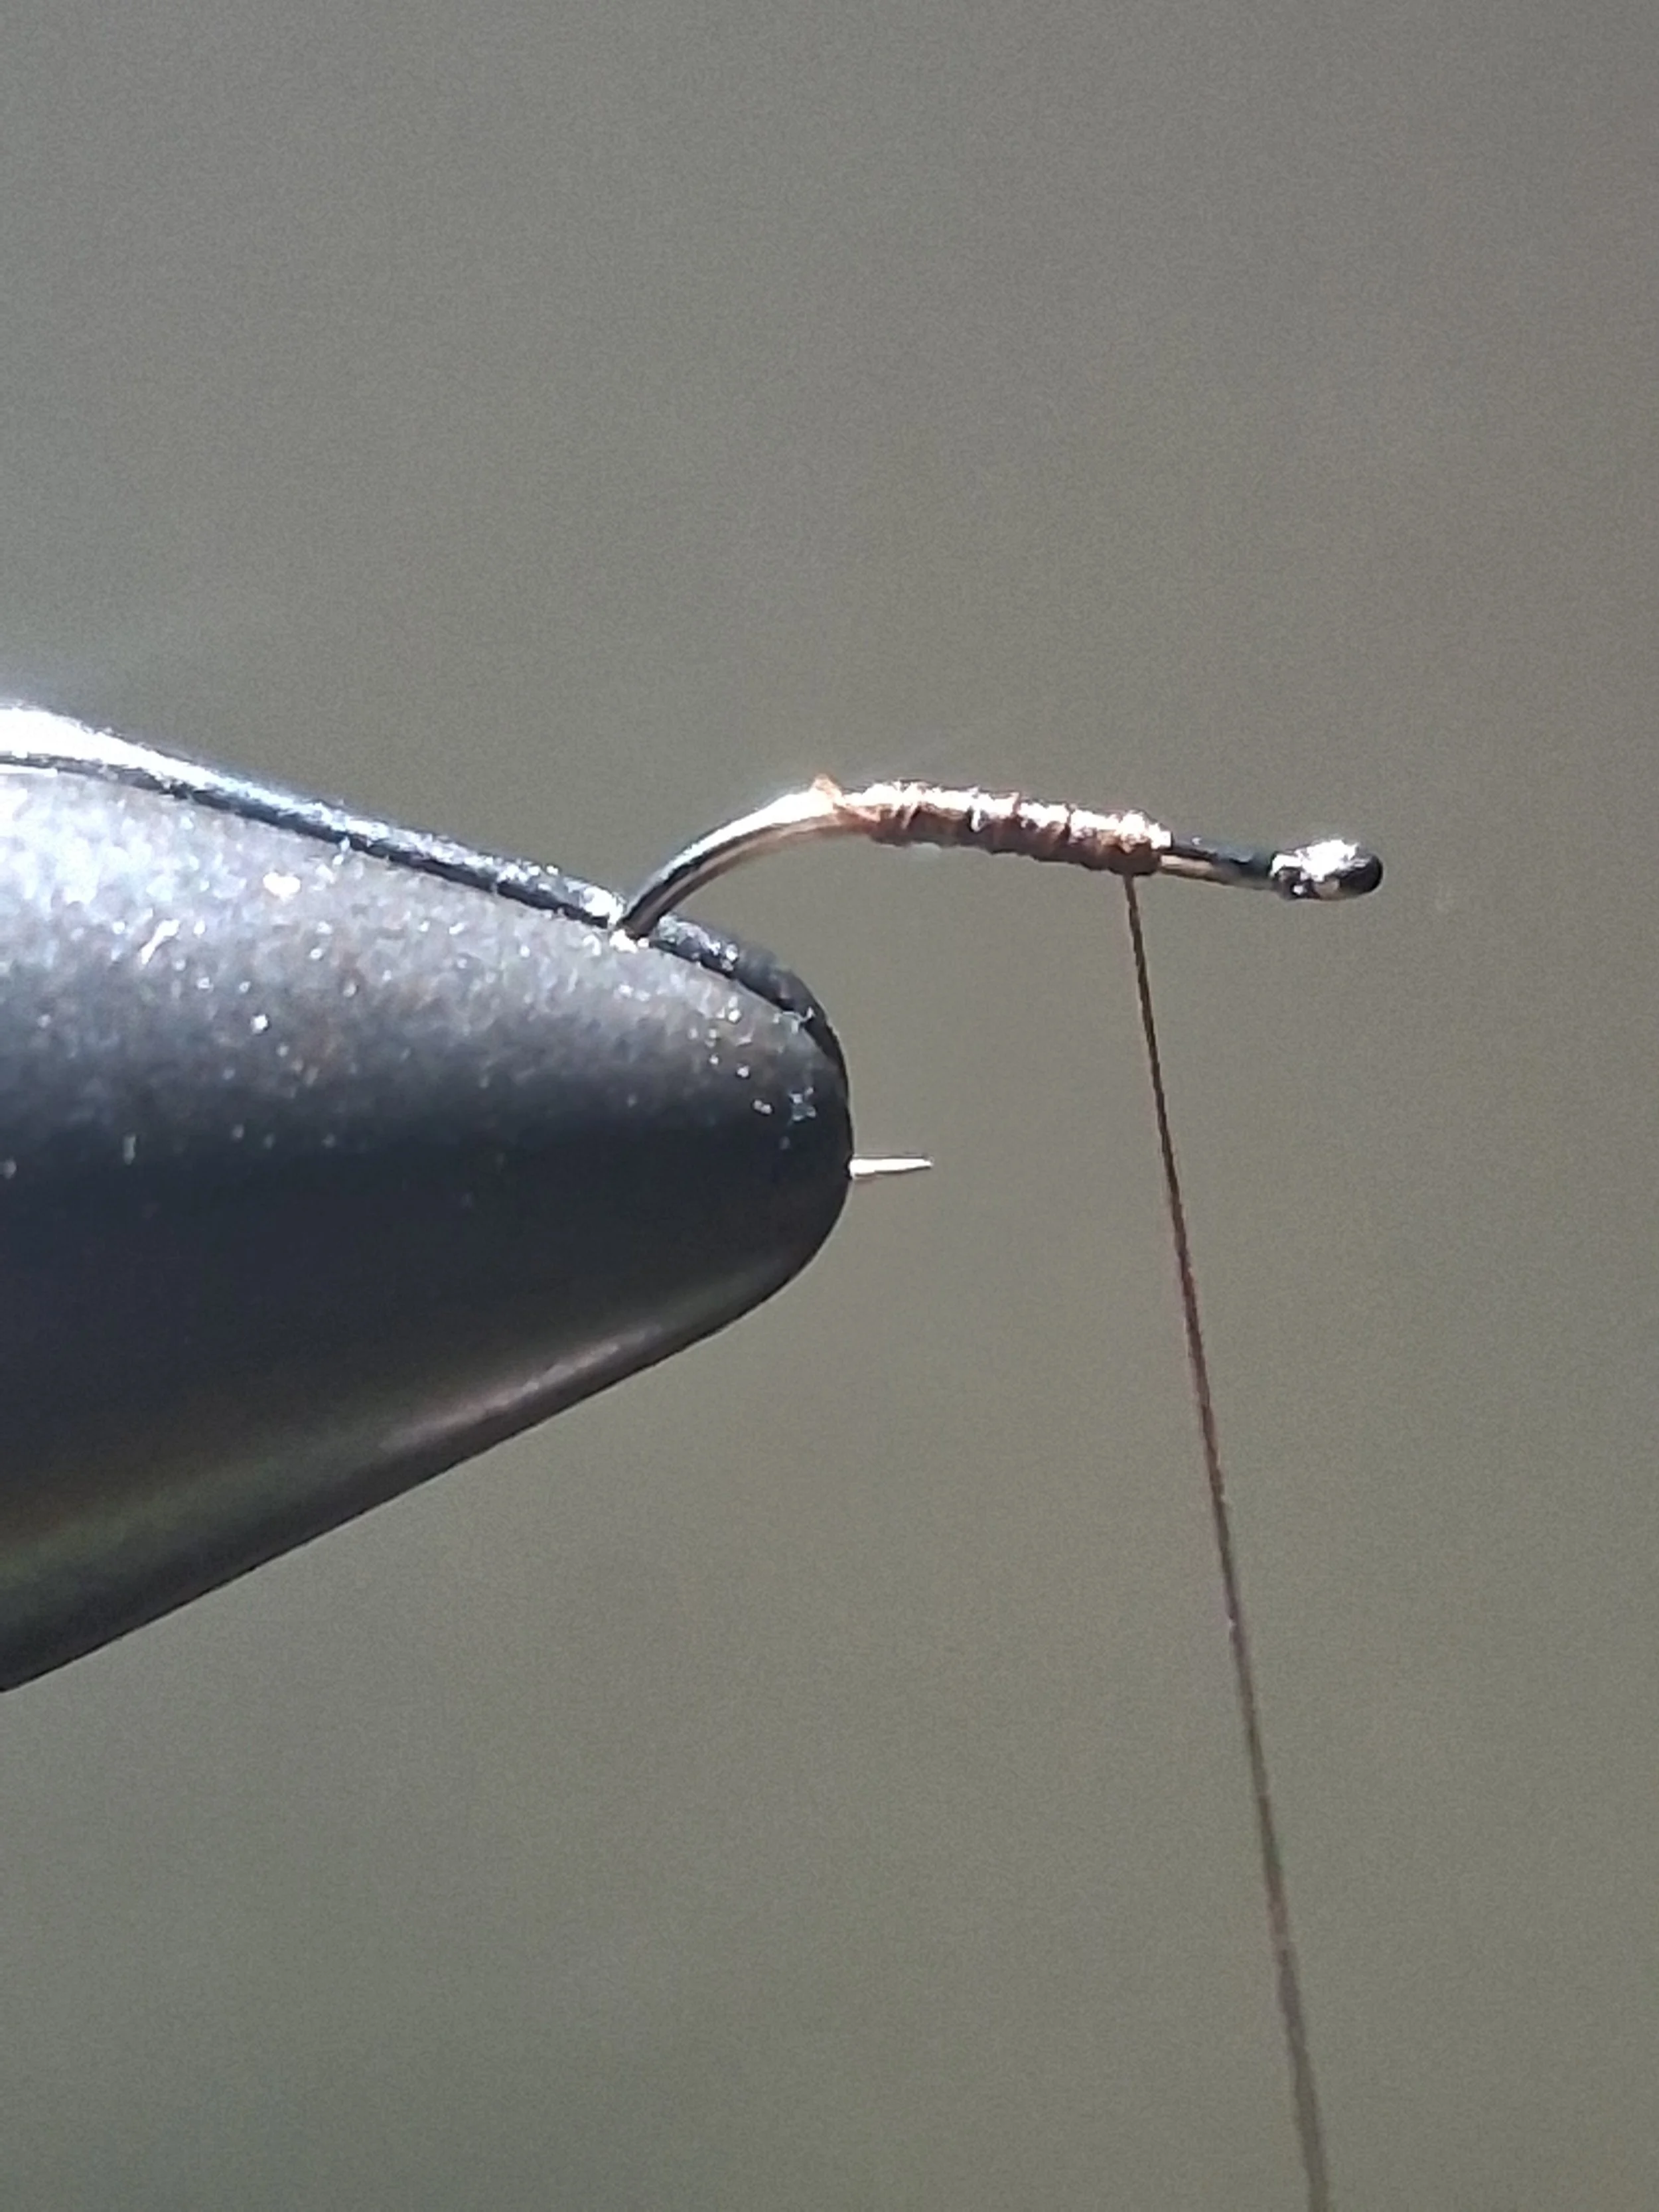
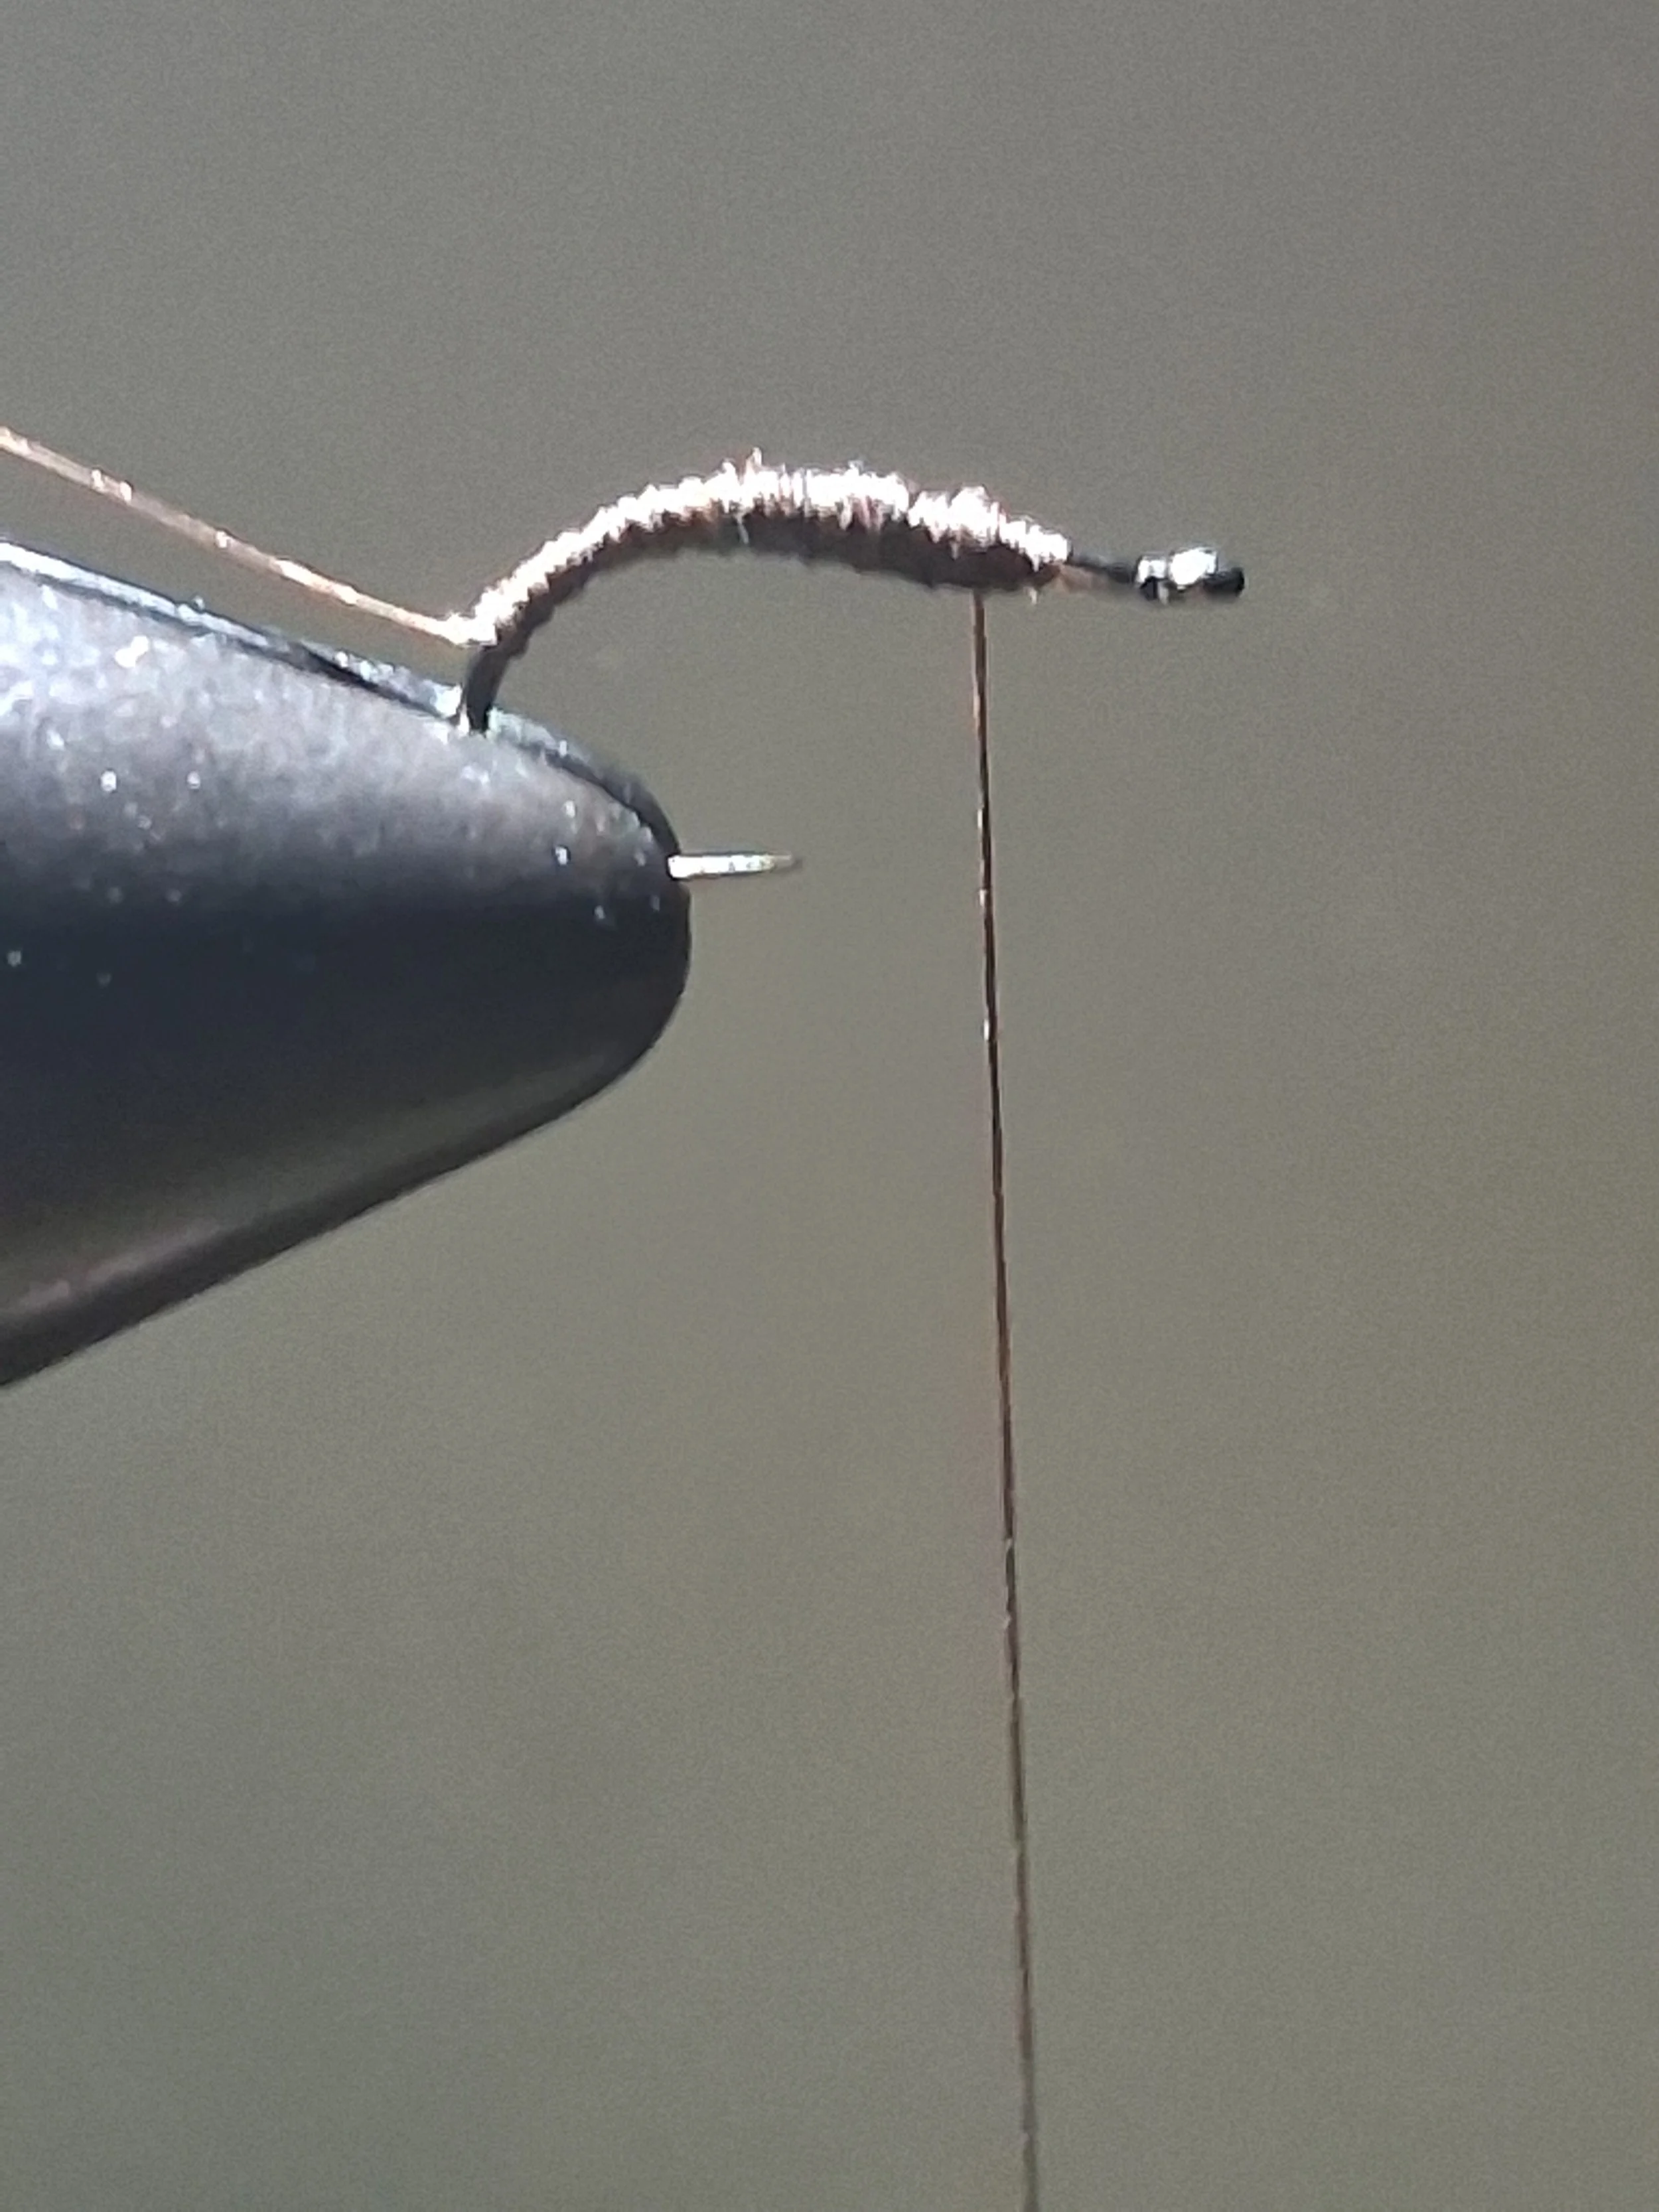
Start the thread on the hook and add the wire with a gap behind the eye. Wrap back past the bend and begin a tapered thread body. Wrap to the gap and to the wire at the bend. Wrap to the gap and back 3/4. Wrap to the gap and to 1/2 back to the bend. Wrap to the gap and 1/4 back. Be sure you are leaving some space just behind the hook eye.
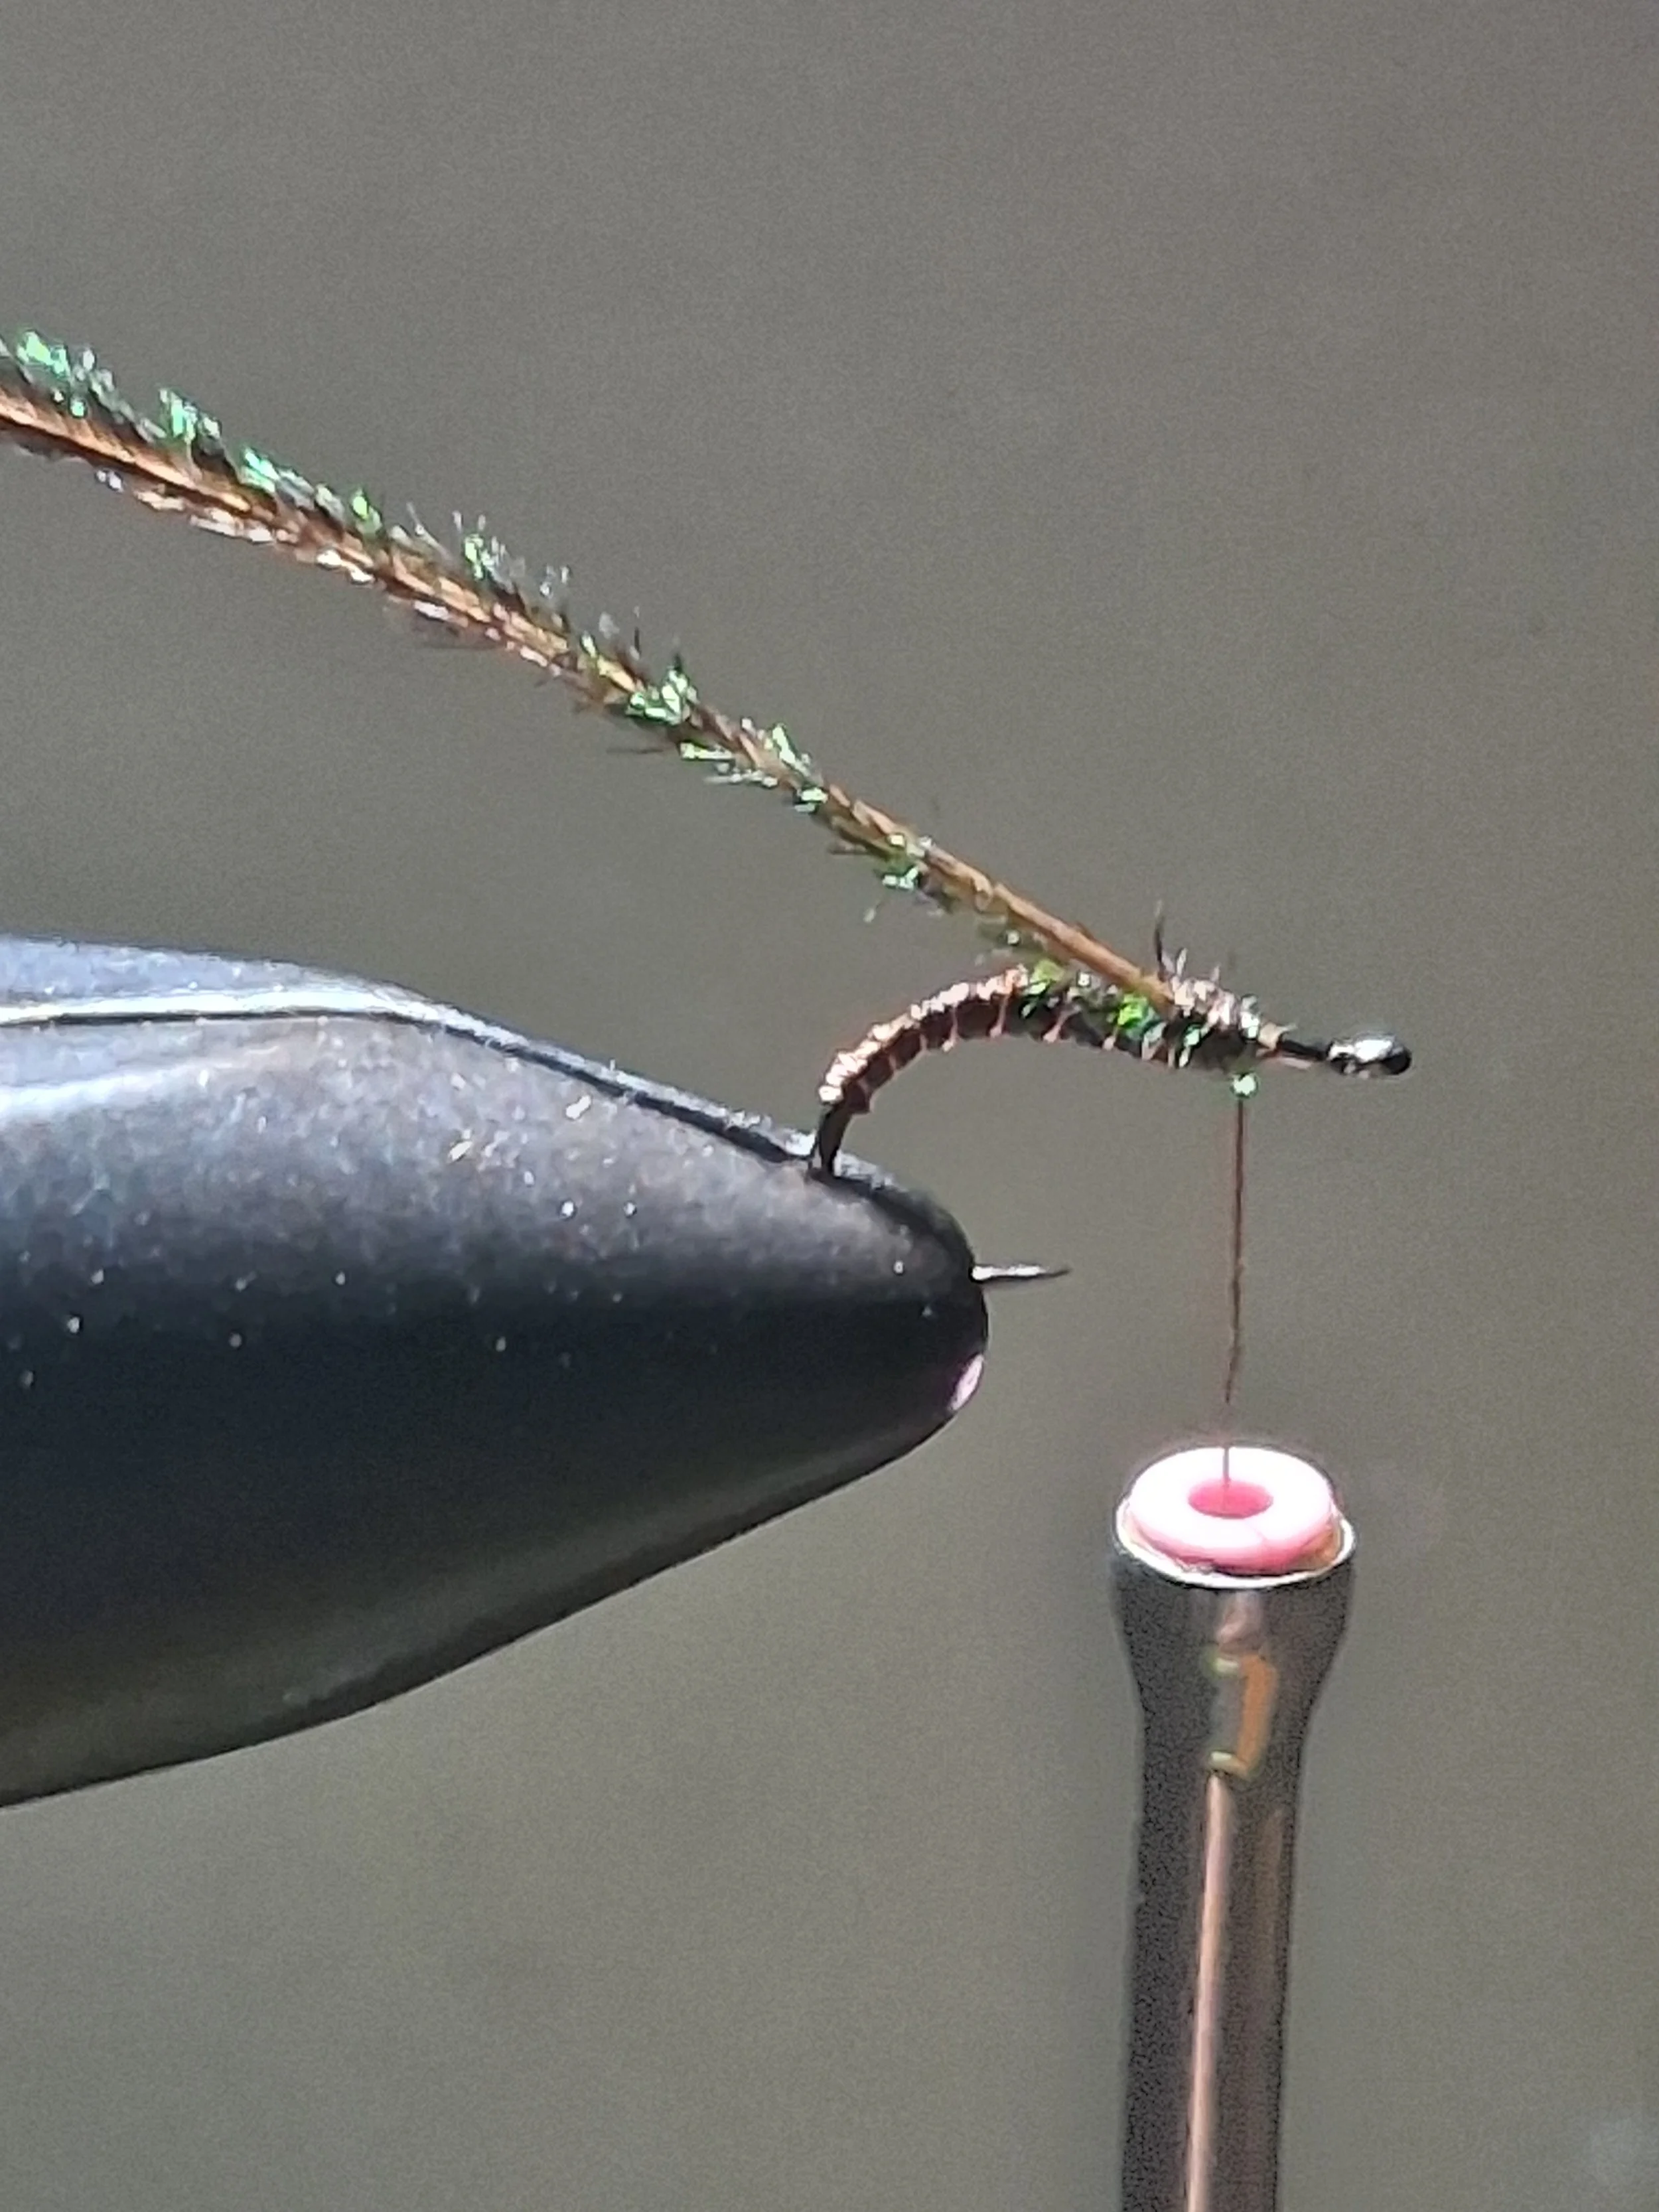
Wrap the wire stopping at the gap behind the eye.
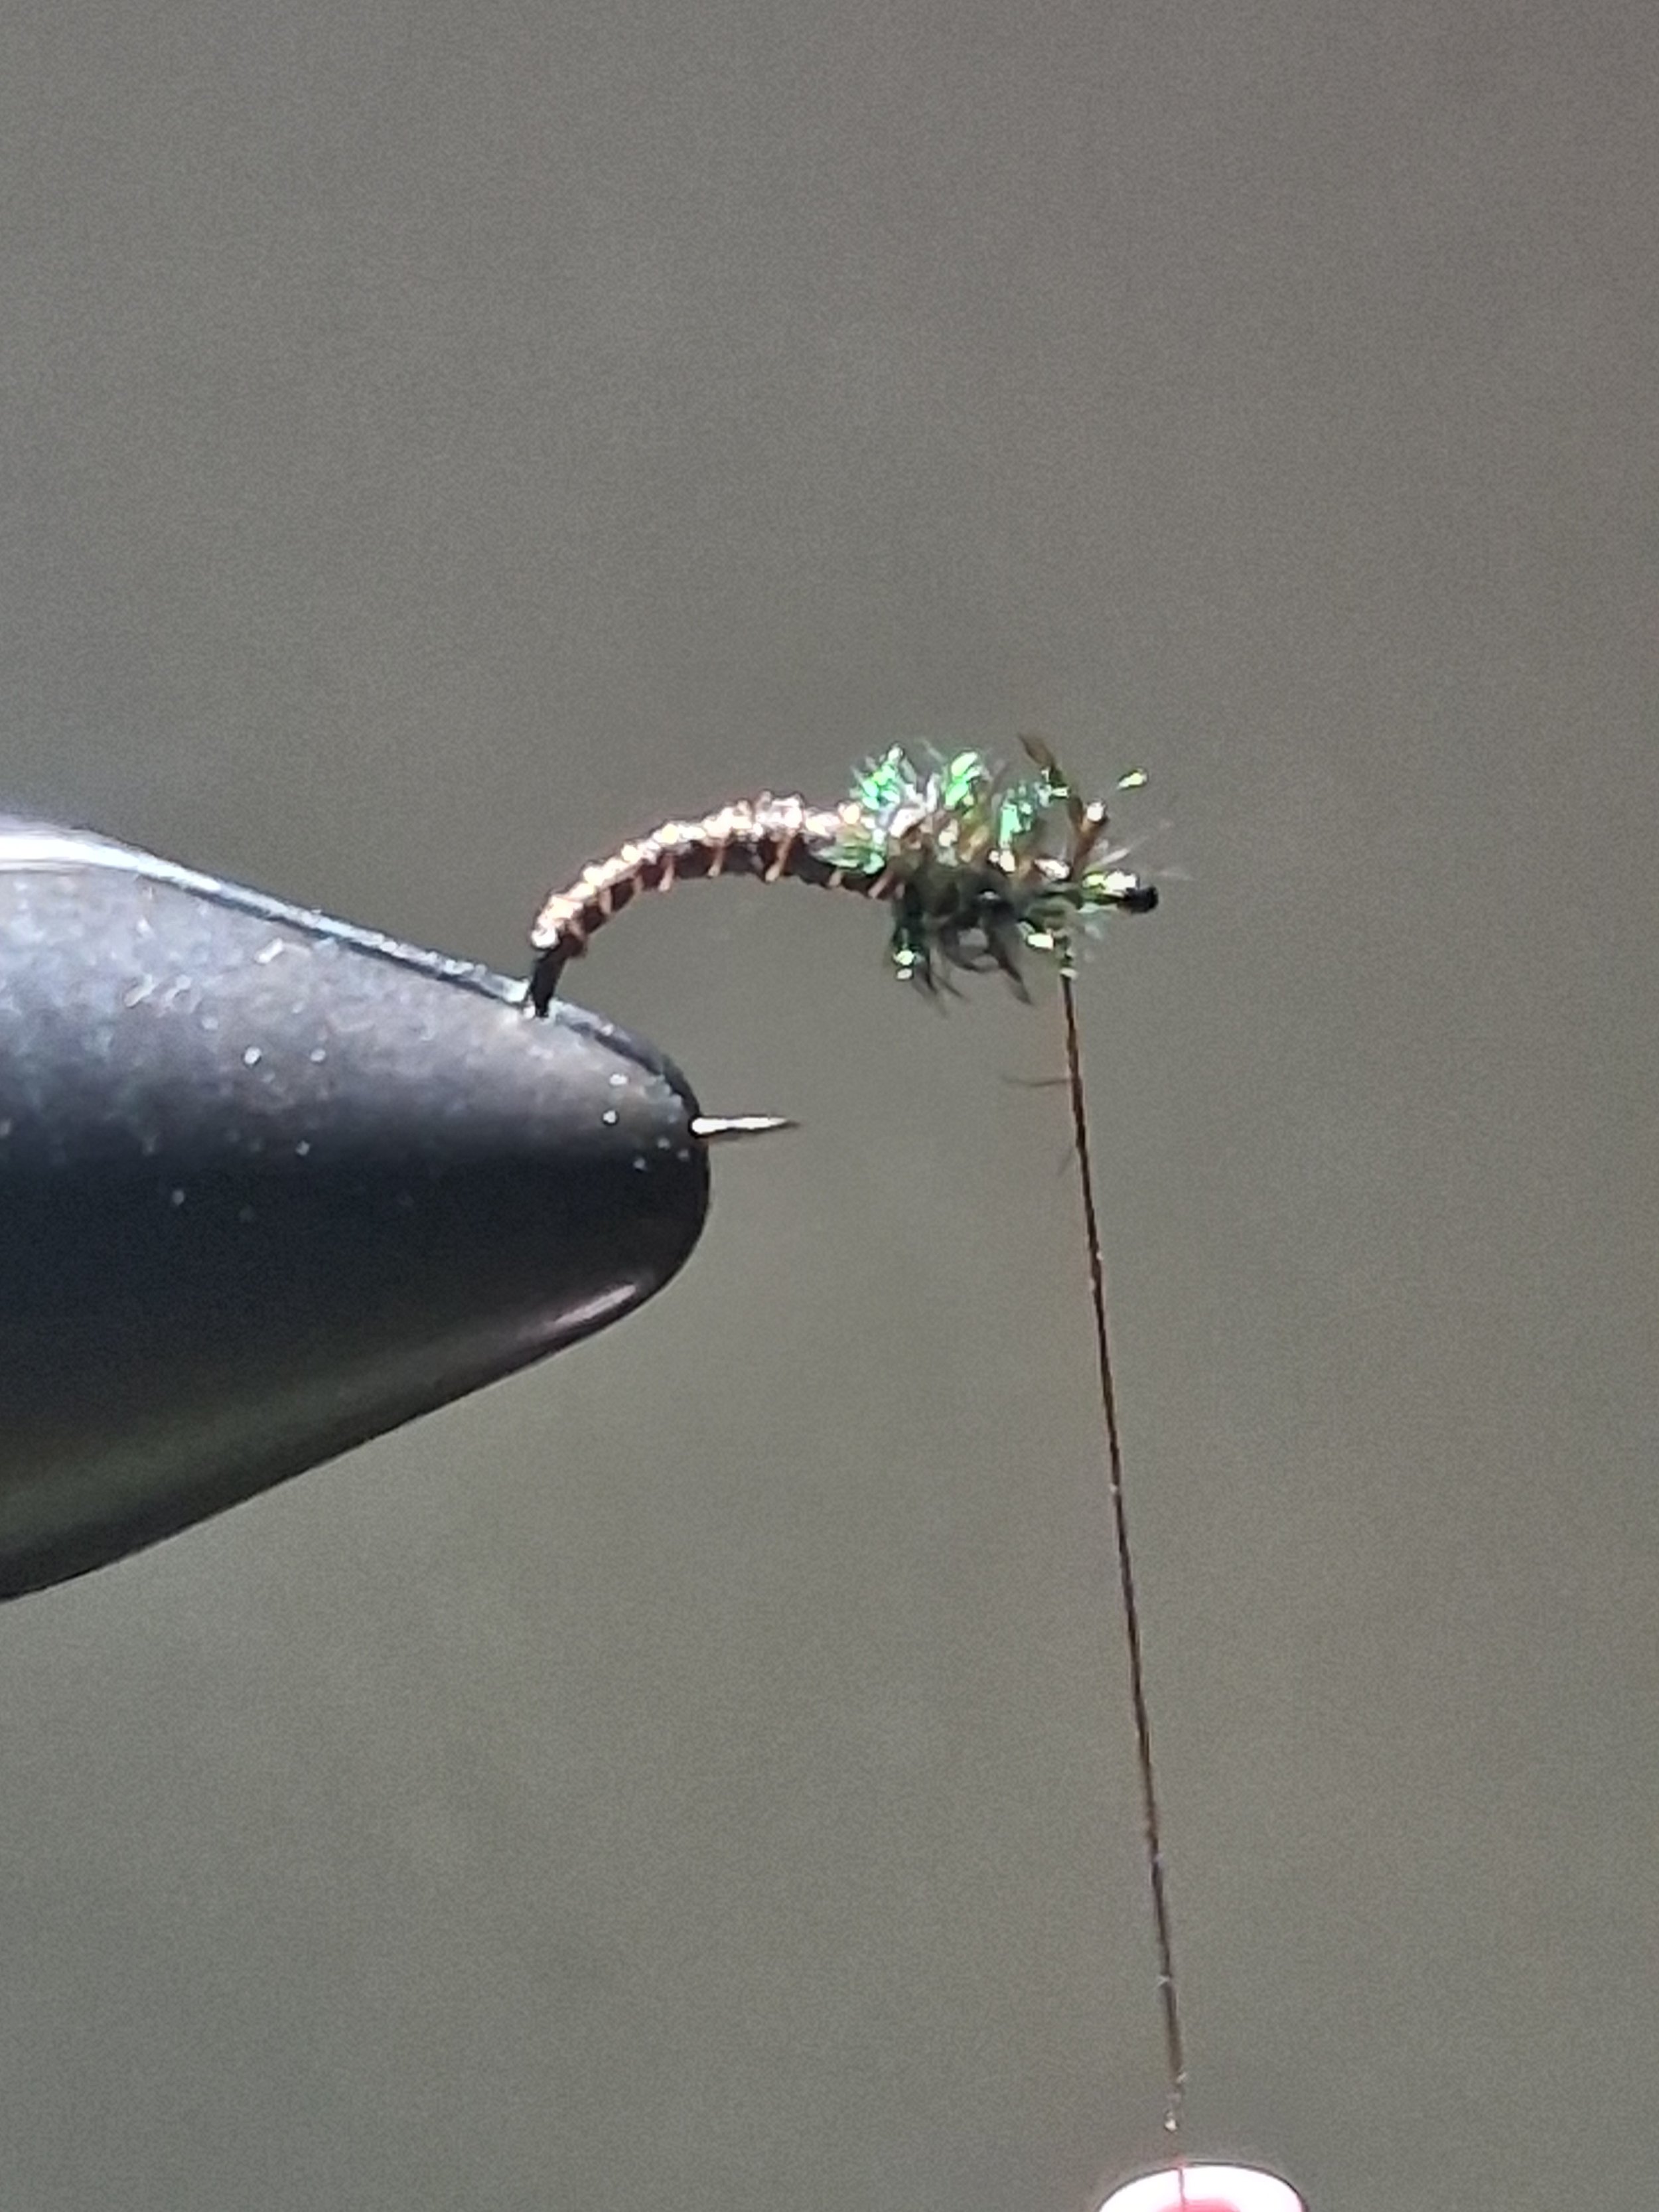
Add one peacock herl and take several wraps filling the gap. Don't crowd the eye!
Whip it; whip it good.
For a Zebra midge: replace peacock herl with a bead. Try red, black, and other colors. Use gold, silver or colored wire, but the classics are red and black.
For a Black Beauty,: replace peacock herl with dubbing.
Next month: LBS - Little Black Stone Fly